
为图像添加边框
本教程中你将学到如何:
- 使用 OpenCV 函数 copyMakeBorder() 来设置边框(为图像添加额外的填充)。
注: 下面的解释出自 Bradski 和 Kaehler 所著的 Learning OpenCV 一书。
-
在之前的教程中,我们学习了使用卷积对图像进行操作。一个自然产生的问题是如何处理边界:当被计算的点位于图像边缘时,我们如何进行卷积?
-
大多数 OpenCV 函数的做法是:把给定图像复制到另一幅稍大的图像上,然后自动对边界进行填充(使用下面示例代码中介绍的任意一种方法)。这样,卷积就可以顺利地在所需的像素上执行(操作完成后,多余的填充会被裁掉)。
-
在本教程中,我们将简要探讨为图像定义额外填充(边框)的两种方式:
- BORDER_CONSTANT:用一个常量值填充图像边框(例如黑色或 )。
- BORDER_REPLICATE:把原图最边缘的行或列复制到额外的边框中。
这在代码部分会看得更清楚。
- 这个程序做什么?
-
加载一幅图像
-
让用户选择在输入图像上使用哪种填充方式。有两个选项:
1. *常量值边框*:对整个边框应用一个常量值填充。该值每 0.5 秒随机更新一次。2. *复制边框*:边框将从原图边缘的像素值复制而来。用户通过按 `c`(constant)或 `r`(replicate)来选择任一选项。 -
当用户按下
ESC时程序结束。
-
教程代码如下所示。
C++
你也可以从此处下载。
#include "opencv2/imgproc.hpp"#include "opencv2/imgcodecs.hpp"#include "opencv2/highgui.hpp"
using namespace cv;
// Declare the variablesMat src, dst;int top, bottom, left, right;int borderType = BORDER_CONSTANT;const char* window_name = "copyMakeBorder Demo";RNG rng(12345);
int main( int argc, char** argv ){    const char* imageName = argc >=2 ? argv[1] : "lena.jpg";
    // Loads an image    src = imread( samples::findFile( imageName ), IMREAD_COLOR ); // Load an image
    // Check if image is loaded fine    if( src.empty()) {        printf(" Error opening image\n");        printf(" Program Arguments: [image_name -- default lena.jpg] \n");        return -1;    }
    // Brief how-to for this program    printf( "\n \t copyMakeBorder Demo: \n" );    printf( "\t -------------------- \n" );    printf( " ** Press 'c' to set the border to a random constant value \n");    printf( " ** Press 'r' to set the border to be replicated \n");    printf( " ** Press 'ESC' to exit the program \n");
    namedWindow( window_name, WINDOW_AUTOSIZE );
    // Initialize arguments for the filter    top = (int) (0.05*src.rows); bottom = top;    left = (int) (0.05*src.cols); right = left;
    for(;;)    {        Scalar value( rng.uniform(0, 255), rng.uniform(0, 255), rng.uniform(0, 255) );
        copyMakeBorder( src, dst, top, bottom, left, right, borderType, value );
        imshow( window_name, dst );
        char c = (char)waitKey(500);        if( c == 27 )        { break; }        else if( c == 'c' )        { borderType = BORDER_CONSTANT; }        else if( c == 'r' )        { borderType = BORDER_REPLICATE; }    }
    return 0;}
Java
你也可以从此处下载。
import org.opencv.core.*;import org.opencv.highgui.HighGui;import org.opencv.imgcodecs.Imgcodecs;
import java.util.Random;
class CopyMakeBorderRun {
    public void run(String[] args) {
        // Declare the variables        Mat src, dst = new Mat();        int top, bottom, left, right;        int borderType = Core.BORDER_CONSTANT;        String window_name = "copyMakeBorder Demo";        Random rng;
        String imageName = ((args.length > 0) ? args[0] : "../data/lena.jpg");
        // Load an image        src = Imgcodecs.imread(imageName, Imgcodecs.IMREAD_COLOR);
        // Check if image is loaded fine        if( src.empty() ) {            System.out.println("Error opening image!");            System.out.println("Program Arguments: [image_name -- default ../data/lena.jpg] \n");            System.exit(-1);        }
        // Brief how-to for this program        System.out.println("\n" +                "\t copyMakeBorder Demo: \n" +                "\t -------------------- \n" +                " ** Press 'c' to set the border to a random constant value \n" +                " ** Press 'r' to set the border to be replicated \n" +                " ** Press 'ESC' to exit the program \n");
        HighGui.namedWindow( window_name, HighGui.WINDOW_AUTOSIZE );
        // Initialize arguments for the filter        top = (int) (0.05*src.rows()); bottom = top;        left = (int) (0.05*src.cols()); right = left;
        while( true ) {            rng = new Random();            Scalar value = new Scalar( rng.nextInt(256),                    rng.nextInt(256), rng.nextInt(256) );
            Core.copyMakeBorder( src, dst, top, bottom, left, right, borderType, value);            HighGui.imshow( window_name, dst );
            char c = (char) HighGui.waitKey(500);            c = Character.toLowerCase(c);
            if( c == 27 )            { break; }            else if( c == 'c' )            { borderType = Core.BORDER_CONSTANT;}            else if( c == 'r' )            { borderType = Core.BORDER_REPLICATE;}        }
        System.exit(0);    }}
public class CopyMakeBorder {    public static void main(String[] args) {        // Load the native library.        System.loadLibrary(Core.NATIVE_LIBRARY_NAME);        new CopyMakeBorderRun().run(args);    }}
Python
你也可以从此处下载。
import sysfrom random import randintimport cv2 as cv

def main(argv):    # First we declare the variables we are going to use    borderType = cv.BORDER_CONSTANT    window_name = "copyMakeBorder Demo"
    imageName = argv[0] if len(argv) > 0 else 'lena.jpg'
    # Loads an image    src = cv.imread(cv.samples.findFile(imageName), cv.IMREAD_COLOR)
    # Check if image is loaded fine    if src is None:        print ('Error opening image!')        print ('Usage: copy_make_border.py [image_name -- default lena.jpg] \n')        return -1
    # Brief how-to for this program    print ('\n'           '\t   copyMakeBorder Demo: \n'           '  -------------------- \n'           ' ** Press \'c\' to set the border to a random constant value \n'           ' ** Press \'r\' to set the border to be replicated \n'           ' ** Press \'ESC\' to exit the program ')
    cv.namedWindow(window_name, cv.WINDOW_AUTOSIZE)
    # Initialize arguments for the filter    top = int(0.05 * src.shape[0])  # shape[0] = rows    bottom = top    left = int(0.05 * src.shape[1])  # shape[1] = cols    right = left
    while 1:        value = [randint(0, 255), randint(0, 255), randint(0, 255)]
        dst = cv.copyMakeBorder(src, top, bottom, left, right, borderType, None, value)
        cv.imshow(window_name, dst)
        c = cv.waitKey(500)
        if c == 27:            break        elif c == 99: # 99 = ord('c')            borderType = cv.BORDER_CONSTANT        elif c == 114: # 114 = ord('r')            borderType = cv.BORDER_REPLICATE    return 0

if __name__ == "__main__": main(sys.argv[1:])首先我们声明要用到的变量:
C++
// Declare the variablesMat src, dst;int top, bottom, left, right;int borderType = BORDER_CONSTANT;const char* window_name = "copyMakeBorder Demo";RNG rng(12345);Java
// Declare the variablesMat src, dst = new Mat();int top, bottom, left, right;int borderType = Core.BORDER_CONSTANT;String window_name = "copyMakeBorder Demo";Random rng;Python
borderType = cv.BORDER_CONSTANTwindow_name = "copyMakeBorder Demo"特别值得注意的是变量 rng,它是一个随机数生成器。我们用它生成随机的边框颜色,稍后就会看到。
像往常一样,我们加载源图像 src:
C++
const char* imageName = argc >=2 ? argv[1] : "lena.jpg";
// Loads an imagesrc = imread( samples::findFile( imageName ), IMREAD_COLOR ); // Load an image
// Check if image is loaded fineif( src.empty()) {    printf(" Error opening image\n");    printf(" Program Arguments: [image_name -- default lena.jpg] \n");    return -1;}
Java
String imageName = ((args.length > 0) ? args[0] : "../data/lena.jpg");
// Load an imagesrc = Imgcodecs.imread(imageName, Imgcodecs.IMREAD_COLOR);
// Check if image is loaded fineif( src.empty() ) {    System.out.println("Error opening image!");    System.out.println("Program Arguments: [image_name -- default ../data/lena.jpg] \n");    System.exit(-1);}
Python
imageName = argv[0] if len(argv) > 0 else 'lena.jpg'
# Loads an imagesrc = cv.imread(cv.samples.findFile(imageName), cv.IMREAD_COLOR)
# Check if image is loaded fineif src is None: print ('Error opening image!') print ('Usage: copy_make_border.py [image_name -- default lena.jpg] \n') return -1在简短介绍如何使用本程序之后,我们创建一个窗口:
C++
namedWindow( window_name, WINDOW_AUTOSIZE );Java
HighGui.namedWindow( window_name, HighGui.WINDOW_AUTOSIZE );Python
cv.namedWindow(window_name, cv.WINDOW_AUTOSIZE)现在我们初始化定义边框大小的参数(top、bottom、left 和 right)。我们把它们设为 src 尺寸的 5%:
C++
// Initialize arguments for the filtertop = (int) (0.05*src.rows); bottom = top;left = (int) (0.05*src.cols); right = left;Java
// Initialize arguments for the filtertop = (int) (0.05*src.rows()); bottom = top;left = (int) (0.05*src.cols()); right = left;Python
# Initialize arguments for the filtertop = int(0.05 * src.shape[0]) # shape[0] = rowsbottom = topleft = int(0.05 * src.shape[1]) # shape[1] = colsright = left程序在一个无限循环中运行,直到按下 ESC 键。如果用户按下 c 或 r,borderType 变量将分别取 BORDER_CONSTANT 或 BORDER_REPLICATE 的值:
C++
char c = (char)waitKey(500);if( c == 27 ){ break; }else if( c == 'c' ){ borderType = BORDER_CONSTANT; }else if( c == 'r' ){ borderType = BORDER_REPLICATE; }Java
char c = (char) HighGui.waitKey(500);c = Character.toLowerCase(c);
if( c == 27 ){ break; }else if( c == 'c' ){ borderType = Core.BORDER_CONSTANT;}else if( c == 'r' ){ borderType = Core.BORDER_REPLICATE;}
Python
c = cv.waitKey(500)
if c == 27: breakelif c == 99: # 99 = ord('c') borderType = cv.BORDER_CONSTANTelif c == 114: # 114 = ord('r') borderType = cv.BORDER_REPLICATE每次迭代(每 0.5 秒),随机边框颜色(value)都会被更新:
C++
Scalar value( rng.uniform(0, 255), rng.uniform(0, 255), rng.uniform(0, 255) );Java
rng = new Random();Scalar value = new Scalar( rng.nextInt(256), rng.nextInt(256), rng.nextInt(256) );Python
value = [randint(0, 255), randint(0, 255), randint(0, 255)]这个值是在 范围内随机选取的三个数。
在图像周围生成边框
Section titled “在图像周围生成边框”最后,我们调用函数 copyMakeBorder() 来应用相应的填充:
C++
copyMakeBorder( src, dst, top, bottom, left, right, borderType, value );Java
Core.copyMakeBorder( src, dst, top, bottom, left, right, borderType, value);Python
dst = cv.copyMakeBorder(src, top, bottom, left, right, borderType, None, value)-
各参数为:
- src:源图像
- dst:目标图像
- top、bottom、left、right:图像各侧边框的像素长度。我们把它们定义为原图尺寸的 5%。
- borderType:定义应用哪种类型的边框。本例中可以是 constant 或 replicate。
- value:如果 borderType 是 BORDER_CONSTANT,这就是用于填充边框像素的值。
我们在先前创建的窗口中显示输出图像:
C++
imshow( window_name, dst );Java
HighGui.imshow( window_name, dst );Python
cv.imshow(window_name, dst)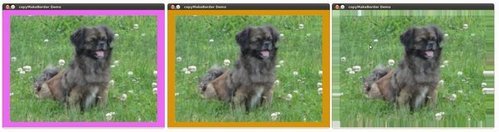
-
编译上面的代码后,你可以以图像路径为参数运行它。结果应当是:
- 默认情况下,程序以 BORDER_CONSTANT 边框开始。因此,你会看到一系列随机颜色的边框。
- 如果你按
r,边框将变成边缘像素的复制。 - 如果你按
c,随机颜色边框会再次出现。 - 如果你按
ESC,程序将退出。