
仿射变换
在本教程中,你将学到如何:
- 使用 OpenCV 函数 cv::warpAffine 实现简单的重映射例程。
- 使用 OpenCV 函数 cv::getRotationMatrix2D 获取一个 旋转矩阵。
什么是仿射变换?
Section titled “什么是仿射变换?”-
一种可以表示为矩阵乘法(线性变换)之后跟随一次向量加法(平移)的变换。
-
由上可知,我们可以用仿射变换(Affine Transformation)来表达:
- 旋转(线性变换)
- 平移(向量加法)
- 缩放操作(线性变换)
可以看到,从本质上说,仿射变换表示的是两幅图像之间的一种关系。
-
表示仿射变换的常用方式是使用一个 矩阵。
考虑到我们要用 和 来变换一个二维向量 ,等价的做法是:
a_{00}x + a_{01}y + b_{00} \\ a_{10}x + a_{11}y + b_{10} \end{bmatrix}$$
如何获得一个仿射变换?
Section titled “如何获得一个仿射变换?”-
我们提到过,仿射变换本质上是两幅图像之间的一种关系。关于这种关系的信息,大致可以通过两种方式获得:
- 我们已知 和 ,并且知道它们相互关联。那么我们的任务就是求出 。
- 我们已知 和 。要得到 ,只需应用 。我们关于 的信息可能是显式的(即直接拥有这个 2×3 矩阵),也可能以点与点之间几何关系的形式给出。
-
让我们用更好的方式(即上面的第二种情形)来解释。既然 关联两幅图像,我们可以分析最简单的情形:它关联两幅图像中的三个点。
点 1、2、3(在图像 1 中构成一个三角形)被映射到图像 2 中,仍然构成一个三角形,但形状已经发生了明显的变化。如果我们用这 3 个点(可以任意选取)求出仿射变换,就可以把求得的关系应用到图像中的所有像素上。
- 这个程序做什么?
- 加载一幅图像
- 对图像应用一个仿射变换。该变换由三个点之间的关系求得,我们使用 cv::warpAffine 函数完成。
- 在变换之后对图像应用一次旋转,旋转中心为图像中心。
- 等待用户退出程序。
C++: 本教程的代码如下所示。你也可以从 这里 下载。
/** * @function Geometric_Transforms_Demo.cpp * @brief Demo code for Geometric Transforms * @author OpenCV team */
#include "opencv2/imgcodecs.hpp"#include "opencv2/highgui.hpp"#include "opencv2/imgproc.hpp"#include <iostream>
using namespace cv;using namespace std;
/** * @function main */int main( int argc, char** argv ){    CommandLineParser parser( argc, argv, "{@input | lena.jpg | input image}" );    Mat src = imread( samples::findFile( parser.get<String>( "@input" ) ) );    if( src.empty() )    {        cout << "Could not open or find the image!\n" << endl;        cout << "Usage: " << argv[0] << " <Input image>" << endl;        return -1;    }
    Point2f srcTri[3];    srcTri[0] = Point2f( 0.f, 0.f );    srcTri[1] = Point2f( src.cols - 1.f, 0.f );    srcTri[2] = Point2f( 0.f, src.rows - 1.f );
    Point2f dstTri[3];    dstTri[0] = Point2f( 0.f, src.rows*0.33f );    dstTri[1] = Point2f( src.cols*0.85f, src.rows*0.25f );    dstTri[2] = Point2f( src.cols*0.15f, src.rows*0.7f );
    Mat warp_mat = getAffineTransform( srcTri, dstTri );
    /// Set the dst image the same type and size as src    Mat warp_dst = Mat::zeros( src.rows, src.cols, src.type() );
    warpAffine( src, warp_dst, warp_mat, warp_dst.size() );
    /** Rotating the image after Warp */
    Point center = Point( warp_dst.cols/2, warp_dst.rows/2 );    double angle = -50.0;    double scale = 0.6;
    Mat rot_mat = getRotationMatrix2D( center, angle, scale );
    Mat warp_rotate_dst;    warpAffine( warp_dst, warp_rotate_dst, rot_mat, warp_dst.size() );
    imshow( "Source image", src );    imshow( "Warp", warp_dst );    imshow( "Warp + Rotate", warp_rotate_dst );
    waitKey();
    return 0;}
Java: 本教程的代码如下所示。你也可以从 这里 下载。
import org.opencv.core.Core;import org.opencv.core.Mat;import org.opencv.core.MatOfPoint2f;import org.opencv.core.Point;import org.opencv.highgui.HighGui;import org.opencv.imgcodecs.Imgcodecs;import org.opencv.imgproc.Imgproc;
class GeometricTransforms {    public void run(String[] args) {        String filename = args.length > 0 ? args[0] : "../data/lena.jpg";        Mat src = Imgcodecs.imread(filename);        if (src.empty()) {            System.err.println("Cannot read image: " + filename);            System.exit(0);        }
        Point[] srcTri = new Point[3];        srcTri[0] = new Point( 0, 0 );        srcTri[1] = new Point( src.cols() - 1, 0 );        srcTri[2] = new Point( 0, src.rows() - 1 );
        Point[] dstTri = new Point[3];        dstTri[0] = new Point( 0, src.rows()*0.33 );        dstTri[1] = new Point( src.cols()*0.85, src.rows()*0.25 );        dstTri[2] = new Point( src.cols()*0.15, src.rows()*0.7 );
        Mat warpMat = Imgproc.getAffineTransform( new MatOfPoint2f(srcTri), new MatOfPoint2f(dstTri) );
        Mat warpDst = Mat.zeros( src.rows(), src.cols(), src.type() );
        Imgproc.warpAffine( src, warpDst, warpMat, warpDst.size() );
        /** Rotating the image after Warp */
        Point center = new Point(warpDst.cols() / 2, warpDst.rows() / 2);        double angle = -50.0;        double scale = 0.6;
        Mat rotMat = Imgproc.getRotationMatrix2D( center, angle, scale );
        Mat warpRotateDst = new Mat();        Imgproc.warpAffine( warpDst, warpRotateDst, rotMat, warpDst.size() );
        HighGui.imshow( "Source image", src );        HighGui.imshow( "Warp", warpDst );        HighGui.imshow( "Warp + Rotate", warpRotateDst );
        HighGui.waitKey(0);
        System.exit(0);    }}
public class GeometricTransformsDemo {    public static void main(String[] args) {        // Load the native OpenCV library        System.loadLibrary(Core.NATIVE_LIBRARY_NAME);
        new GeometricTransforms().run(args);    }}
Python: 本教程的代码如下所示。你也可以从 这里 下载。
from __future__ import print_functionimport cv2 as cvimport numpy as npimport argparse
parser = argparse.ArgumentParser(description='Code for Affine Transformations tutorial.')parser.add_argument('--input', help='Path to input image.', default='lena.jpg')args = parser.parse_args()
src = cv.imread(cv.samples.findFile(args.input))if src is None:    print('Could not open or find the image:', args.input)    exit(0)
srcTri = np.array( [[0, 0], [src.shape[1] - 1, 0], [0, src.shape[0] - 1]] ).astype(np.float32)dstTri = np.array( [[0, src.shape[1]*0.33], [src.shape[1]*0.85, src.shape[0]*0.25], [src.shape[1]*0.15, src.shape[0]*0.7]] ).astype(np.float32)
warp_mat = cv.getAffineTransform(srcTri, dstTri)
warp_dst = cv.warpAffine(src, warp_mat, (src.shape[1], src.shape[0]))
# Rotating the image after Warp
center = (warp_dst.shape[1]//2, warp_dst.shape[0]//2)angle = -50scale = 0.6
rot_mat = cv.getRotationMatrix2D( center, angle, scale )
warp_rotate_dst = cv.warpAffine(warp_dst, rot_mat, (warp_dst.shape[1], warp_dst.shape[0]))
cv.imshow('Source image', src)cv.imshow('Warp', warp_dst)cv.imshow('Warp + Rotate', warp_rotate_dst)
cv.waitKey()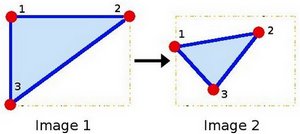
-
加载一幅图像:
CommandLineParser parser( argc, argv, "{@input | lena.jpg | input image}" );Mat src = imread( samples::findFile( parser.get<String>( "@input" ) ) );if( src.empty() ){cout << "Could not open or find the image!\n" << endl;cout << "Usage: " << argv[0] << " <Input image>" << endl;return -1;} -
仿射变换: 如上文所述,我们需要两组各 3 个点来推导仿射变换关系。请看:
Point2f srcTri[3];srcTri[0] = Point2f( 0.f, 0.f );srcTri[1] = Point2f( src.cols - 1.f, 0.f );srcTri[2] = Point2f( 0.f, src.rows - 1.f );Point2f dstTri[3];dstTri[0] = Point2f( 0.f, src.rows*0.33f );dstTri[1] = Point2f( src.cols*0.85f, src.rows*0.25f );dstTri[2] = Point2f( src.cols*0.15f, src.rows*0.7f );你可能想把这些点画出来,以便更好地理解它们如何变化。它们的位置大致与示例图(理论部分)中描绘的位置相同。你可以注意到,由这 3 个点定义的三角形的大小和朝向都发生了变化。
-
有了这两组点之后,我们使用 OpenCV 函数 cv::getAffineTransform 计算仿射变换:
Mat warp_mat = getAffineTransform( srcTri, dstTri );输出是一个 矩阵(此处为 warp_mat)。
-
然后,我们把刚求得的仿射变换应用到源图像上:
/// Set the dst image the same type and size as srcMat warp_dst = Mat::zeros( src.rows, src.cols, src.type() );warpAffine( src, warp_dst, warp_mat, warp_dst.size() );其参数如下:
-
src:输入图像
-
warp_dst:输出图像
-
warp_mat:仿射变换
-
warp_dst.size():输出图像的期望大小
我们刚刚得到了第一幅变换后的图像!稍后我们会显示它。在那之前,我们还想对它做旋转……
-
-
旋转: 要旋转一幅图像,我们需要知道两件事:
- 图像绕哪个中心旋转。
- 旋转的角度。在 OpenCV 中,正角度表示逆时针方向。
- 可选: 一个缩放因子。
我们用下面的代码片段定义这些参数:
Point center = Point( warp_dst.cols/2, warp_dst.rows/2 );double angle = -50.0;double scale = 0.6; -
我们使用 OpenCV 函数 cv::getRotationMatrix2D 生成旋转矩阵,它返回一个 矩阵(此处为 rot_mat):
Mat rot_mat = getRotationMatrix2D( center, angle, scale ); -
现在,我们把求得的旋转应用到上一步变换的输出上:
Mat warp_rotate_dst;warpAffine( warp_dst, warp_rotate_dst, rot_mat, warp_dst.size() ); -
最后,我们在两个窗口中显示结果,并附上原图:
imshow( "Source image", src );imshow( "Warp", warp_dst );imshow( "Warp + Rotate", warp_rotate_dst ); -
剩下的就是等待用户退出程序:
waitKey();
-
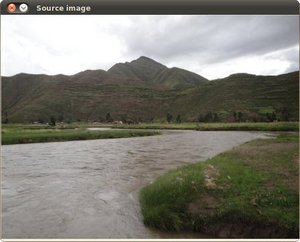
编译上面的代码后,我们可以把图像路径作为参数来运行它。例如,对于这样一幅图片:
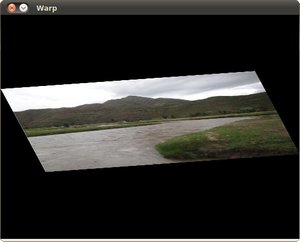
在应用第一个仿射变换后,我们得到:
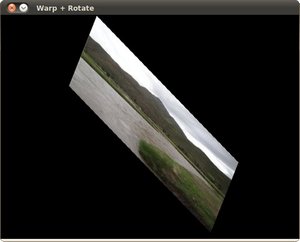
最后,在应用一次负角度旋转(记住,负角度表示顺时针)和一个缩放因子后,我们得到: