
基本阈值处理操作
本教程中你将学到如何:
- 使用 OpenCV 函数 cv::threshold 执行基本的阈值处理(thresholding)操作。
注意: 以下说明出自 Bradski 与 Kaehler 所著的 Learning OpenCV 一书。
什么是阈值处理?
Section titled “什么是阈值处理?”- 最简单的分割方法。
- 应用示例:将图像中与我们要分析的目标相对应的区域分离出来。这种分离基于目标像素与背景像素之间的强度变化。
- 为了把我们感兴趣的像素与其余像素(最终会被丢弃)区分开,我们将每个像素的强度值与一个阈值(threshold,根据要解决的问题来确定)进行比较。
- 一旦正确地分离出了重要的像素,我们就可以为它们设定一个确定的值来标识它们(即可以把它们赋值为 (黑)、(白)或任何符合你需求的值)。
阈值处理的类型
Section titled “阈值处理的类型”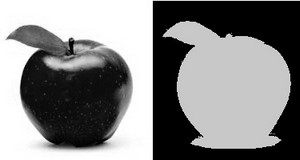
- OpenCV 提供了函数 cv::threshold 来执行阈值处理操作。
- 用该函数可以实现 种类型的阈值处理操作,我们将在下面的小节中逐一说明。
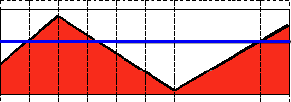
- 为了说明这些阈值处理过程的工作原理,假设我们有一幅源图像,其像素强度值为 。在下方的示意图中,水平蓝线代表阈值 (固定值)。
二值阈值处理(Threshold Binary)
Section titled “二值阈值处理(Threshold Binary)”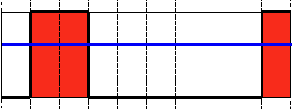
-
该阈值处理操作可以表示为:
-
因此,如果像素 的强度高于 ,则新像素的强度被设为 ;否则像素被设为 。
反二值阈值处理(Threshold Binary, Inverted)
Section titled “反二值阈值处理(Threshold Binary, Inverted)”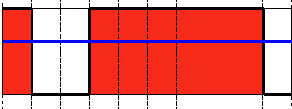
-
该阈值处理操作可以表示为:
-
如果像素 的强度高于 ,则新像素的强度被设为 ;否则被设为 。
截断(Truncate)
Section titled “截断(Truncate)”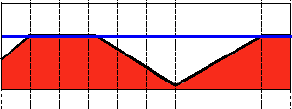
-
该阈值处理操作可以表示为:
-
像素的最大强度值为 ;如果 更大,则其值被截断。
阈值化为零(Threshold to Zero)
Section titled “阈值化为零(Threshold to Zero)”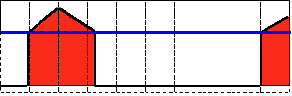
-
该操作可以表示为:
-
如果 低于 ,则新像素值将被设为 。
反阈值化为零(Threshold to Zero, Inverted)
Section titled “反阈值化为零(Threshold to Zero, Inverted)”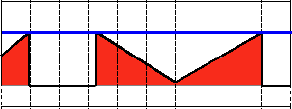
-
该操作可以表示为:
-
如果 大于 ,则新像素值将被设为 。
本教程的代码如下所示。你也可以从 这里 下载 C++ 版本。
/** * @file Threshold.cpp * @brief Sample code that shows how to use the diverse threshold options offered by OpenCV * @author OpenCV team */
#include "opencv2/imgproc.hpp"#include "opencv2/imgcodecs.hpp"#include "opencv2/highgui.hpp"#include <iostream>
using namespace cv;using std::cout;
/// Global variables
int threshold_value = 0;int threshold_type = 3;int const max_value = 255;int const max_type = 4;int const max_binary_value = 255;
Mat src, src_gray, dst;const char* window_name = "Threshold Demo";
const char* trackbar_type = "Type: \n 0: Binary \n 1: Binary Inverted \n 2: Truncate \n 3: To Zero \n 4: To Zero Inverted";const char* trackbar_value = "Value";
/** * @function Threshold_Demo */static void Threshold_Demo( int, void* ){    /* 0: Binary     1: Binary Inverted     2: Threshold Truncated     3: Threshold to Zero     4: Threshold to Zero Inverted    */    threshold( src_gray, dst, threshold_value, max_binary_value, threshold_type );    imshow( window_name, dst );}
/** * @function main */int main( int argc, char** argv ){    String imageName("stuff.jpg"); // by default    if (argc > 1)    {        imageName = argv[1];    }    src = imread( samples::findFile( imageName ), IMREAD_COLOR ); // Load an image
    if (src.empty())    {        cout << "Cannot read the image: " << imageName << std::endl;        return -1;    }
    cvtColor( src, src_gray, COLOR_BGR2GRAY ); // Convert the image to Gray
    namedWindow( window_name, WINDOW_AUTOSIZE ); // Create a window to display results
    createTrackbar( trackbar_type,                    window_name, &threshold_type,                    max_type, Threshold_Demo ); // Create a Trackbar to choose type of Threshold
    createTrackbar( trackbar_value,                    window_name, &threshold_value,                    max_value, Threshold_Demo ); // Create a Trackbar to choose Threshold value
    Threshold_Demo( 0, 0 ); // Call the function to initialize
    /// Wait until the user finishes the program    waitKey();    return 0;}
Java 版本可从 这里 下载。
import java.awt.BorderLayout;import java.awt.Container;import java.awt.Image;
import javax.swing.BoxLayout;import javax.swing.ImageIcon;import javax.swing.JFrame;import javax.swing.JLabel;import javax.swing.JPanel;import javax.swing.JSlider;import javax.swing.event.ChangeEvent;import javax.swing.event.ChangeListener;
import org.opencv.core.Core;import org.opencv.core.Mat;import org.opencv.highgui.HighGui;import org.opencv.imgcodecs.Imgcodecs;import org.opencv.imgproc.Imgproc;
public class Threshold {    private static int MAX_VALUE = 255;    private static int MAX_TYPE = 4;    private static int MAX_BINARY_VALUE = 255;    private static final String WINDOW_NAME = "Threshold Demo";    private static final String TRACKBAR_TYPE = "<html><body>Type: <br> 0: Binary <br> "            + "1: Binary Inverted <br> 2: Truncate <br> "            + "3: To Zero <br> 4: To Zero Inverted</body></html>";    private static final String TRACKBAR_VALUE = "Value";    private int thresholdValue = 0;    private int thresholdType = 3;    private Mat src;    private Mat srcGray = new Mat();    private Mat dst = new Mat();    private JFrame frame;    private JLabel imgLabel;
    public Threshold(String[] args) {        String imagePath = "../data/stuff.jpg";        if (args.length > 0) {            imagePath = args[0];        }        // Load an image        src = Imgcodecs.imread(imagePath);        if (src.empty()) {            System.out.println("Empty image: " + imagePath);            System.exit(0);        }        // Convert the image to Gray        Imgproc.cvtColor(src, srcGray, Imgproc.COLOR_BGR2GRAY);
        // Create and set up the window.        frame = new JFrame(WINDOW_NAME);        frame.setDefaultCloseOperation(JFrame.EXIT_ON_CLOSE);        // Set up the content pane.        Image img = HighGui.toBufferedImage(srcGray);        addComponentsToPane(frame.getContentPane(), img);        // Use the content pane's default BorderLayout. No need for        // setLayout(new BorderLayout());        // Display the window.        frame.pack();        frame.setVisible(true);    }
    private void addComponentsToPane(Container pane, Image img) {        if (!(pane.getLayout() instanceof BorderLayout)) {            pane.add(new JLabel("Container doesn't use BorderLayout!"));            return;        }
        JPanel sliderPanel = new JPanel();        sliderPanel.setLayout(new BoxLayout(sliderPanel, BoxLayout.PAGE_AXIS));
        sliderPanel.add(new JLabel(TRACKBAR_TYPE));        // Create Trackbar to choose type of Threshold        JSlider sliderThreshType = new JSlider(0, MAX_TYPE, thresholdType);        sliderThreshType.setMajorTickSpacing(1);        sliderThreshType.setMinorTickSpacing(1);        sliderThreshType.setPaintTicks(true);        sliderThreshType.setPaintLabels(true);        sliderPanel.add(sliderThreshType);
        sliderPanel.add(new JLabel(TRACKBAR_VALUE));        // Create Trackbar to choose Threshold value        JSlider sliderThreshValue = new JSlider(0, MAX_VALUE, 0);        sliderThreshValue.setMajorTickSpacing(50);        sliderThreshValue.setMinorTickSpacing(10);        sliderThreshValue.setPaintTicks(true);        sliderThreshValue.setPaintLabels(true);        sliderPanel.add(sliderThreshValue);
        sliderThreshType.addChangeListener(new ChangeListener() {            @Override            public void stateChanged(ChangeEvent e) {                JSlider source = (JSlider) e.getSource();                thresholdType = source.getValue();                update();            }        });
        sliderThreshValue.addChangeListener(new ChangeListener() {            @Override            public void stateChanged(ChangeEvent e) {                JSlider source = (JSlider) e.getSource();                thresholdValue = source.getValue();                update();            }        });
        pane.add(sliderPanel, BorderLayout.PAGE_START);        imgLabel = new JLabel(new ImageIcon(img));        pane.add(imgLabel, BorderLayout.CENTER);    }
    private void update() {        Imgproc.threshold(srcGray, dst, thresholdValue, MAX_BINARY_VALUE, thresholdType);        Image img = HighGui.toBufferedImage(dst);        imgLabel.setIcon(new ImageIcon(img));        frame.repaint();    }
    public static void main(String[] args) {        // Load the native OpenCV library        System.loadLibrary(Core.NATIVE_LIBRARY_NAME);
        // Schedule a job for the event dispatch thread:        // creating and showing this application's GUI.        javax.swing.SwingUtilities.invokeLater(new Runnable() {            @Override            public void run() {                new Threshold(args);            }        });    }}
Python 版本可从 这里 下载。
from __future__ import print_functionimport cv2 as cvimport argparse
max_value = 255max_type = 4max_binary_value = 255trackbar_type = 'Type: \n 0: Binary \n 1: Binary Inverted \n 2: Truncate \n 3: To Zero \n 4: To Zero Inverted'trackbar_value = 'Value'window_name = 'Threshold Demo'
def Threshold_Demo(val):    #0: Binary    #1: Binary Inverted    #2: Threshold Truncated    #3: Threshold to Zero    #4: Threshold to Zero Inverted    threshold_type = cv.getTrackbarPos(trackbar_type, window_name)    threshold_value = cv.getTrackbarPos(trackbar_value, window_name)    _, dst = cv.threshold(src_gray, threshold_value, max_binary_value, threshold_type )    cv.imshow(window_name, dst)
parser = argparse.ArgumentParser(description='Code for Basic Thresholding Operations tutorial.')parser.add_argument('--input', help='Path to input image.', default='stuff.jpg')args = parser.parse_args()
# Load an imagesrc = cv.imread(cv.samples.findFile(args.input))if src is None:    print('Could not open or find the image: ', args.input)    exit(0)# Convert the image to Graysrc_gray = cv.cvtColor(src, cv.COLOR_BGR2GRAY)
# Create a window to display resultscv.namedWindow(window_name)
# Create Trackbar to choose type of Thresholdcv.createTrackbar(trackbar_type, window_name , 3, max_type, Threshold_Demo)# Create Trackbar to choose Threshold valuecv.createTrackbar(trackbar_value, window_name , 0, max_value, Threshold_Demo)
# Call the function to initializeThreshold_Demo(0)# Wait until user finishes programcv.waitKey()我们来看看程序的总体结构:
-
载入一幅图像。如果它是 BGR 格式,则将其转换为灰度图。为此,记住我们可以使用函数 cv::cvtColor:
String imageName("stuff.jpg"); // by defaultif (argc > 1){imageName = argv[1];}src = imread( samples::findFile( imageName ), IMREAD_COLOR ); // Load an imageif (src.empty()){cout << "Cannot read the image: " << imageName << std::endl;return -1;}cvtColor( src, src_gray, COLOR_BGR2GRAY ); // Convert the image to Gray
```javaString imagePath = "../data/stuff.jpg";if (args.length > 0) {    imagePath = args[0];}// Load an imagesrc = Imgcodecs.imread(imagePath);if (src.empty()) {    System.out.println("Empty image: " + imagePath);    System.exit(0);}// Convert the image to GrayImgproc.cvtColor(src, srcGray, Imgproc.COLOR_BGR2GRAY);```
```python# Load an imagesrc = cv.imread(cv.samples.findFile(args.input))if src is None: print('Could not open or find the image: ', args.input) exit(0)# Convert the image to Graysrc_gray = cv.cvtColor(src, cv.COLOR_BGR2GRAY)```-
创建一个窗口以显示结果:
namedWindow( window_name, WINDOW_AUTOSIZE ); // Create a window to display results// Create and set up the window.frame = new JFrame(WINDOW_NAME);frame.setDefaultCloseOperation(JFrame.EXIT_ON_CLOSE);// Set up the content pane.Image img = HighGui.toBufferedImage(srcGray);addComponentsToPane(frame.getContentPane(), img);// Use the content pane's default BorderLayout. No need for// setLayout(new BorderLayout());// Display the window.frame.pack();frame.setVisible(true);# Create a window to display resultscv.namedWindow(window_name) -
创建 个滑动条(Trackbar)供用户输入:
- 阈值处理类型:二值、化为零等等……
- 阈值
createTrackbar( trackbar_type,window_name, &threshold_type,max_type, Threshold_Demo ); // Create a Trackbar to choose type of ThresholdcreateTrackbar( trackbar_value,window_name, &threshold_value,max_value, Threshold_Demo ); // Create a Trackbar to choose Threshold valuesliderPanel.add(new JLabel(TRACKBAR_TYPE));// Create Trackbar to choose type of ThresholdJSlider sliderThreshType = new JSlider(0, MAX_TYPE, thresholdType);sliderThreshType.setMajorTickSpacing(1);sliderThreshType.setMinorTickSpacing(1);sliderThreshType.setPaintTicks(true);sliderThreshType.setPaintLabels(true);sliderPanel.add(sliderThreshType);sliderPanel.add(new JLabel(TRACKBAR_VALUE));// Create Trackbar to choose Threshold valueJSlider sliderThreshValue = new JSlider(0, MAX_VALUE, 0);sliderThreshValue.setMajorTickSpacing(50);sliderThreshValue.setMinorTickSpacing(10);sliderThreshValue.setPaintTicks(true);sliderThreshValue.setPaintLabels(true);sliderPanel.add(sliderThreshValue);# Create Trackbar to choose type of Thresholdcv.createTrackbar(trackbar_type, window_name , 3, max_type, Threshold_Demo)# Create Trackbar to choose Threshold valuecv.createTrackbar(trackbar_value, window_name , 0, max_value, Threshold_Demo) -
等待用户输入阈值与阈值处理类型(或直到程序退出)。
-
每当用户改变任一滑动条的值时,函数 Threshold_Demo(Java 中为 update)就会被调用:
static void Threshold_Demo( int, void* ){/* 0: Binary1: Binary Inverted2: Threshold Truncated3: Threshold to Zero4: Threshold to Zero Inverted*/threshold( src_gray, dst, threshold_value, max_binary_value, threshold_type );imshow( window_name, dst );}private void update() {Imgproc.threshold(srcGray, dst, thresholdValue, MAX_BINARY_VALUE, thresholdType);Image img = HighGui.toBufferedImage(dst);imgLabel.setIcon(new ImageIcon(img));frame.repaint();}def Threshold_Demo(val):#0: Binary#1: Binary Inverted#2: Threshold Truncated#3: Threshold to Zero#4: Threshold to Zero Invertedthreshold_type = cv.getTrackbarPos(trackbar_type, window_name)threshold_value = cv.getTrackbarPos(trackbar_value, window_name)_, dst = cv.threshold(src_gray, threshold_value, max_binary_value, threshold_type )cv.imshow(window_name, dst)
可以看到,这里调用了函数 cv::threshold。我们在 C++ 代码中给它传了 个参数:
- src_gray:我们的输入图像
- dst:目标(输出)图像
- threshold_value:阈值处理操作所参照的 值
- max_BINARY_value:二值阈值处理操作中使用的值(用于设定被选中的像素)
- threshold_type: 种阈值处理操作之一。它们列在上面函数的注释中。
-
编译该程序后,运行时把一幅图像的路径作为参数传入。
-
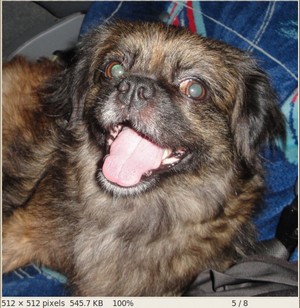
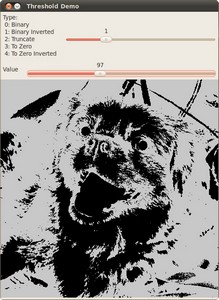
首先,我们尝试用反二值阈值处理图像。我们期望比 亮的像素会变暗,实际情况正是如此(从原图可以注意到,小狗的舌头和眼睛相比图像其他部分特别亮,这一点反映在输出图像中)。
-
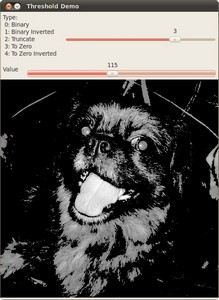
现在我们尝试阈值化为零。我们期望最暗的像素(低于阈值)将变为全黑,而值大于阈值的像素将保持其原始值,输出图像的快照证实了这一点。