
动态物体跟随
Nav2 提供了两种实现动态物体跟随的方法:
- Following 服务器(Following Server):专用服务器,内置恢复行为和平滑控制,专用于动态物体跟随。
- ComputePathToPose 与 FollowPath:基于行为树的方法,利用传统导航组件实现自定义跟随行为。
使用 Following 服务器
Section titled “使用 Following 服务器”- Following Server 概述
- Following Server 教程步骤
Following Server 概述
Section titled “Following Server 概述”Following 服务器是 Nav2 中专用于动态物体跟随的服务器。它会动态跟随目标物体,同时保持由 desired_distance 参数指定的距离。该服务器封装了跟踪和跟随移动物体的复杂逻辑,使开发者可以专注于上层的导航目标。
FollowObject 动作支持两种输入方式:
- pose_topic:发布待跟随物体位姿的话题。服务器会订阅该话题(类型为
geometry_msgs::msg::PoseStamped),从中获取待跟随物体的位姿。 - tracked_frame:待跟随的目标 TF 坐标系。服务器通过变换树(transform tree)直接跟随指定的坐标系。
Following 服务器使用与 Docking 服务器相同的控制器,借助 SmoothControlLaw 生成速度命令来平滑跟随目标物体,从而保证 Nav2 各专用服务器之间运动行为的一致性和可预测性。
恢复行为(Recovery):当目标物体在一段时间内无法检测到时(例如位姿话题停止发布),服务器会触发恢复行为——机器人左右旋转以搜索目标,直到重新定位到目标物体。
Following Server 教程步骤
Section titled “Following Server 教程步骤”要使用 Following 服务器,需要在行为树中进行配置,包括设置必要的动作节点和参数,以实现平滑的跟随行为。FollowObject 动作节点提供两种物体跟踪方式。
方法 1:使用 pose_topic
Section titled “方法 1:使用 pose_topic”使用位姿话题跟随动态物体的最简行为树如下:
<root main_tree_to_execute="MainTree"> <BehaviorTree ID="MainTree"> <FollowObject name="FollowPerson" pose_topic="/person_pose" max_duration="0.0"/> </BehaviorTree></root>在此配置中:
pose_topic:指定发布物体位姿的geometry_msgs::msg::PoseStamped话题(/person_pose)max_duration:动作的运行时长(0.0 表示无限期运行)
方法 2:使用 tracked_frame
Section titled “方法 2:使用 tracked_frame”也可以直接跟随特定的 TF 坐标系:
<root main_tree_to_execute="MainTree"> <BehaviorTree ID="MainTree"> <FollowObject name="FollowPerson" tracked_frame="person_frame" max_duration="0.0"/> </BehaviorTree></root>在此配置中:
tracked_frame:指定待跟随的坐标系名称(person_frame),通过变换树进行跟随max_duration:动作的运行时长(0.0 表示无限期运行)
其他参数
FollowObject 动作还支持用于微调的其他参数:
desired_distance:与目标物体保持的距离(单位:米)detection_timeout:触发恢复行为前,未检测到物体的等待时间rotate_to_object_timeout:旋转恢复行为搜索物体的最大允许时间static_object_timeout:判断物体是否已静止的时间阈值search_by_rotating:启用/禁用物体丢失时的旋转搜索恢复行为
当目标变得不可检测时,恢复行为会自动激活,并使用上述搜索参数。
Following 服务器实战演示
以下视频演示了 Following 服务器在真实场景中的功能:
<h1 align="center"> <div style="position: relative; padding-bottom: 0%; overflow: hidden; max-width: 100%; height: auto;"> <iframe width="700" height="450" src="https://www.youtube.com/embed/g-g58J1g9Ww?autoplay=1" frameborder="1" allow="accelerometer; autoplay; encrypted-media; gyroscope; picture-in-picture" allowfullscreen></iframe> </div></h1>使用 ComputePathToPose 和 FollowPath
Section titled “使用 ComputePathToPose 和 FollowPath”- ComputePathToPose 概述
- ComputePathToPose 教程步骤
<h1 align="center"> <div style="position: relative; padding-bottom: 0%; overflow: hidden; max-width: 100%; height: auto;"> <iframe width="700" height="450" src="https://www.youtube.com/embed/sRodzrrJChA?autoplay=1" frameborder="1" allow="accelerometer; autoplay; encrypted-media; gyroscope; picture-in-picture" allowfullscreen></iframe> </div></h1>ComputePathToPose 概述
Section titled “ComputePathToPose 概述”本教程演示如何将 Nav2 用于「从 A 点移动到 B 点」以外的导航任务。在本例中,我们将使用 Nav2 在保持一定距离的前提下,无限期跟随一个移动物体。
这类任务在跟随行人或其他机器人等场景中非常实用。以下是利用该能力构建的一些应用示例视频:「Carry My Luggage」RoboCup @ Home 测试中,CATIE Robotics 团队成功完成了该测试;以及这个真实(面向未来)的应用案例:
<h1 align="center"> <div> <div style="position: relative; padding-bottom: 0%; overflow: hidden; max-width: 100%; height: auto;"> <iframe width="450" height="300" src="https://www.youtube.com/embed/lTjKO4M7yZc?autoplay=1&mute=1" frameborder="1" allowfullscreen></iframe> <iframe width="450" height="300" src="https://www.youtube.com/embed/KgRKyzsja9Q?autoplay=1&mute=1" frameborder="1" allowfullscreen></iframe> </div> </div></h1>本任务的要求如下:
- 仅修改导航行为树。该行为树可按需通过
NavigateToPose动作选择,也可使用默认行为树,由运行时可配置的插件组成。 - 不修改规划器和控制器配置。
- 动作将无限期运行,直至发起者取消。
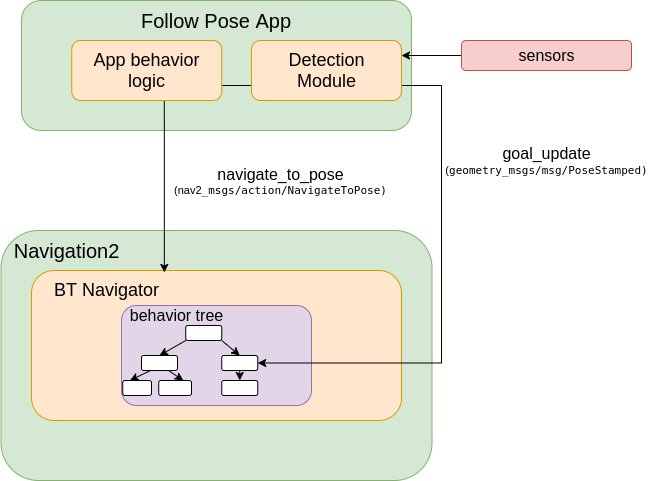
待跟随动态物体(如行人)的检测不在本教程范围内。如下方示意图所示,应用程序需为目标物体提供检测器,将初始位姿发送给 NavigateToPose 动作,并在任务期间通过话题持续更新位姿。可使用各种类型的检测器来实现:
ComputePathToPose 教程步骤
Section titled “ComputePathToPose 教程步骤”0 - 创建行为树
Section titled “0 - 创建行为树”从这个简单的行为树开始。该行为树以 1 Hz 的频率重新规划路径,并将路径传递给控制器执行:
<root main_tree_to_execute="MainTree"> <BehaviorTree ID="MainTree"> <PipelineSequence name="NavigateWithReplanning"> <RateController hz="1.0"> <ComputePathToPose goal="{goal}" path="{path}" planner_id="GridBased"/> </RateController> <FollowPath path="{path}" controller_id="FollowPath"/> </PipelineSequence> </BehaviorTree></root>首先,让该行为一直运行直到出现失败。为此,使用 KeepRunningUntilFailure 控制节点。
<root main_tree_to_execute="MainTree"> <BehaviorTree ID="MainTree"> <PipelineSequence name="NavigateWithReplanning"> <RateController hz="1.0"> <ComputePathToPose goal="{goal}" path="{path}" planner_id="GridBased"/> </RateController> <KeepRunningUntilFailure> <FollowPath path="{path}" controller_id="FollowPath"/> </KeepRunningUntilFailure> </PipelineSequence> </BehaviorTree></root>接下来,使用装饰器 GoalUpdater 接收待跟随动态物体位姿的更新。该节点以当前目标作为输入,订阅话题 /goal_update。一旦在该话题上收到新目标,便将其设置为 updated_goal。
<root main_tree_to_execute="MainTree"> <BehaviorTree ID="MainTree"> <PipelineSequence name="NavigateWithReplanning"> <RateController hz="1.0"> <GoalUpdater input_goal="{goal}" output_goal="{updated_goal}"> <ComputePathToPose goal="{updated_goal}" path="{path}" planner_id="GridBased"/> </GoalUpdater> </RateController> <KeepRunningUntilFailure> <FollowPath path="{path}" controller_id="FollowPath"/> </KeepRunningUntilFailure> </PipelineSequence> </BehaviorTree></root>为了与目标保持一定距离,使用动作节点 TruncatePath。该节点会缩短路径,使机器人不会直接撞入目标物体。可通过输入端口 distance 设置与目标的期望距离。
<root main_tree_to_execute="MainTree"> <BehaviorTree ID="MainTree"> <PipelineSequence name="NavigateWithReplanning"> <RateController hz="1.0"> <Sequence> <GoalUpdater input_goal="{goal}" output_goal="{updated_goal}"> <ComputePathToPose goal="{updated_goal}" path="{path}" planner_id="GridBased"/> </GoalUpdater> <TruncatePath distance="1.0" input_path="{path}" output_path="{truncated_path}"/> </Sequence> </RateController> <KeepRunningUntilFailure> <FollowPath path="{truncated_path}" controller_id="FollowPath"/> </KeepRunningUntilFailure> </PipelineSequence> </BehaviorTree></root>保存这个行为树,即可用于导航任务。
作为参考,nav2_bt_navigator 包已开箱即用地提供了完全相同的行为树:follow_point.xml。
1 - 设置 RViz clicked point
Section titled “1 - 设置 RViz clicked point”这里使用 RViz 而非完整应用程序,这样无需准备检测器即可开始测试。利用工具栏上的「clicked point」按钮来模拟物体检测,为 Nav2 提供目标更新。该按钮会在话题 /clicked_point 上发布坐标。该坐标点需要通过此仓库中的 clicked_point_to_pose 程序发送给行为树。将该仓库克隆到工作空间中,编译后在终端中运行:
ros2 run nav2_test_utils clicked_point_to_pose
也可以在 RViz 配置文件中将该话题重映射为 goal_updates。
2 - 在 Nav2 仿真中运行动态物体跟随
Section titled “2 - 在 Nav2 仿真中运行动态物体跟随”在终端中启动 Nav2:
ros2 launch nav2_bringup tb3_simulation_launch.py headless:=False
打开 RViz,初始化机器人位置后,命令机器人导航到任意位置。使用「clicked point」按钮模拟对目标物体的一次新检测,如本教程开头视频所示。
当检测器以更高频率(1 Hz、10 Hz、100 Hz)检测目标物体时,机器人会做出更快、更灵敏的跟随反应。
<h1 align="center"> <div style="position: relative; padding-bottom: 0%; overflow: hidden; max-width: 100%; height: auto;"> <iframe width="700" height="450" src="https://www.youtube.com/embed/r4fIkcktZUM?autoplay=1" frameborder="1" allow="accelerometer; autoplay; encrypted-media; gyroscope; picture-in-picture" allowfullscreen></iframe> </div></h1>