
纹理目标的实时位姿估计
如今,增强现实是计算机视觉与机器人领域最热门的研究课题之一。增强现实中最基本的问题是估计相机相对于某个物体的位姿——在计算机视觉领域,这是为了进行后续的三维渲染;在机器人领域,则是为了获取物体位姿以进行抓取和操作。然而,这并不是一个容易解决的问题,因为图像处理中最常见的问题在于:为了求解一个对人类来说既基本又直接的问题,需要应用大量算法或数学运算,其计算开销很大。
本教程讲解如何构建一个实时应用程序:在给定二维图像及其三维纹理模型的情况下,估计相机位姿,以跟踪具有六个自由度的纹理目标。
该应用程序包含以下部分:
- 读取三维纹理物体模型和物体网格。
- 从相机或视频获取输入。
- 从场景中提取 ORB 特征与描述子。
- 使用 Flann 匹配器将场景描述子与模型描述子进行匹配。
- 使用 PnP + Ransac 进行位姿估计。
- 使用线性卡尔曼滤波器(Kalman Filter)剔除不良位姿。
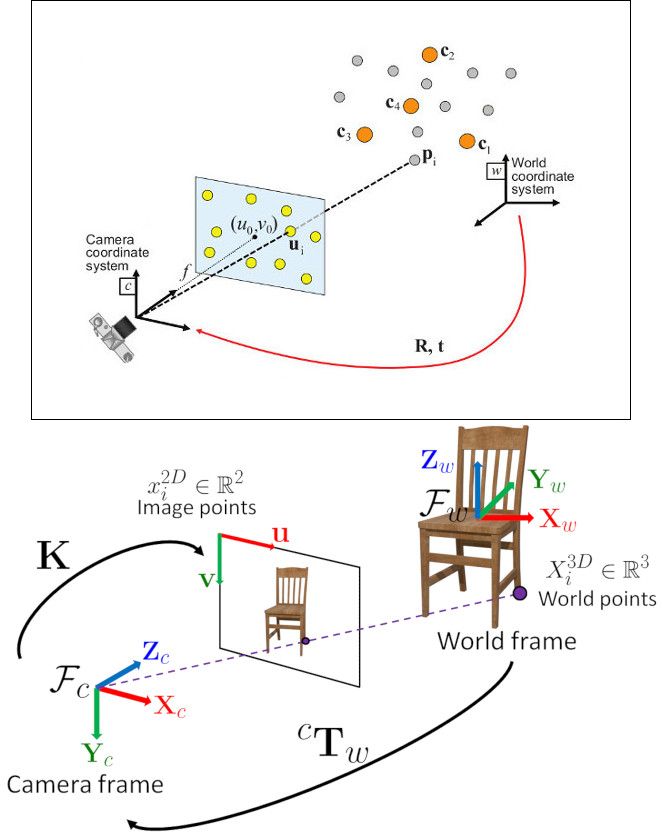
在计算机视觉中,由 n 组三维到二维的点对应关系估计相机位姿,是一个基础且已被充分研究的问题。该问题最一般的版本需要估计位姿的六个自由度以及五个标定参数:焦距、主点、宽高比和 skew(倾斜因子)。使用著名的直接线性变换(Direct Linear Transform,DLT)算法,最少 6 组对应点即可求解。不过,该问题存在多种简化形式,由此衍生出长长一串在 DLT 基础上提高精度的不同算法。
最常见的简化是假设标定参数已知,这就是所谓 Perspective-n-Point 问题(PnP 问题):
问题描述: 给定一组三维点 (在世界参考系下表示)与其在图像上的二维投影 之间的对应关系,求相机相对于世界的位姿( 和 )以及焦距 。
OpenCV 提供了四种不同的方法来求解 Perspective-n-Point 问题并返回 和 。随后,使用下面的公式就可以把三维点投影到图像平面上:
关于如何处理这些方程的完整文档,请参见 OpenCV 参考文档的 calib3d 模块。
你可以在 OpenCV 源码库的 samples/cpp/tutorial_code/calib3d/real_time_pose_estimation/ 目录中找到本教程的源代码。
本教程包含两个主要程序:
-
模型注册
本应用程序面向手头没有待检测物体三维纹理模型的用户。你可以用这个程序创建自己的纹理三维模型。该程序仅适用于平面物体;如果要为复杂形状的物体建模,应使用专业的建模软件。
应用程序需要输入待注册物体的图像及其三维网格。我们还必须提供拍摄输入图像时所用相机的内参。所有文件都需要使用绝对路径,或相对于应用程序工作目录的相对路径来指定。如果未指定文件,程序将尝试打开提供的默认参数。
应用程序启动时从输入图像中提取 ORB 特征与描述子,然后利用网格并结合 Möller–Trumbore 相交算法 计算所找到特征的三维坐标。最后,三维点与描述子分别存储在一个 YAML 格式文件的不同列表中,每行是一个不同的点。关于文件存储的技术背景,可参阅「XML/YAML 文件输入输出」教程。
-
模型检测
本应用程序的目标是在给定三维纹理模型的情况下实时估计物体位姿。
应用程序启动时,加载与模型注册程序所述结构相同的 YAML 格式三维纹理模型。然后从场景中检测并提取 ORB 特征与描述子。接着使用 cv::FlannBasedMatcher 配合 cv::flann::GenericIndex 在场景描述子与模型描述子之间进行匹配。利用找到的匹配点,通过 cv::solvePnPRansac 函数计算相机的
R和t。最后应用卡尔曼滤波器剔除不良位姿。如果你编译 OpenCV 时带上了示例,可以在
opencv/build/bin/cpp-tutorial-pnp_detection找到该程序。运行该应用程序时可以修改一些参数:This program shows how to detect an object given its 3D textured model. You can choose to use a recorded video or the webcam.Usage:./cpp-tutorial-pnp_detection -helpKeys:'esc' - to quit.--------------------------------------------------------------------------Usage: cpp-tutorial-pnp_detection [params]-c, --confidence (value:0.95)RANSAC confidence-e, --error (value:2.0)RANSAC reprojection error-f, --fast (value:true)use of robust fast match-h, --help (value:true)print this message--in, --inliers (value:30)minimum inliers for Kalman update--it, --iterations (value:500)RANSAC maximum iterations count-k, --keypoints (value:2000)number of keypoints to detect--meshpath to ply mesh--method, --pnp (value:0)PnP method: (0) ITERATIVE - (1) EPNP - (2) P3P - (3) DLS--modelpath to yml model-r, --ratio (value:0.7)threshold for ratio test-v, --videopath to recorded video例如,你可以更改 PnP 方法来运行该应用程序:
Terminal window ./cpp-tutorial-pnp_detection --method=2
下面对实时应用程序的代码进行详细讲解:
-
读取三维纹理物体模型和物体网格。
为了加载纹理模型,我实现了一个 Model 类,其 load() 函数打开一个 YAML 文件并取出存储的三维点及对应描述子。你可以在
samples/cpp/tutorial_code/calib3d/real_time_pose_estimation/Data/cookies_ORB.yml找到一个三维纹理模型示例。/* Load a YAML file using OpenCV */void Model::load(const std::string path){cv::Mat points3d_mat;cv::FileStorage storage(path, cv::FileStorage::READ);storage["points_3d"] >> points3d_mat;storage["descriptors"] >> descriptors_;points3d_mat.copyTo(list_points3d_in_);storage.release();}在主程序中,模型按如下方式加载:
Model model; // instantiate Model objectmodel.load(yml_read_path); // load a 3D textured object model为了读取模型网格,我实现了一个 Mesh 类,其 load() 函数打开一个
*.ply文件并存储物体的三维点以及组成的三角形。你可以在samples/cpp/tutorial_code/calib3d/real_time_pose_estimation/Data/box.ply找到一个模型网格示例。/* Load a CSV with *.ply format */void Mesh::load(const std::string path){// Create the readerCsvReader csvReader(path);// Clear previous datalist_vertex_.clear();list_triangles_.clear();// Read from .ply filecsvReader.readPLY(list_vertex_, list_triangles_);// Update mesh attributesnum_vertexs_ = list_vertex_.size();num_triangles_ = list_triangles_.size();}在主程序中,网格按如下方式加载:
Mesh mesh; // instantiate Mesh objectmesh.load(ply_read_path); // load an object mesh你也可以加载不同的模型和网格:
Terminal window ./cpp-tutorial-pnp_detection --mesh=/absolute_path_to_your_mesh.ply --model=/absolute_path_to_your_model.yml -
从相机或视频获取输入。
检测需要捕获视频。可以通过传入视频文件在你机器上的绝对路径来加载已录制的视频。为测试该应用程序,你可以在
samples/cpp/tutorial_code/calib3d/real_time_pose_estimation/Data/box.mp4找到一段录制好的视频。cv::VideoCapture cap; // instantiate VideoCapturecap.open(video_read_path); // open a recorded videoif(!cap.isOpened()) // check if we succeeded{std::cout << "Could not open the camera device" << std::endl;return -1;}然后算法逐帧计算:
cv::Mat frame, frame_vis;while(cap.read(frame) && cv::waitKey(30) != 27) // capture frame until ESC is pressed{frame_vis = frame.clone(); // refresh visualisation frame// MAIN ALGORITHM}你也可以加载不同的录制视频:
Terminal window ./cpp-tutorial-pnp_detection --video=/absolute_path_to_your_video.mp4 -
从场景中提取 ORB 特征与描述子。
下一步是检测场景特征并提取其描述子。为此,我实现了一个 RobustMatcher 类,其中包含用于关键点检测和特征提取的函数。你可以在
samples/cpp/tutorial_code/calib3d/real_time_pose_estimation/src/RobustMatcher.cpp中找到它。在你的 RobustMatcher 对象中,可以使用 OpenCV 的任意一种二维特征检测器。本例中我使用了 cv::ORB 特征,因为它基于 cv::FAST 来检测关键点,并使用 cv::xfeatures2d::BriefDescriptorExtractor 提取描述子,这意味着它速度快且对旋转具有鲁棒性。你可以在文档中找到关于 ORB 的更详细信息。下面的代码展示如何实例化并设置特征检测器与描述子提取器:
RobustMatcher rmatcher; // instantiate RobustMatchercv::FeatureDetector * detector = new cv::OrbFeatureDetector(numKeyPoints); // instantiate ORB feature detectorcv::DescriptorExtractor * extractor = new cv::OrbDescriptorExtractor(); // instantiate ORB descriptor extractorrmatcher.setFeatureDetector(detector); // set feature detectorrmatcher.setDescriptorExtractor(extractor); // set descriptor extractor特征与描述子将由 RobustMatcher 在匹配函数内部计算。
-
使用 Flann 匹配器将场景描述子与模型描述子进行匹配。
这是我们检测算法的第一步。主要思路是将场景描述子与模型描述子进行匹配,从而获知当前场景中所找到特征的三维坐标。
首先,我们需要设置使用哪种匹配器。本例中使用 cv::FlannBasedMatcher 匹配器——随着训练特征集合的增大,它在计算开销上比 cv::BFMatcher 匹配器更快。由于 ORB 描述子是二值的,FlannBased 匹配器创建的索引是 Multi-Probe LSH: Efficient Indexing for High-Dimensional Similarity Search。
你可以调节 LSH 和搜索参数以提高匹配效率:
cv::Ptr<cv::flann::IndexParams> indexParams = cv::makePtr<cv::flann::LshIndexParams>(6, 12, 1); // instantiate LSH index parameterscv::Ptr<cv::flann::SearchParams> searchParams = cv::makePtr<cv::flann::SearchParams>(50); // instantiate flann search parameterscv::DescriptorMatcher * matcher = new cv::FlannBasedMatcher(indexParams, searchParams); // instantiate FlannBased matcherrmatcher.setDescriptorMatcher(matcher); // set matcher其次,我们需要调用 robustMatch() 或 fastRobustMatch() 函数来执行匹配。这两个函数的区别在于计算开销:第一种方法较慢,但筛选优质匹配时更鲁棒,因为它使用了两次比率检验和一次对称性检验;相比之下,第二种方法更快,但鲁棒性较差,因为它只对匹配应用一次比率检验。
下面的代码获取模型三维点及其描述子,然后在主程序中调用匹配器:
// Get the MODEL INFOstd::vector<cv::Point3f> list_points3d_model = model.get_points3d(); // list with model 3D coordinatescv::Mat descriptors_model = model.get_descriptors(); // list with descriptors of each 3D coordinate// -- Step 1: Robust matching between model descriptors and scene descriptorsstd::vector<cv::DMatch> good_matches; // to obtain the model 3D points in the scenestd::vector<cv::KeyPoint> keypoints_scene; // to obtain the 2D points of the sceneif(fast_match){rmatcher.fastRobustMatch(frame, good_matches, keypoints_scene, descriptors_model);}else{rmatcher.robustMatch(frame, good_matches, keypoints_scene, descriptors_model);}下面的代码是 RobustMatcher 类的 robustMatch() 函数。该函数使用给定图像检测关键点并提取描述子,以两个最近邻的方式将提取的描述子与给定的模型描述子互相匹配;然后对两个方向的匹配应用比率检验,移除那些最佳匹配与次佳匹配距离之比大于给定阈值的匹配;最后应用对称性检验,移除不对称的匹配。
void RobustMatcher::robustMatch( const cv::Mat& frame, std::vector<cv::DMatch>& good_matches,std::vector<cv::KeyPoint>& keypoints_frame,const std::vector<cv::KeyPoint>& keypoints_model, const cv::Mat& descriptors_model ){// 1a. Detection of the ORB featuresthis->computeKeyPoints(frame, keypoints_frame);// 1b. Extraction of the ORB descriptorscv::Mat descriptors_frame;this->computeDescriptors(frame, keypoints_frame, descriptors_frame);// 2. Match the two image descriptorsstd::vector<std::vector<cv::DMatch> > matches12, matches21;// 2a. From image 1 to image 2matcher_->knnMatch(descriptors_frame, descriptors_model, matches12, 2); // return 2 nearest neighbours// 2b. From image 2 to image 1matcher_->knnMatch(descriptors_model, descriptors_frame, matches21, 2); // return 2 nearest neighbours// 3. Remove matches for which NN ratio is > than threshold// clean image 1 -> image 2 matchesint removed1 = ratioTest(matches12);// clean image 2 -> image 1 matchesint removed2 = ratioTest(matches21);// 4. Remove non-symmetrical matchessymmetryTest(matches12, matches21, good_matches);}匹配过滤之后,我们需要利用得到的 DMatches 向量,从找到的场景关键点和我们的三维模型中提取二维与三维对应点。关于 cv::DMatch 的更多信息,请查阅文档。
// -- Step 2: Find out the 2D/3D correspondencesstd::vector<cv::Point3f> list_points3d_model_match; // container for the model 3D coordinates found in the scenestd::vector<cv::Point2f> list_points2d_scene_match; // container for the model 2D coordinates found in the scenefor(unsigned int match_index = 0; match_index < good_matches.size(); ++match_index){cv::Point3f point3d_model = list_points3d_model[ good_matches[match_index].trainIdx ]; // 3D point from modelcv::Point2f point2d_scene = keypoints_scene[ good_matches[match_index].queryIdx ].pt; // 2D point from the scenelist_points3d_model_match.push_back(point3d_model); // add 3D pointlist_points2d_scene_match.push_back(point2d_scene); // add 2D point}你也可以更改比率检验阈值、要检测的关键点数量,以及是否使用鲁棒匹配器:
Terminal window ./cpp-tutorial-pnp_detection --ratio=0.8 --keypoints=1000 --fast=false -
使用 PnP + Ransac 进行位姿估计。
有了二维与三维对应点之后,我们需要应用 PnP 算法来估计相机位姿。之所以必须使用 cv::solvePnPRansac 而不是 cv::solvePnP,是因为匹配之后并非所有找到的对应关系都是正确的,很可能存在错误对应,即所谓的外点(outliers)。随机抽样一致性(Random Sample Consensus,Ransac)是一种非确定性的迭代方法,它从观测数据中估计数学模型的参数,迭代次数越多,结果越接近真值。应用 Ransac 之后,所有外点都会被剔除,从而以一定的概率估计出正确的相机位姿。
为了估计相机位姿,我实现了一个 PnPProblem 类。该类有 4 个属性:给定的标定矩阵、旋转矩阵、平移矩阵以及旋转-平移矩阵。估计位姿时必须提供你所用相机的内参标定参数。获取参数的方法可参阅「棋盘格相机标定」和「相机标定」教程。
下面的代码展示如何在主程序中声明 PnPProblem 类:
// Intrinsic camera parameters: UVC WEBCAMdouble f = 55; // focal length in mmdouble sx = 22.3, sy = 14.9; // sensor sizedouble width = 640, height = 480; // image sizedouble params_WEBCAM[] = { width*f/sx, // fxheight*f/sy, // fywidth/2, // cxheight/2}; // cyPnPProblem pnp_detection(params_WEBCAM); // instantiate PnPProblem class下面的代码展示 PnPProblem 类如何初始化其属性:
// Custom constructor given the intrinsic camera parametersPnPProblem::PnPProblem(const double params[]){_A_matrix = cv::Mat::zeros(3, 3, CV_64FC1); // intrinsic camera parameters_A_matrix.at<double>(0, 0) = params[0]; // [ fx 0 cx ]_A_matrix.at<double>(1, 1) = params[1]; // [ 0 fy cy ]_A_matrix.at<double>(0, 2) = params[2]; // [ 0 0 1 ]_A_matrix.at<double>(1, 2) = params[3];_A_matrix.at<double>(2, 2) = 1;_R_matrix = cv::Mat::zeros(3, 3, CV_64FC1); // rotation matrix_t_matrix = cv::Mat::zeros(3, 1, CV_64FC1); // translation matrix_P_matrix = cv::Mat::zeros(3, 4, CV_64FC1); // rotation-translation matrix}OpenCV 提供四种 PnP 方法:ITERATIVE、EPNP、P3P 和 DLS。根据应用类型的不同,应选用不同的估计方法。对于实时应用,更合适的方法是 EPNP 和 P3P,因为它们比 ITERATIVE 和 DLS 更快地找到最优解。然而,EPNP 和 P3P 在平面物体面前并不特别鲁棒,有时位姿估计会出现镜像效应。因此,本教程使用 ITERATIVE 方法,因为待检测物体具有平面结构。
OpenCV 的 RANSAC 实现要求你提供三个参数:1)算法停止前的最大迭代次数;2)观测点投影与计算点投影之间被视为内点所允许的最大距离;3)获得良好结果的置信度。你可以调节这些参数以改善算法性能:增加迭代次数会得到更精确的解,但找到解所需的时间更长;增大重投影误差会减少计算时间,但解会不精确;降低置信度会让算法更快,但得到的解会不精确。
以下参数适用于本应用程序:
// RANSAC parametersint iterationsCount = 500; // number of Ransac iterations.float reprojectionError = 2.0; // maximum allowed distance to consider it an inlier.float confidence = 0.95; // RANSAC successful confidence.下面的代码是 PnPProblem 类的 estimatePoseRANSAC() 函数。该函数在给定一组二维/三维对应点、要使用的 PnP 方法、输出内点容器以及 Ransac 参数的情况下,估计旋转矩阵和平移矩阵:
// Estimate the pose given a list of 2D/3D correspondences with RANSAC and the method to usevoid PnPProblem::estimatePoseRANSAC( const std::vector<cv::Point3f> &list_points3d, // list with model 3D coordinatesconst std::vector<cv::Point2f> &list_points2d, // list with scene 2D coordinatesint flags, cv::Mat &inliers, int iterationsCount, // PnP method; inliers containerfloat reprojectionError, float confidence ) // RANSAC parameters{cv::Mat distCoeffs = cv::Mat::zeros(4, 1, CV_64FC1); // vector of distortion coefficientscv::Mat rvec = cv::Mat::zeros(3, 1, CV_64FC1); // output rotation vectorcv::Mat tvec = cv::Mat::zeros(3, 1, CV_64FC1); // output translation vectorbool useExtrinsicGuess = false; // if true the function uses the provided rvec and tvec values as// initial approximations of the rotation and translation vectorscv::solvePnPRansac( list_points3d, list_points2d, _A_matrix, distCoeffs, rvec, tvec,useExtrinsicGuess, iterationsCount, reprojectionError, confidence,inliers, flags );Rodrigues(rvec,_R_matrix); // converts Rotation Vector to Matrix_t_matrix = tvec; // set translation matrixthis->set_P_matrix(_R_matrix, _t_matrix); // set rotation-translation matrix}下面的代码是主算法的第 3 步和第 4 步:首先调用上面的函数,然后取出 RANSAC 输出的内点向量,获得用于绘制的二维场景点。如代码所示,我们必须确保有匹配时才应用 RANSAC;否则 cv::solvePnPRansac 会因 OpenCV 的某个 bug 而崩溃。
if(good_matches.size() > 0) // None matches, then RANSAC crashes{// -- Step 3: Estimate the pose using RANSAC approachpnp_detection.estimatePoseRANSAC( list_points3d_model_match, list_points2d_scene_match,pnpMethod, inliers_idx, iterationsCount, reprojectionError, confidence );// -- Step 4: Catch the inliers keypoints to drawfor(int inliers_index = 0; inliers_index < inliers_idx.rows; ++inliers_index){int n = inliers_idx.at<int>(inliers_index); // i-inliercv::Point2f point2d = list_points2d_scene_match[n]; // i-inlier point 2Dlist_points2d_inliers.push_back(point2d); // add i-inlier to list}最后,一旦估计出相机位姿,我们就可以用 和 ,按照理论部分给出的公式,把世界参考系下的给定三维点投影到图像上。
下面的代码是 PnPProblem 类的 backproject3DPoint() 函数,它将世界参考系下的给定三维点反投影到二维图像上:
// Backproject a 3D point to 2D using the estimated pose parameterscv::Point2f PnPProblem::backproject3DPoint(const cv::Point3f &point3d){// 3D point vector [x y z 1]'cv::Mat point3d_vec = cv::Mat(4, 1, CV_64FC1);point3d_vec.at<double>(0) = point3d.x;point3d_vec.at<double>(1) = point3d.y;point3d_vec.at<double>(2) = point3d.z;point3d_vec.at<double>(3) = 1;// 2D point vector [u v 1]'cv::Mat point2d_vec = cv::Mat(4, 1, CV_64FC1);point2d_vec = _A_matrix * _P_matrix * point3d_vec;// Normalization of [u v]'cv::Point2f point2d;point2d.x = point2d_vec.at<double>(0) / point2d_vec.at<double>(2);point2d.y = point2d_vec.at<double>(1) / point2d_vec.at<double>(2);return point2d;}上述函数用于计算物体网格的所有三维点,以显示物体的位姿。
你也可以更改 RANSAC 参数和 PnP 方法:
Terminal window ./cpp-tutorial-pnp_detection --error=0.25 --confidence=0.90 --iterations=250 --method=3 -
使用线性卡尔曼滤波器剔除不良位姿。
在计算机视觉或机器人领域,应用检测或跟踪技术后常常由于某些传感器误差而得到不良结果。为避免这些不良检测,本教程讲解如何实现一个线性卡尔曼滤波器(Kalman Filter)。卡尔曼滤波器将在检测到给定数量的内点之后应用。
你可以在这里找到更多关于卡尔曼滤波器的信息。本教程使用 OpenCV 的 cv::KalmanFilter 实现,并基于用于位置与朝向跟踪的线性卡尔曼滤波器来设置动力学模型和量测模型。
首先,我们需要定义状态向量,它将有 18 个状态:位置数据 (x,y,z) 及其一阶和二阶导数(速度与加速度),然后是以三个欧拉角(roll、pitch、yaw)形式表示的旋转,以及它们的一阶和二阶导数(角速度与角加速度)。
其次,我们需要定义量测数量,这里是 6:从 和 中我们可以提取 和 。此外,还需要定义施加到系统上的控制量数量,本例中为零。最后,需要定义量测之间的差分时间,本例中为 ,其中 T 是视频的帧率。
cv::KalmanFilter KF; // instantiate Kalman Filterint nStates = 18; // the number of statesint nMeasurements = 6; // the number of measured statesint nInputs = 0; // the number of action controldouble dt = 0.125; // time between measurements (1/FPS)initKalmanFilter(KF, nStates, nMeasurements, nInputs, dt); // init function下面的代码是卡尔曼滤波器的初始化。首先设置过程噪声、量测噪声和误差协方差矩阵;其次设置转移矩阵(即动力学模型);最后是量测矩阵(即量测模型)。
你可以调节过程噪声与量测噪声以改善卡尔曼滤波器的性能。量测噪声越小,算法收敛越快,但对不良量测也越敏感。
void initKalmanFilter(cv::KalmanFilter &KF, int nStates, int nMeasurements, int nInputs, double dt){KF.init(nStates, nMeasurements, nInputs, CV_64F); // init Kalman Filtercv::setIdentity(KF.processNoiseCov, cv::Scalar::all(1e-5)); // set process noisecv::setIdentity(KF.measurementNoiseCov, cv::Scalar::all(1e-4)); // set measurement noisecv::setIdentity(KF.errorCovPost, cv::Scalar::all(1)); // error covariance/* DYNAMIC MODEL */// [1 0 0 dt 0 0 dt2 0 0 0 0 0 0 0 0 0 0 0]// [0 1 0 0 dt 0 0 dt2 0 0 0 0 0 0 0 0 0 0]// [0 0 1 0 0 dt 0 0 dt2 0 0 0 0 0 0 0 0 0]// [0 0 0 1 0 0 dt 0 0 0 0 0 0 0 0 0 0 0]// [0 0 0 0 1 0 0 dt 0 0 0 0 0 0 0 0 0 0]// [0 0 0 0 0 1 0 0 dt 0 0 0 0 0 0 0 0 0]// [0 0 0 0 0 0 1 0 0 0 0 0 0 0 0 0 0 0]// [0 0 0 0 0 0 0 1 0 0 0 0 0 0 0 0 0 0]// [0 0 0 0 0 0 0 0 1 0 0 0 0 0 0 0 0 0]// [0 0 0 0 0 0 0 0 0 1 0 0 dt 0 0 dt2 0 0]// [0 0 0 0 0 0 0 0 0 0 1 0 0 dt 0 0 dt2 0]// [0 0 0 0 0 0 0 0 0 0 0 1 0 0 dt 0 0 dt2]// [0 0 0 0 0 0 0 0 0 0 0 0 1 0 0 dt 0 0]// [0 0 0 0 0 0 0 0 0 0 0 0 0 1 0 0 dt 0]// [0 0 0 0 0 0 0 0 0 0 0 0 0 0 1 0 0 dt]// [0 0 0 0 0 0 0 0 0 0 0 0 0 0 0 1 0 0]// [0 0 0 0 0 0 0 0 0 0 0 0 0 0 0 0 1 0]// [0 0 0 0 0 0 0 0 0 0 0 0 0 0 0 0 0 1]// positionKF.transitionMatrix.at<double>(0,3) = dt;KF.transitionMatrix.at<double>(1,4) = dt;KF.transitionMatrix.at<double>(2,5) = dt;KF.transitionMatrix.at<double>(3,6) = dt;KF.transitionMatrix.at<double>(4,7) = dt;KF.transitionMatrix.at<double>(5,8) = dt;KF.transitionMatrix.at<double>(0,6) = 0.5*std::pow(dt,2);KF.transitionMatrix.at<double>(1,7) = 0.5*std::pow(dt,2);KF.transitionMatrix.at<double>(2,8) = 0.5*std::pow(dt,2);// orientationKF.transitionMatrix.at<double>(9,12) = dt;KF.transitionMatrix.at<double>(10,13) = dt;KF.transitionMatrix.at<double>(11,14) = dt;KF.transitionMatrix.at<double>(12,15) = dt;KF.transitionMatrix.at<double>(13,16) = dt;KF.transitionMatrix.at<double>(14,17) = dt;KF.transitionMatrix.at<double>(9,15) = 0.5*std::pow(dt,2);KF.transitionMatrix.at<double>(10,16) = 0.5*std::pow(dt,2);KF.transitionMatrix.at<double>(11,17) = 0.5*std::pow(dt,2);/* MEASUREMENT MODEL */// [1 0 0 0 0 0 0 0 0 0 0 0 0 0 0 0 0 0]// [0 1 0 0 0 0 0 0 0 0 0 0 0 0 0 0 0 0]// [0 0 1 0 0 0 0 0 0 0 0 0 0 0 0 0 0 0]// [0 0 0 0 0 0 0 0 0 1 0 0 0 0 0 0 0 0]// [0 0 0 0 0 0 0 0 0 0 1 0 0 0 0 0 0 0]// [0 0 0 0 0 0 0 0 0 0 0 1 0 0 0 0 0 0]KF.measurementMatrix.at<double>(0,0) = 1; // xKF.measurementMatrix.at<double>(1,1) = 1; // yKF.measurementMatrix.at<double>(2,2) = 1; // zKF.measurementMatrix.at<double>(3,9) = 1; // rollKF.measurementMatrix.at<double>(4,10) = 1; // pitchKF.measurementMatrix.at<double>(5,11) = 1; // yaw}下面的代码是主算法的第 5 步。当 Ransac 之后得到的内点数量超过阈值时,填充量测矩阵,然后更新卡尔曼滤波器:
// -- Step 5: Kalman Filter// GOOD MEASUREMENTif( inliers_idx.rows >= minInliersKalman ){// Get the measured translationcv::Mat translation_measured(3, 1, CV_64F);translation_measured = pnp_detection.get_t_matrix();// Get the measured rotationcv::Mat rotation_measured(3, 3, CV_64F);rotation_measured = pnp_detection.get_R_matrix();// fill the measurements vectorfillMeasurements(measurements, translation_measured, rotation_measured);}// Instantiate estimated translation and rotationcv::Mat translation_estimated(3, 1, CV_64F);cv::Mat rotation_estimated(3, 3, CV_64F);// update the Kalman filter with good measurementsupdateKalmanFilter( KF, measurements,translation_estimated, rotation_estimated);下面的代码是 fillMeasurements() 函数,它将量测到的旋转矩阵转换为欧拉角,并连同量测到的平移向量一起填充量测矩阵:
void fillMeasurements( cv::Mat &measurements,const cv::Mat &translation_measured, const cv::Mat &rotation_measured){// Convert rotation matrix to euler anglescv::Mat measured_eulers(3, 1, CV_64F);measured_eulers = rot2euler(rotation_measured);// Set measurement to predictmeasurements.at<double>(0) = translation_measured.at<double>(0); // xmeasurements.at<double>(1) = translation_measured.at<double>(1); // ymeasurements.at<double>(2) = translation_measured.at<double>(2); // zmeasurements.at<double>(3) = measured_eulers.at<double>(0); // rollmeasurements.at<double>(4) = measured_eulers.at<double>(1); // pitchmeasurements.at<double>(5) = measured_eulers.at<double>(2); // yaw}下面的代码是 updateKalmanFilter() 函数,它更新卡尔曼滤波器并设置估计出的旋转矩阵和平移向量。估计出的旋转矩阵来自估计的欧拉角到旋转矩阵的转换:
void updateKalmanFilter( cv::KalmanFilter &KF, cv::Mat &measurement,cv::Mat &translation_estimated, cv::Mat &rotation_estimated ){// First predict, to update the internal statePre variablecv::Mat prediction = KF.predict();// The "correct" phase that is going to use the predicted value and our measurementcv::Mat estimated = KF.correct(measurement);// Estimated translationtranslation_estimated.at<double>(0) = estimated.at<double>(0);translation_estimated.at<double>(1) = estimated.at<double>(1);translation_estimated.at<double>(2) = estimated.at<double>(2);// Estimated euler anglescv::Mat eulers_estimated(3, 1, CV_64F);eulers_estimated.at<double>(0) = estimated.at<double>(9);eulers_estimated.at<double>(1) = estimated.at<double>(10);eulers_estimated.at<double>(2) = estimated.at<double>(11);// Convert estimated quaternion to rotation matrixrotation_estimated = euler2rot(eulers_estimated);}第 6 步是设置估计出的旋转-平移矩阵:
// -- Step 6: Set estimated projection matrixpnp_detection_est.set_P_matrix(rotation_estimated, translation_estimated);最后一步(可选)是绘制求得的位姿。为此我实现了一个函数,绘制网格的所有三维点以及一个额外的参考坐标轴:
// -- Step X: Draw posedrawObjectMesh(frame_vis, &mesh, &pnp_detection, green); // draw current posedrawObjectMesh(frame_vis, &mesh, &pnp_detection_est, yellow); // draw estimated posedouble l = 5;std::vector<cv::Point2f> pose_points2d;pose_points2d.push_back(pnp_detection_est.backproject3DPoint(cv::Point3f(0,0,0))); // axis centerpose_points2d.push_back(pnp_detection_est.backproject3DPoint(cv::Point3f(l,0,0))); // axis xpose_points2d.push_back(pnp_detection_est.backproject3DPoint(cv::Point3f(0,l,0))); // axis ypose_points2d.push_back(pnp_detection_est.backproject3DPoint(cv::Point3f(0,0,l))); // axis zdraw3DCoordinateAxes(frame_vis, pose_points2d); // draw axes你也可以修改更新卡尔曼滤波器所需的最小内点数:
Terminal window ./cpp-tutorial-pnp_detection --inliers=20
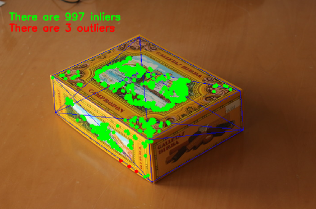
下面的视频展示了使用上述检测算法及以下参数进行实时位姿估计的结果:
// Robust Matcher parameters
int numKeyPoints = 2000;      // number of detected keypointsfloat ratio = 0.70f;          // ratio testbool fast_match = true;       // fastRobustMatch() or robustMatch()

// RANSAC parameters
int iterationsCount = 500;    // number of Ransac iterations.int reprojectionError = 2.0;  // maximum allowed distance to consider it an inlier.float confidence = 0.95;      // ransac successful confidence.

// Kalman Filter parameters
int minInliersKalman = 30;    // Kalman threshold updating
你可以在 YouTube 上观看实时位姿估计的演示视频。