
URDF 与 Robot State Publisher (C++)
目标: 模拟一个用 URDF 建模的行走机器人,并在 RViz 中查看。
教程级别: 中级
预计用时: 15 分钟
本教程将展示如何建模一个行走机器人,将其状态以 tf2 消息的形式发布,并在 RViz 中查看仿真效果。首先,创建描述机器人组件的 URDF 模型。然后,编写一个节点来模拟运动并发布 JointState 和坐标变换。最后,使用 robot_state_publisher 将整个机器人状态发布到 /tf。
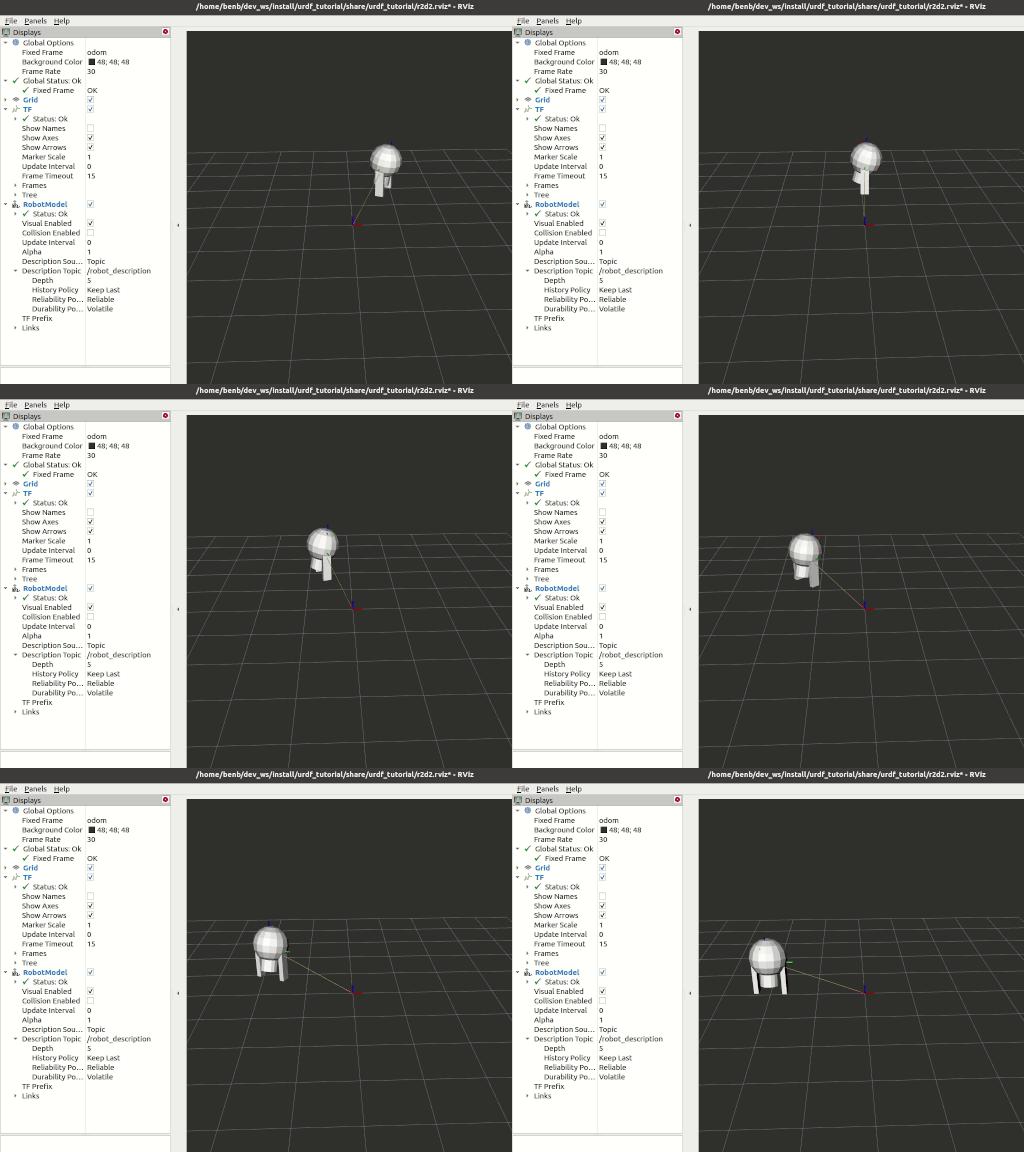
一如往常,别忘了在每个新打开的终端中 source ROS 2。
进入你的 ROS 2 工作空间,创建一个名为 urdf_tutorial_cpp 的包:
cd srcros2 pkg create --build-type ament_cmake --license Apache-2.0 urdf_tutorial_cpp --dependencies rclcpp geometry_msgs sensor_msgs tf2_ros tf2_geometry_msgscd urdf_tutorial_cpp现在你应该能看到一个 urdf_tutorial_cpp 文件夹,接下来需要对它进行一些修改。
2 创建 URDF 文件
Section titled “2 创建 URDF 文件”创建一个用于存储资源的目录:
Linux / macOS:
mkdir -p urdfWindows:
md urdf下载 URDF 文件 并将其保存为 urdf_tutorial_cpp/urdf/r2d2.urdf.xml。下载 RViz 配置文件 并将其保存为 urdf_tutorial_cpp/urdf/r2d2.rviz。
3 发布状态
Section titled “3 发布状态”现在需要一种方式来指定机器人的状态。为此,必须指定所有三个关节的状态以及整体机器人几何体。
打开你喜欢的编辑器,将以下代码粘贴到 urdf_tutorial_cpp/src/urdf_tutorial.cpp 中:
#include <rclcpp/rclcpp.hpp>#include <geometry_msgs/msg/quaternion.hpp>#include <sensor_msgs/msg/joint_state.hpp>#include <tf2_ros/transform_broadcaster.hpp>#include <tf2_geometry_msgs/tf2_geometry_msgs.hpp>#include <cmath>#include <thread>#include <chrono>
using namespace std::chrono;
class StatePublisher : public rclcpp::Node {    public:
    StatePublisher(rclcpp::NodeOptions options=rclcpp::NodeOptions()):        Node("state_publisher", options){            joint_pub_ = this->create_publisher<sensor_msgs::msg::JointState>("joint_states",10);            // create a publisher to tell robot_state_publisher the JointState information.            // robot_state_publisher will deal with this transformation            broadcaster = std::make_shared<tf2_ros::TransformBroadcaster>(this);            // create a broadcaster to tell the tf2 state information            // this broadcaster will determine the position of coordinate system 'axis' in coordinate system 'odom'            RCLCPP_INFO(this->get_logger(),"Starting state publisher");
            timer_=this->create_wall_timer(33ms,std::bind(&StatePublisher::publish,this));        }
    private:    rclcpp::Publisher<sensor_msgs::msg::JointState>::SharedPtr joint_pub_;    std::shared_ptr<tf2_ros::TransformBroadcaster> broadcaster;    rclcpp::TimerBase::SharedPtr timer_;
    // Robot state variables (one degree in radians)    const double degree = M_PI/180.0;    double tilt = 0.;    double tinc = degree;    double swivel = 0.;    double angle = 0.;    double height = 0.;    double hinc = 0.005;
    void publish();};
void StatePublisher::publish(){    // create the necessary messages    geometry_msgs::msg::TransformStamped t;    sensor_msgs::msg::JointState joint_state;
    const auto ts = this->get_clock()->now();    joint_state.header.stamp = ts;    // Specify joints' name which are defined in the r2d2.urdf.xml and their content    joint_state.name={"swivel","tilt","periscope"};    joint_state.position={swivel,tilt,height};
    // add time stamp    t.header.stamp = ts;    // specify the father and child frame
    // odom is the base coordinate system of tf2    t.header.frame_id="odom";    // axis is defined in r2d2.urdf.xml file and it is the base coordinate of model    t.child_frame_id="axis";
    // add translation change    t.transform.translation.x=cos(angle)*2;    t.transform.translation.y=sin(angle)*2;    t.transform.translation.z=0.7;    tf2::Quaternion q;    // euler angle into Quaternion and add rotation change    q.setRPY(0,0,angle+M_PI/2);    t.transform.rotation.x=q.x();    t.transform.rotation.y=q.y();    t.transform.rotation.z=q.z();    t.transform.rotation.w=q.w();
    // update state for next time    tilt+=tinc;    if (tilt\<-0.5 || tilt>0.0){        tinc*=-1;    }    height+=hinc;    if (height>0.2 || height<0.0){        hinc*=-1;    }    swivel+=degree;  // Increment by 1 degree (in radians)    angle+=degree;    // Change angle at a slower pace
    // send message    broadcaster->sendTransform(t);    joint_pub_->publish(joint_state);
    RCLCPP_INFO_THROTTLE(this->get_logger(), *this->get_clock(), 1000, "Publishing joint state");}
int main(int argc, char * argv[]){    rclcpp::init(argc,argv);    rclcpp::spin(std::make_shared<StatePublisher>());    rclcpp::shutdown();    return 0;}
这个节点完成两件事:
- 向
/joint_states话题发布JointState消息,让robot_state_publisher据此计算所有关节的变换并通过/tf广播。 - 广播一个根变换,将机器人模型(
axis坐标系)放置在世界(odom坐标系)中,使整个机器人在一个圆上行进。
4 创建 launch 文件
Section titled “4 创建 launch 文件”创建一个新的 urdf_tutorial_cpp/launch 文件夹。打开编辑器并粘贴以下代码,保存为 urdf_tutorial_cpp/launch/launch.py:
from launch import LaunchDescriptionfrom launch.actions import DeclareLaunchArgumentfrom launch.substitutions import FileContent, LaunchConfiguration, PathJoinSubstitutionfrom launch_ros.actions import Nodefrom launch_ros.substitutions import FindPackageShare

def generate_launch_description():    # ''use_sim_time'' is used to have ros2 use /clock topic for the time source    use_sim_time = LaunchConfiguration('use_sim_time', default='false')
    urdf = FileContent(        PathJoinSubstitution([FindPackageShare('urdf_tutorial_cpp'), 'urdf', 'r2d2.urdf.xml']))
    return LaunchDescription([        DeclareLaunchArgument(            'use_sim_time',            default_value='false',            description='Use simulation (Gazebo) clock if true'),        Node(            package='robot_state_publisher',            executable='robot_state_publisher',            name='robot_state_publisher',            output='screen',            parameters=[{'use_sim_time': use_sim_time, 'robot_description': urdf}],            arguments=[urdf]),        Node(            package='urdf_tutorial_cpp',            executable='urdf_tutorial_cpp',            name='urdf_tutorial_cpp',            output='screen'),    ])
5 编辑 CMakeLists.txt 文件
Section titled “5 编辑 CMakeLists.txt 文件”需要告诉 colcon 构建工具如何安装你的 C++ 包。按如下方式编辑 CMakeLists.txt 文件:
cmake_minimum_required(VERSION 3.20)project(urdf_tutorial_cpp)
if(CMAKE_COMPILER_IS_GNUCXX OR CMAKE_CXX_COMPILER_ID MATCHES "Clang")  add_compile_options(-Wall -Wextra -Wpedantic)endif()
# find dependenciesfind_package(ament_cmake REQUIRED)find_package(geometry_msgs REQUIRED)find_package(sensor_msgs REQUIRED)find_package(tf2_ros REQUIRED)find_package(tf2_geometry_msgs REQUIRED)find_package(rclcpp REQUIRED)
add_executable(urdf_tutorial_cpp src/urdf_tutorial.cpp)
target_link_libraries(urdf_tutorial_cpp PUBLIC  geometry_msgs::geometry_msgs  sensor_msgs::sensor_msgs  tf2_ros::tf2_ros  tf2_geometry_msgs::tf2_geometry_msgs  rclcpp::rclcpp)
install(TARGETS  urdf_tutorial_cpp  DESTINATION lib/${PROJECT_NAME})
install(DIRECTORY  launch  DESTINATION share/${PROJECT_NAME})
install(DIRECTORY  urdf  DESTINATION share/${PROJECT_NAME})
ament_package()
install(DIRECTORY urdf ...) 规则会将 r2d2.urdf.xml 和 r2d2.rviz 都复制到安装目录中,以便运行时能够找到它们。
返回工作空间根目录并构建:
colcon build --symlink-install --packages-select urdf_tutorial_cppsource 环境设置文件:
Linux / macOS:
source install/setup.bashWindows:
call install/setup.bat7 查看结果
Section titled “7 查看结果”要启动你的新包,运行以下命令:
ros2 launch urdf_tutorial_cpp launch.py要可视化结果,打开一个新终端并使用你的 RViz 配置文件运行 RViz:
rviz2 -d install/urdf_tutorial_cpp/share/urdf_tutorial_cpp/urdf/r2d2.rviz有关 RViz 的详细用法,请参见用户指南。
install/urdf_tutorial_cpp/share/urdf_tutorial_cpp/urdf/r2d2.rviz 是 r2d2.rviz 的安装路径。
恭喜!你创建了一个 JointState 发布者节点,并将其与 robot_state_publisher 结合使用,成功模拟了一个行走机器人。