
使用接口
本页面涵盖 ROS 2 中使用各类通信接口的四项核心主题:使用 ros2 bag 录制与回放话题/服务/动作数据、tf2 坐标变换库入门、四元数(Quaternion)数学基础,以及 rosidl::Buffer 后端机制概述。
录制与回放数据
Section titled “录制与回放数据”目标: 录制发布在话题、服务和动作上的数据,以便随时回放和检查。
教程级别: 初级
预计用时: 20 分钟
ros2 bag 是一个命令行工具,用于录制 ROS 2 系统中发布在话题、服务和动作上的数据。它可以同时录制任意数量的话题、服务和动作上传输的数据,并将其保存到数据库中。之后你可以回放这些数据,以重现测试和实验的结果。录制话题、服务和动作数据也是分享你的工作成果、让他人能够复现的绝佳方式。
ros2 bag 应该已作为常规 ROS 2 安装的一部分安装在你的系统中。
如果你需要安装 ROS 2,请参阅安装说明。
本教程涉及前序教程中涵盖的概念,包括节点、话题、服务和动作。同时还会使用 turtlesim 包、Service Introspection 示例和 Action Introspection 示例。
与往常一样,不要忘记在每个新打开的终端中 source ROS 2 环境。
管理话题数据
Section titled “管理话题数据”1 准备工作
Section titled “1 准备工作”你将在 turtlesim 系统中录制键盘输入,以便稍后保存和回放。首先,启动 /turtlesim 和 /teleop_turtle 节点。
打开一个新终端并运行:
$ ros2 run turtlesim turtlesim_node打开另一个终端并运行:
$ ros2 run turtlesim turtle_teleop_key同样,创建一个新目录来存放录制文件,这是一个好习惯:
$ mkdir bag_files$ cd bag_files2 选择一个话题
Section titled “2 选择一个话题”ros2 bag 可以录制发布到话题上的消息数据。要查看系统中的话题列表,打开一个新终端并运行以下命令:
$ ros2 topic list/parameter_events/rosout/turtle1/cmd_vel/turtle1/color_sensor/turtle1/pose在话题教程中,你已经了解到 /turtle_teleop 节点在 /turtle1/cmd_vel 话题上发布命令来移动 turtlesim 中的海龟。
要查看 /turtle1/cmd_vel 正在发布的数据,运行以下命令:
$ ros2 topic echo /turtle1/cmd_vel起初不会有任何输出,因为 teleop 还没有发布数据。回到运行 teleop 的终端并选中它使其处于活动状态。使用方向键移动海龟,你会看到运行 ros2 topic echo 的终端上有数据发布出来。
linear: x: 2.0 y: 0.0 z: 0.0angular: x: 0.0 y: 0.0 z: 0.0 ---3 录制话题
Section titled “3 录制话题”3.1 录制单个话题
Section titled “3.1 录制单个话题”使用以下命令语法来录制发布到某个话题的数据:
$ ros2 bag record --topics <topic_name>在你选定的话题上运行此命令之前,打开一个新终端并进入之前创建的 bag_files 目录,因为 rosbag 文件会保存在运行命令时所在的目录中。
运行以下命令:
$ ros2 bag record --topics /turtle1/cmd_vel[INFO] [rosbag2_storage]: Opened database 'rosbag2_2019_10_11-05_18_45'.[INFO] [rosbag2_transport]: Listening for topics...[INFO] [rosbag2_transport]: Subscribed to topic '/turtle1/cmd_vel'[INFO] [rosbag2_transport]: All requested topics are subscribed. Stopping discovery...现在 ros2 bag 正在录制 /turtle1/cmd_vel 话题上发布的数据。回到 teleop 终端再次移动海龟。移动方式不重要,但尽量做一个有辨识度的轨迹,以便稍后回放数据时能够观察。
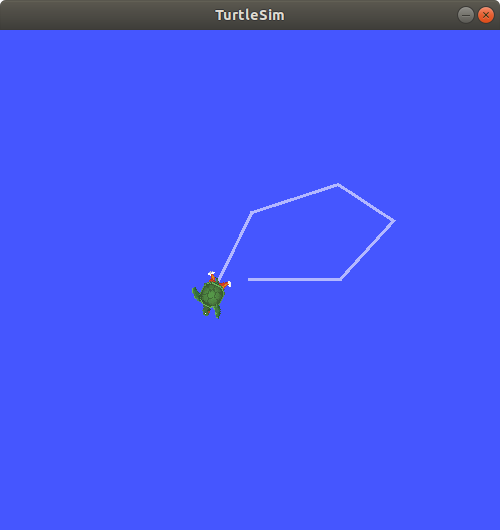
按下 Ctrl+C 停止录制。
数据将累积保存在一个新的 bag 目录中,目录名称格式为 rosbag2_year_month_day-hour_minute_second。该目录将包含一个 metadata.yaml 文件以及录制格式的 bag 文件。
3.2 录制多个话题
Section titled “3.2 录制多个话题”你也可以同时录制多个话题,并更改 ros2 bag 保存的 bag 目录名称。
运行以下命令:
$ ros2 bag record -o subset --topics /turtle1/cmd_vel /turtle1/pose[INFO] [rosbag2_storage]: Opened database 'subset'.[INFO] [rosbag2_transport]: Listening for topics...[INFO] [rosbag2_transport]: Subscribed to topic '/turtle1/cmd_vel'[INFO] [rosbag2_transport]: Subscribed to topic '/turtle1/pose'[INFO] [rosbag2_transport]: All requested topics are subscribed. Stopping discovery...-o 选项允许你为 bag 目录选择一个唯一的名称。紧随其后的字符串(本例中为 subset)就是 bag 目录名。
要同时录制多个话题,只需在 --topics 后面用空格分隔列出每个话题即可。上方的命令输出确认了两个话题都在被录制。
你可以移动海龟,完成后按下 Ctrl+C。
注意:你还可以在命令中添加
-a选项,录制系统中的所有话题。
3.3 将录制拆分为多个文件
Section titled “3.3 将录制拆分为多个文件”你还可以根据录制时长或文件大小将录制拆分为多个文件。-d <max_bag_duration> 确保每个文件只持续 <max_bag_duration> 秒,然后开始写入新文件;-b <max_bag_size> 确保每个文件的大小不超过 <max_bag_size> 字节。这样可以防止文件过大而难以管理,并且在录制中途损坏时也能避免丢失全部数据。
至少运行 15 秒,以生成三个 5 秒的 bag 文件:
$ ros2 bag record -o subset_split -d 5 --topics /turtle1/cmd_vel /turtle1/pose[INFO] [rosbag2_recorder]: Press SPACE for pausing/resuming[INFO] [rosbag2_recorder]: Listening for topics...[INFO] [rosbag2_recorder]: Event publisher thread: Starting[INFO] [rosbag2_recorder]: Recording...[INFO] [rosbag2_recorder]: Subscribed to topic '/turtle1/cmd_vel'[INFO] [rosbag2_recorder]: Subscribed to topic '/turtle1/pose'[INFO] [rosbag2_recorder]: All requested topics are subscribed. Stopping discovery...[INFO] [rosbag2_cpp]: Writing remaining messages from cache to the bag. It may take a while[INFO] [rosbag2_cpp]: Writing remaining messages from cache to the bag. It may take a while[INFO] [rosbag2_cpp]: Writing remaining messages from cache to the bag. It may take a while完成后按下 Ctrl+C。你应该会找到一个 subset_split 目录,里面包含这些文件:0_subset_split_YYYY_MM_DD-HH_MM_SS.mcap、1_subset_split_YYYY_MM_DD-HH_MM_SS.mcap,以此类推。
4 检查话题数据
Section titled “4 检查话题数据”你可以通过运行以下命令查看录制的详细信息:
$ ros2 bag info <bag_name>对 subset bag 录制运行此命令,将返回以下信息:
$ ros2 bag info subsetFiles: subset_0.mcapBag size: 228.5 KiBStorage id: mcapROS Distro: rollingDuration: 48.47sStart: Oct 11 2019 06:09:09.12 (1570799349.12)End Oct 11 2019 06:09:57.60 (1570799397.60)Messages: 3013Topic information: Topic: /turtle1/cmd_vel | Type: geometry_msgs/msg/Twist | Count: 9 | Serialization Format: cdr Topic: /turtle1/pose | Type: turtlesim_msgs/msg/Pose | Count: 3004 | Serialization Format: cdrServices: 0Service information:Actions: 0Action information:或者,你也可以对单个文件调用 ros2 bag info,例如 subset_split/0_subset_split_YYYY_MM_DD-HH_MM_SS.mcap,它只会显示该部分录制的信息——本例中即前 5 秒。
5 回放话题数据
Section titled “5 回放话题数据”5.1 回放单个 bag
Section titled “5.1 回放单个 bag”在回放 bag 之前,在运行 teleop 的终端中按下 Ctrl+C。然后确保 turtlesim 窗口可见,以便看到 bag 文件的运行效果。
输入以下命令:
$ ros2 bag play subset[INFO] [rosbag2_player]: Set rate to 1[INFO] [rosbag2_player]: Adding keyboard callbacks.[INFO] [rosbag2_player]: Press SPACE for Pause/Resume[INFO] [rosbag2_player]: Press CURSOR_RIGHT for Play Next Message[INFO] [rosbag2_player]: Press CURSOR_UP for Increase Rate 10%[INFO] [rosbag2_player]: Press CURSOR_DOWN for Decrease Rate 10%Progress bar enabled at 3 Hz.Progress bar [?]: [R]unning, [P]aused, [B]urst, [D]elayed, [S]topped[INFO] [rosbag2_player]: Playback until timestamp: -1

====== Playback Progress ======[1751923361.427372456] Duration 0.00/48.47 [R]
你的海龟将沿着录制时输入的路径移动(虽然不是 100% 精确,因为 turtlesim 对系统时序的微小变化很敏感)。
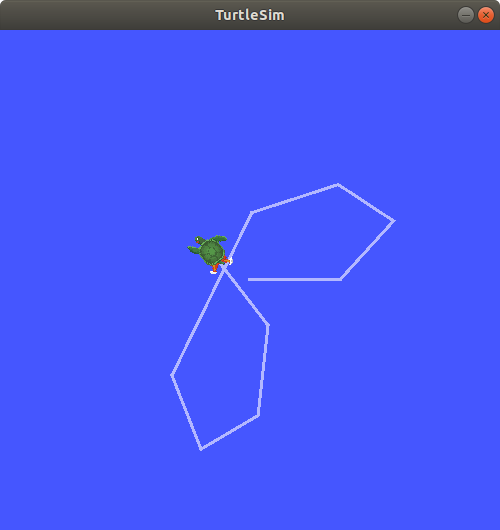
因为 subset 文件录制了 /turtle1/pose 话题,所以只要 turtlesim 还在运行,ros2 bag play 命令就不会退出,即使你没有在移动海龟。
这是因为只要 /turtlesim 节点处于活动状态,它就会定期在 /turtle1/pose 话题上发布数据。你可能已经注意到,在上面的 ros2 bag info 示例结果中,/turtle1/cmd_vel 话题的 Count 只有 9——那就是我们录制时按下方向键的次数。
注意 /turtle1/pose 的 Count 值超过 3000——在我们录制期间,该话题上发布了 3000 多次数据。
要了解位置数据发布的频率,可以运行以下命令:
$ ros2 topic hz /turtle1/pose5.2 回放多个 bag
Section titled “5.2 回放多个 bag”有时,将需要录制的话题分散到多个录制会话中是合理的,相当于分担录制的工作负载。例如,我们可以分别将 /turtle1/cmd_vel 和 /turtle1/pose 录制到各自的 bag 中。
打开两个终端。在第一个终端中,运行以下命令:
$ ros2 bag record -o subset_cmd_vel --topics /turtle1/cmd_vel在第二个终端中,运行以下命令:
$ ros2 bag record -o subset_pose --topics /turtle1/pose像之前一样移动海龟,完成后用 Ctrl+C 结束两个录制。
要让这两个录制以正确的时序并行回放,对每个要包含的 bag 调用 ros2 bag play 并使用 -i <bag_name> 参数。在本例中,运行:
$ ros2 bag play -i subset_cmd_vel -i subset_pose这将同时播放 subset_cmd_vel 和 subset_pose 录制,回放同步以重现原始消息顺序。如果使用可选参数 --message-order {received,sent},则决定消息是按照接收时间还是发布时间排序(默认为 received)。该参数同样适用于单个 bag 的播放。
管理服务数据
Section titled “管理服务数据”1 准备工作
Section titled “1 准备工作”你将录制 introspection_client 和 introspection_service 之间的服务数据,然后显示并回放同样的数据。要录制服务客户端和服务端之间的服务数据,必须在节点上启用 Service Introspection。
让我们启动 introspection_client 和 introspection_service 节点并启用 Service Introspection。你可以在 Service Introspection 示例中查看更多详细信息。
打开一个新终端并运行 introspection_service,启用 Service Introspection:
$ ros2 run demo_nodes_cpp introspection_service --ros-args -p service_configure_introspection:=contents打开另一个终端并运行 introspection_client,启用 Service Introspection:
$ ros2 run demo_nodes_cpp introspection_client --ros-args -p client_configure_introspection:=contents2 检查服务可用性
Section titled “2 检查服务可用性”ros2 bag 只能录制可用服务的数据。要查看系统中的服务列表,打开一个新终端并运行以下命令:
$ ros2 service list/add_two_ints/introspection_client/describe_parameters/introspection_client/get_parameter_types/introspection_client/get_parameters/introspection_client/get_type_description/introspection_client/list_parameters/introspection_client/set_parameters/introspection_client/set_parameters_atomically/introspection_service/describe_parameters/introspection_service/get_parameter_types/introspection_service/get_parameters/introspection_service/get_type_description/introspection_service/list_parameters/introspection_service/set_parameters/introspection_service/set_parameters_atomically要检查客户端和服务端上是否启用了 Service Introspection,运行以下命令:
$ ros2 service echo --flow-style /add_two_intsinfo: event_type: REQUEST_SENT stamp: sec: 1713995389 nanosec: 386809259 client_gid: [1, 15, 96, 219, 162, 1, 108, 201, 0, 0, 0, 0, 0, 0, 21, 3] sequence_number: 133request: [{a: 2, b: 3}]response: []---你应该能看到服务通信。
3 录制服务
Section titled “3 录制服务”录制服务数据支持以下选项。服务数据可以与话题同时录制。
录制特定服务:
$ ros2 bag record --service <service_names>录制所有服务:
$ ros2 bag record --all-services运行以下命令:
$ ros2 bag record --service /add_two_ints[INFO] [1713995957.643573503] [rosbag2_recorder]: Press SPACE for pausing/resuming[INFO] [1713995957.662067587] [rosbag2_recorder]: Event publisher thread: Starting[INFO] [1713995957.662067614] [rosbag2_recorder]: Listening for topics...[INFO] [1713995957.666048323] [rosbag2_recorder]: Subscribed to topic '/add_two_ints/_service_event'[INFO] [1713995957.666092458] [rosbag2_recorder]: Recording...现在 ros2 bag 正在录制 /add_two_ints 服务上发布的通信数据。要停止录制,在该终端中按下 Ctrl+C。
数据将累积保存在一个新的 bag 目录中,目录名称格式为 rosbag2_year_month_day-hour_minute_second。该目录将包含一个 metadata.yaml 文件以及录制格式的 bag 文件。
4 检查服务数据
Section titled “4 检查服务数据”你可以通过运行以下命令查看录制的详细信息:
$ ros2 bag info <bag_file_name>Files: rosbag2_2024_04_24-14_59_17_0.mcapBag size: 15.1 KiBStorage id: mcapROS Distro: rollingDuration: 9.211sStart: Apr 24 2024 14:59:17.676 (1713995957.676)End: Apr 24 2024 14:59:26.888 (1713995966.888)Messages: 0Topic information:Service: 1Service information: Service: /add_two_ints | Type: example_interfaces/srv/AddTwoInts | Event Count: 78 | Serialization Format: cdr5 回放服务数据
Section titled “5 回放服务数据”在回放 bag 文件之前,在运行 introspection_client 的终端中按下 Ctrl+C。当 introspection_client 停止运行时,introspection_service 也会停止打印结果,因为没有传入的请求。
从 bag 文件回放服务数据将开始向 introspection_service 发送请求。
输入以下命令:
$ ros2 bag play --publish-service-requests <bag_file_name>[INFO] [1713997477.870856190] [rosbag2_player]: Set rate to 1[INFO] [1713997477.877417477] [rosbag2_player]: Adding keyboard callbacks.[INFO] [1713997477.877442404] [rosbag2_player]: Press SPACE for Pause/Resume[INFO] [1713997477.877447855] [rosbag2_player]: Press CURSOR_RIGHT for Play Next Message[INFO] [1713997477.877452655] [rosbag2_player]: Press CURSOR_UP for Increase Rate 10%[INFO] [1713997477.877456954] [rosbag2_player]: Press CURSOR_DOWN for Decrease Rate 10%[INFO] [1713997477.877573647] [rosbag2_player]: Playback until timestamp: -1你的 introspection_service 终端将再次开始打印以下服务消息:
[INFO] [1713997478.090466075] [introspection_service]: Incoming requesta: 2 b: 3这是因为 ros2 bag play 将 bag 文件中的服务请求数据发送到了 /add_two_ints 服务。
我们还可以在 ros2 bag play 回放时检查服务通信,以验证 introspection_service。
在 ros2 bag play 之前运行此命令以查看 introspection_service:
$ ros2 service echo --flow-style /add_two_ints你可以看到来自 bag 文件的服务请求和来自 introspection_service 的服务响应。
info: event_type: REQUEST_RECEIVED stamp: sec: 1713998176 nanosec: 372700698 client_gid: [1, 15, 96, 219, 80, 2, 158, 123, 0, 0, 0, 0, 0, 0, 20, 4] sequence_number: 1request: [{a: 2, b: 3}]response: []---info: event_type: RESPONSE_SENT stamp: sec: 1713998176 nanosec: 373016882 client_gid: [1, 15, 96, 219, 80, 2, 158, 123, 0, 0, 0, 0, 0, 0, 20, 4] sequence_number: 1request: []response: [{sum: 5}]管理动作数据
Section titled “管理动作数据”1 准备工作
Section titled “1 准备工作”你将录制 fibonacci_action_client 和 fibonacci_action_server 之间的 Action 数据,然后显示并回放同样的数据。要录制 Action 客户端与服务端之间的 Action 数据,必须在节点上启用 Action Introspection。
让我们启动 fibonacci_action_client 和 fibonacci_action_server 节点并启用 Action Introspection。你可以在 Action Introspection 示例中查看更多详细信息。
打开一个新终端并运行 fibonacci_action_server,启用 Action Introspection:
$ ros2 run action_tutorials_py fibonacci_action_server --ros-args -p action_server_configure_introspection:=contents打开另一个终端并运行 fibonacci_action_client,启用 Action Introspection:
$ ros2 run action_tutorials_cpp fibonacci_action_client --ros-args -p action_client_configure_introspection:=contents2 检查动作可用性
Section titled “2 检查动作可用性”ros2 bag 只能录制可用动作的数据。要查看系统中的动作列表,打开一个新终端并运行以下命令:
$ ros2 action list/fibonacci要检查动作上是否启用了 Action Introspection,运行以下命令:
$ ros2 action echo --flow-style /fibonacciinterface: GOAL_SERVICEinfo: event_type: REQUEST_SENT stamp: sec: 1744917904 nanosec: 760683446 client_gid: [1, 15, 165, 231, 234, 109, 65, 202, 0, 0, 0, 0, 0, 0, 19, 4] sequence_number: 1request: [{goal_id: {uuid: [81, 55, 121, 145, 81, 66, 209, 93, 214, 113, 255, 100, 120, 6, 102, 83]}, goal: {order: 10}}]response: []---...3 录制动作
Section titled “3 录制动作”录制动作数据支持以下选项。动作数据可以与话题和服务同时录制。
录制特定动作:
$ ros2 bag record --action <action_names>录制所有动作:
$ ros2 bag record --all-actions运行以下命令:
$ ros2 bag record --action /fibonacci[INFO] [1744953225.214114862] [rosbag2_recorder]: Press SPACE for pausing/resuming[INFO] [1744953225.218369761] [rosbag2_recorder]: Listening for topics...[INFO] [1744953225.218386223] [rosbag2_recorder]: Event publisher thread: Starting[INFO] [1744953225.218580294] [rosbag2_recorder]: Recording...[INFO] [1744953225.725417634] [rosbag2_recorder]: Subscribed to topic '/fibonacci/_action/cancel_goal/_service_event'[INFO] [1744953225.727901848] [rosbag2_recorder]: Subscribed to topic '/fibonacci/_action/feedback'[INFO] [1744953225.729655213] [rosbag2_recorder]: Subscribed to topic '/fibonacci/_action/get_result/_service_event'[INFO] [1744953225.731315612] [rosbag2_recorder]: Subscribed to topic '/fibonacci/_action/send_goal/_service_event'[INFO] [1744953225.735061252] [rosbag2_recorder]: Subscribed to topic '/fibonacci/_action/status'...现在 ros2 bag 正在录制 /fibonacci 动作的数据:goal、result 和 feedback。要停止录制,在该终端中按下 Ctrl+C。
数据将累积保存在一个新的 bag 目录中,目录名称格式为 rosbag2_year_month_day-hour_minute_second。该目录将包含一个 metadata.yaml 文件以及录制格式的 bag 文件。
4 检查动作数据
Section titled “4 检查动作数据”你可以通过运行以下命令查看录制的详细信息:
$ ros2 bag info <bag_file_name>Files: rosbag2_2025_04_17-22_20_40_0.mcapBag size: 20.7 KiBStorage id: mcapROS Distro: rollingDuration: 9.019568080sStart: Apr 17 2025 22:20:47.263125070 (1744953647.263125070)End: Apr 17 2025 22:20:56.282693150 (1744953656.282693150)Messages: 0Topic information:Services: 0Service information:Actions: 1Action information: Action: /fibonacci | Type: example_interfaces/action/Fibonacci | Topics: 2 | Service: 3 | Serialization Format: cdr Topic: feedback | Count: 9 Topic: status | Count: 3 Service: send_goal | Event Count: 4 Service: cancel_goal | Event Count: 0 Service: get_result | Event Count: 45 回放动作数据
Section titled “5 回放动作数据”在回放 bag 文件之前,在运行 fibonacci_action_client 的终端中按下 Ctrl+C。当 fibonacci_action_client 停止运行时,fibonacci_action_server 也会停止打印结果,因为没有新的请求传入。
从 bag 文件回放动作数据将开始向 fibonacci_action_server 发送请求。
输入以下命令:
$ ros2 bag play --send-actions-as-client <bag_file_name>[INFO] [1744953720.691068674] [rosbag2_player]: Set rate to 1[INFO] [1744953720.702365209] [rosbag2_player]: Adding keyboard callbacks.[INFO] [1744953720.702409447] [rosbag2_player]: Press SPACE for Pause/Resume[INFO] [1744953720.702423063] [rosbag2_player]: Press CURSOR_RIGHT for Play Next Message[INFO] [1744953720.702431404] [rosbag2_player]: Press CURSOR_UP for Increase Rate 10%[INFO] [1744953720.702437677] [rosbag2_player]: Press CURSOR_DOWN for Decrease Rate 10%Progress bar enabled at 3 Hz.Progress bar [?]: [R]unning, [P]aused, [B]urst, [D]elayed, [S]topped[INFO] [1744953720.702577680] [rosbag2_player]: Playback until timestamp: -1

====== Playback Progress ======[1744953656.281683207] Duration 9.02/9.02 [R]
你的 fibonacci_action_server 终端将再次开始打印以下消息:
[INFO] [1744953720.815577088] [fibonacci_action_server]: Executing goal...[INFO] [1744953720.815927050] [fibonacci_action_server]: Feedback: array('i', [0, 1, 1])[INFO] [1744953721.816509658] [fibonacci_action_server]: Feedback: array('i', [0, 1, 1, 2])[INFO] [1744953722.817220270] [fibonacci_action_server]: Feedback: array('i', [0, 1, 1, 2, 3])[INFO] [1744953723.817876426] [fibonacci_action_server]: Feedback: array('i', [0, 1, 1, 2, 3, 5])[INFO] [1744953724.818498515] [fibonacci_action_server]: Feedback: array('i', [0, 1, 1, 2, 3, 5, 8])[INFO] [1744953725.819182228] [fibonacci_action_server]: Feedback: array('i', [0, 1, 1, 2, 3, 5, 8, 13])[INFO] [1744953726.820032562] [fibonacci_action_server]: Feedback: array('i', [0, 1, 1, 2, 3, 5, 8, 13, 21])[INFO] [1744953727.820738690] [fibonacci_action_server]: Feedback: array('i', [0, 1, 1, 2, 3, 5, 8, 13, 21, 34])[INFO] [1744953728.821449308] [fibonacci_action_server]: Feedback: array('i', [0, 1, 1, 2, 3, 5, 8, 13, 21, 34, 55])这是因为 ros2 bag play 将 bag 文件中的 Action goal 请求数据发送到了 /fibonacci 动作。
我们还可以在 ros2 bag play 回放时检查 Action 通信,以验证 fibonacci_action_server。
在 ros2 bag play 之前运行此命令以查看 fibonacci_action_server。你可以看到来自 bag 文件的 Action goal 请求和来自 fibonacci_action_server 的响应:
$ ros2 action echo --flow-style /fibonacciinterface: STATUS_TOPICstatus_list: [{goal_info: {goal_id: {uuid: [34, 116, 225, 217, 48, 121, 146, 36, 240, 98, 99, 134, 55, 227, 184, 72]}, stamp: {sec: 1744953720, nanosec: 804984321}}, status: 4}]---interface: GOAL_SERVICEinfo: event_type: REQUEST_RECEIVED stamp: sec: 1744953927 nanosec: 957359210 client_gid: [1, 15, 165, 231, 190, 254, 1, 50, 0, 0, 0, 0, 0, 0, 19, 4] sequence_number: 1request: [{goal_id: {uuid: [191, 200, 153, 122, 221, 251, 152, 172, 60, 69, 94, 20, 212, 160, 40, 12]}, goal: {order: 10}}]response: []---interface: GOAL_SERVICEinfo: event_type: RESPONSE_SENT stamp: sec: 1744953927 nanosec: 957726145 client_gid: [1, 15, 165, 231, 190, 254, 1, 50, 0, 0, 0, 0, 0, 0, 19, 4] sequence_number: 1request: []response: [{accepted: true, stamp: {sec: 1744953927, nanosec: 957615866}}]---interface: STATUS_TOPICstatus_list: [{goal_info: {goal_id: {uuid: [191, 200, 153, 122, 221, 251, 152, 172, 60, 69, 94, 20, 212, 160, 40, 12]}, stamp: {sec: 1744953927, nanosec: 957663383}}, status: 2}]---interface: FEEDBACK_TOPICgoal_id: uuid: [191, 200, 153, 122, 221, 251, 152, 172, 60, 69, 94, 20, 212, 160, 40, 12]feedback: sequence: [0, 1, 1]---...你可以使用 ros2 bag 命令录制 ROS 2 系统中通过话题、服务和动作传输的数据。无论是与他人分享你的工作成果,还是内省自己的实验,它都是一个值得了解的出色工具。
你已完成”初级:CLI 工具”教程!下一步是学习”初级:客户端库”教程,从创建工作空间开始。
关于 ros2 bag 的更详细说明可以在 rosbag2 的 README 中找到。关于服务录制和回放的更多信息可以在 设计文档 中找到。关于动作录制和回放的更多信息可以在 设计文档 中找到。关于 QoS 兼容性和 ros2 bag 的更多信息,请参阅 Overriding QoS Policies For Recording And Playback。
tf2 入门
Section titled “tf2 入门”目标: 运行一个 turtlesim 示例,在一个使用 turtlesim 的多机器人示例中体验 tf2 的强大功能。
教程级别: 中级
预计用时: 10 分钟
首先安装示例包及其依赖。
$ sudo apt-get install ros-{DISTRO}-rviz2 ros-{DISTRO}-turtle-tf2-py ros-{DISTRO}-tf2-ros ros-{DISTRO}-tf2-tools ros-{DISTRO}-turtlesim现在我们已经安装了 turtle_tf2_py 教程包,让我们运行示例。首先,打开一个新终端并 source 你的 ROS 2 安装,使 ros2 命令可用。然后运行以下命令:
$ ros2 launch turtle_tf2_py turtle_tf2_demo.launch.py你将看到 turtlesim 启动并显示两只海龟。

在第二个终端窗口中输入以下命令:
$ ros2 run turtlesim turtle_teleop_keyturtlesim 启动后,你可以使用键盘方向键驱动 turtlesim 中的中心海龟移动。选中第二个终端窗口,以便捕获你的按键来驱动海龟。
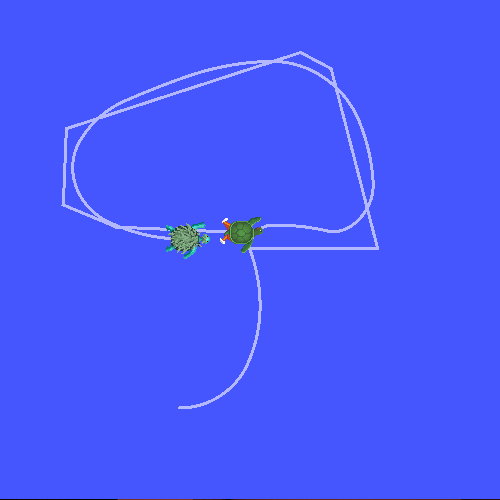
你可以看到一只海龟持续移动,以跟随你正在驱动的海龟。
发生了什么?
Section titled “发生了什么?”此示例使用 tf2 库创建了三个坐标系(coordinate frame):一个 world 坐标系、一个 turtle1 坐标系和一个 turtle2 坐标系。本教程使用一个 tf2 broadcaster(广播器)来发布海龟坐标系,并使用一个 tf2 listener(监听器)来计算海龟坐标系之间的差异,从而移动一只海龟来跟随另一只。
tf2 工具
Section titled “tf2 工具”现在让我们看看 tf2 是如何被用于创建此示例的。我们可以使用 tf2_tools 来查看 tf2 在幕后做了什么。
1 使用 view_frames
Section titled “1 使用 view_frames”view_frames 会创建一张 tf2 通过 ROS 广播的坐标系关系图。注意此工具仅适用于 Linux;如果你使用的是 Windows,请跳到下面的”使用 tf2_echo”部分。
$ ros2 run tf2_tools view_framesListening to tf data during 5 seconds...Generating graph in frames.pdf file...这里一个 tf2 listener 正在监听通过 ROS 广播的坐标系,并绘制一张坐标系之间连接关系的树状图。要查看这棵树,用你喜欢的 PDF 阅读器打开生成的 frames.pdf。
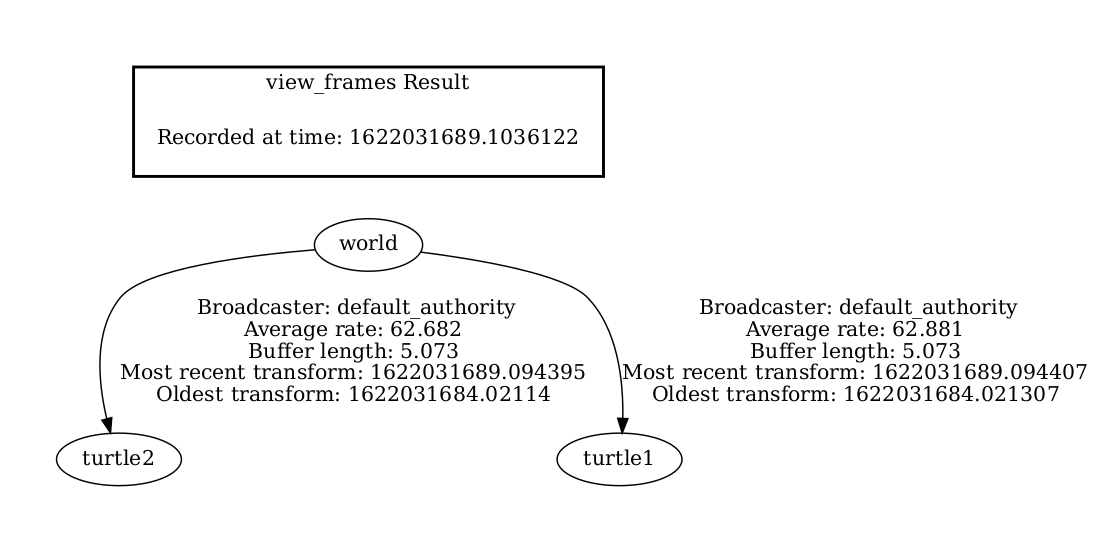
这里我们可以看到 tf2 广播的三个坐标系:world、turtle1 和 turtle2。world 坐标系是 turtle1 和 turtle2 坐标系的父坐标系。view_frames 还报告了一些诊断信息,包括最早和最近的坐标系变换接收时间以及 tf2 坐标系的发布频率,用于调试目的。
2 使用 tf2_echo
Section titled “2 使用 tf2_echo”tf2_echo 报告通过 ROS 广播的任意两个坐标系之间的变换。
用法:
$ ros2 run tf2_ros tf2_echo [source_frame] [target_frame]让我们查看 turtle2 坐标系相对于 turtle1 坐标系的变换,相当于:
$ ros2 run tf2_ros tf2_echo turtle2 turtle1At time 1683385337.850619099- Translation: [2.157, 0.901, 0.000]- Rotation: in Quaternion [0.000, 0.000, 0.172, 0.985]- Rotation: in RPY (radian) [0.000, -0.000, 0.345]- Rotation: in RPY (degree) [0.000, -0.000, 19.760]- Matrix: 0.941 -0.338 0.000 2.157 0.338 0.941 0.000 0.901 0.000 0.000 1.000 0.000 0.000 0.000 0.000 1.000At time 1683385338.841997774- Translation: [1.256, 0.216, 0.000]- Rotation: in Quaternion [0.000, 0.000, -0.016, 1.000]- Rotation: in RPY (radian) [0.000, 0.000, -0.032]- Rotation: in RPY (degree) [0.000, 0.000, -1.839]- Matrix: 0.999 0.032 0.000 1.256 -0.032 0.999 -0.000 0.216 -0.000 0.000 1.000 0.000 0.000 0.000 0.000 1.000随着 tf2_echo listener 接收通过 ROS 2 广播的坐标系,你将看到变换被显示出来。当你驱动海龟移动时,随着两只海龟相对位置的变化,你会看到变换值也随之变化。
rviz2 与 tf2
Section titled “rviz2 与 tf2”rviz2 是一个可视化工具,非常适合用于检查 tf2 坐标系。让我们使用 rviz2 查看我们的海龟坐标系,通过 -d 选项以配置文件启动它:
$ ros2 run rviz2 rviz2 -d $(ros2 pkg prefix --share turtle_tf2_py)/rviz/turtle_rviz.rviz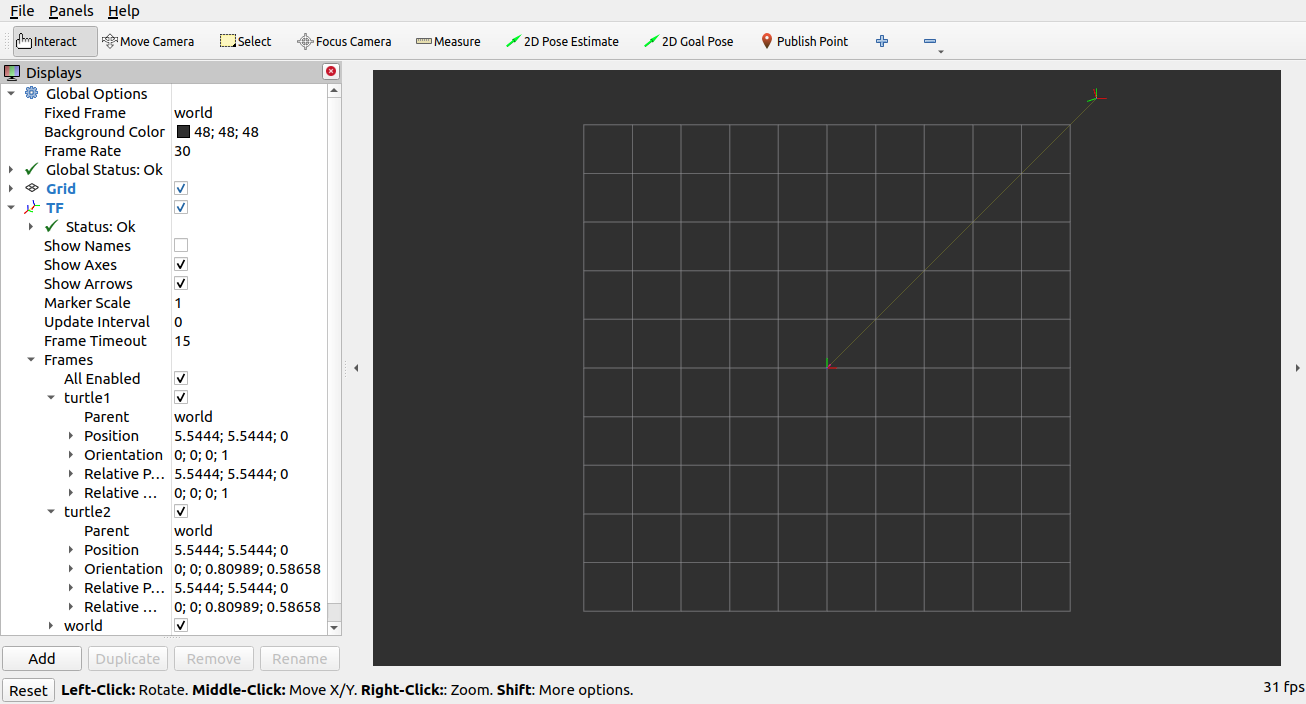
在侧边栏中你将看到 tf2 广播的坐标系。当你驱动海龟移动时,你会看到 rviz 中的坐标系也随之移动。
Quaternion 基础
Section titled “Quaternion 基础”目标: 学习在 ROS 2 中使用 quaternion(四元数)的基础知识。
教程级别: 中级
预计用时: 10 分钟
Quaternion(四元数)是一种用 4 元组表示方向(orientation)的方法,比旋转矩阵更简洁。在涉及三维旋转的场景中,四元数非常高效。四元数被广泛应用于机器人学、量子力学、计算机视觉和 3D 动画中。
你可以在 Wikipedia 上了解更多底层数学概念。你也可以观看由 3blue1brown 制作的探索性视频系列 Visualizing quaternions。
在本教程中,你将学习四元数及其转换方法在 ROS 2 中是如何工作的。
你可以了解一些库,如 transforms3d、scipy.spatial.transform、pytransform3d、numpy-quaternion 或 blender.mathutils。
不过这不是硬性要求,你可以使用任何最适合你的几何变换库。
四元数的分量
Section titled “四元数的分量”ROS 2 使用四元数来跟踪和应用旋转。一个四元数有 4 个分量 (x, y, z, w)。在 ROS 2 中,w 在最后,但在某些库(如 Eigen)中,w 可以放在第一位。常用的单位四元数——不产生绕 x/y/z 轴旋转的四元数——是 (0, 0, 0, 1),可以通过以下方式创建:
#include <tf2/LinearMath/Quaternion.hpp>...
tf2::Quaternion q;// Create a quaternion from roll/pitch/yaw in radians (0, 0, 0)q.setRPY(0, 0, 0);// Print the quaternion components (0, 0, 0, 1)RCLCPP_INFO(this->get_logger(), "%f %f %f %f",            q.x(), q.y(), q.z(), q.w());
四元数的模(magnitude)应始终为 1。如果数值误差导致四元数模不等于 1,ROS 2 将打印警告。为避免这些警告,需要对四元数进行归一化:
q.normalize();ROS 2 中的四元数类型
Section titled “ROS 2 中的四元数类型”ROS 2 使用两种四元数数据类型:tf2::Quaternion 及其等价类型 geometry_msgs::msg::Quaternion。要在 C++ 中进行两者之间的转换,请使用 tf2_geometry_msgs 的方法。
#include <tf2_geometry_msgs/tf2_geometry_msgs.hpp>...
tf2::Quaternion tf2_quat, tf2_quat_from_msg;tf2_quat.setRPY(roll, pitch, yaw);// Convert tf2::Quaternion to geometry_msgs::msg::Quaterniongeometry_msgs::msg::Quaternion msg_quat = tf2::toMsg(tf2_quat);
// Convert geometry_msgs::msg::Quaternion to tf2::Quaterniontf2::convert(msg_quat, tf2_quat_from_msg);// ortf2::fromMsg(msg_quat, tf2_quat_from_msg);
Python 中没有 tf2::Quaternion 的等价类型,而是使用内置的 list。
from geometry_msgs.msg import Quaternion...
# Create a list of floats, which is compatible with tf2# Quaternion methodsquat_tf = [0.0, 1.0, 0.0, 0.0]
# Convert a list to geometry_msgs.msg.Quaternionmsg_quat = Quaternion(x=quat_tf[0], y=quat_tf[1], z=quat_tf[2], w=quat_tf[3])1 先用 RPY 思考,再转换为四元数
Section titled “1 先用 RPY 思考,再转换为四元数”我们很容易想到绕轴旋转,但很难用四元数来思考。一个建议是先计算三个独立的旋转——roll(绕 X 轴)、pitch(绕 Y 轴)和 yaw(绕 Z 轴)——的目标旋转,然后再转换为四元数。
# quaternion_from_euler method is available in turtle_tf2_py/turtle_tf2_py/turtle_tf2_broadcaster.pyq = quaternion_from_euler(1.5707, 0, -1.5707)print(f'The quaternion representation is x: {q[0]} y: {q[1]} z: {q[2]} w: {q[3]}.')此方法与 Euler 角相关。应用 Euler 角有多种方式。上面描述的、ROS 2 所采用的方式称为 fixed(或 static)frame RPY。这意味着三个独立旋转应用于原始的、不移动的坐标轴。这与 relative frame 相反,后者中旋转应用于被先前旋转所变换的坐标轴。
2 应用四元数旋转
Section titled “2 应用四元数旋转”要将一个四元数的旋转应用于一个 pose,只需将该 pose 原有的四元数乘以表示所需旋转的四元数即可。此乘法的顺序很重要。
C++:
#include <tf2_geometry_msgs/tf2_geometry_msgs.hpp>...
tf2::Quaternion q_orig, q_rot, q_new;
q_orig.setRPY(0.0, 0.0, 0.0);// Rotate the previous pose by 180* about Xq_rot.setRPY(3.14159, 0.0, 0.0);q_new = q_rot * q_orig;q_new.normalize();
Python:
q_orig = quaternion_from_euler(0, 0, 0)# Rotate the previous pose by 180* about Xq_rot = quaternion_from_euler(3.14159, 0, 0)q_new = quaternion_multiply(q_rot, q_orig)3 反转四元数
Section titled “3 反转四元数”反转四元数的一种简单方法是取反 x、y 和 z 分量:
q[0] = -q[0]q[1] = -q[1]q[2] = -q[2]注意
不要将此与取反四元数的所有元素混淆。
4 相对旋转
Section titled “4 相对旋转”假设你有来自同一坐标系的两个四元数 q_1 和 q_2。你想找到将 q_1 转换为 q_2 的相对旋转 q_r,方式如下:
q_2 = q_r * q_1你可以像解矩阵方程一样求解 q_r。反转 q_1 并在两边右乘。同样,乘法顺序很重要:
q_r = q_2 * q_1_inverse以下是 Python 中获取从先前机器人 pose 到当前机器人 pose 的相对旋转的示例:
def quaternion_multiply(q0, q1):    """    Multiplies two quaternions.
    Input    :param q0: A 4 element array containing the first quaternion (q01, q11, q21, q31)    :param q1: A 4 element array containing the second quaternion (q02, q12, q22, q32)
    Output    :return: A 4 element array containing the final quaternion (q03,q13,q23,q33) in (w, x, y, z) order
    """    # Extract the values from q0    x0 = q0[0]    y0 = q0[1]    z0 = q0[2]    w0 = q0[3]
    # Extract the values from q1    x1 = q1[0]    y1 = q1[1]    z1 = q1[2]    w1 = q1[3]
    # Compute the product of the two quaternions, term by term    q0q1_w = w0 * w1 - x0 * x1 - y0 * y1 - z0 * z1    q0q1_x = w0 * x1 + x0 * w1 + y0 * z1 - z0 * y1    q0q1_y = w0 * y1 - x0 * z1 + y0 * w1 + z0 * x1    q0q1_z = w0 * z1 + x0 * y1 - y0 * x1 + z0 * w1
    # Create a 4 element array containing the final quaternion    final_quaternion = np.array([q0q1_w, q0q1_x, q0q1_y, q0q1_z])
    # Return a 4 element array containing the final quaternion (q02,q12,q22,q32)    return final_quaternion
q1_inv[0] = -prev_pose.pose.orientation.x   # Negate for inverseq1_inv[1] = -prev_pose.pose.orientation.y   # Negate for inverseq1_inv[2] = -prev_pose.pose.orientation.z   # Negate for inverseq1_inv[3] = prev_pose.pose.orientation.w
q2[0] = current_pose.pose.orientation.xq2[1] = current_pose.pose.orientation.yq2[2] = current_pose.pose.orientation.zq2[3] = current_pose.pose.orientation.w
qr = quaternion_multiply(q2, q1_inv)在本教程中,你学习了四元数的基本概念及其相关的数学操作,如反转和旋转。你还学习了它在 ROS 2 中的使用示例以及两种不同 Quaternion 类之间的转换方法。
关于 rosidl::Buffer 后端
Section titled “关于 rosidl::Buffer 后端”rosidl::Buffer<T> 是一种容器类型,用作生成的 C++ 消息中变长原始数组字段(uint8[]、float32[] 等)的内存表示。它是 std::vector<T> 的直接替代品(drop-in replacement),同时支持可插拔的内存后端,因此 uint8[] 字段的字节可以存在于 CPU 内存、GPU 内存或任何厂商提供的其他内存域中——所有这些都无需更改 .msg 文件或 ROS 2 消息管线的其余部分。
引入此特性的目的是让厂商能够通过现有的 ROS 2 pub/sub API 传输大型二进制载荷(相机图像、点云、张量等),复制次数尽可能少(取决于底层内存技术),同时保持所有将 uint8[] 字段视为 std::vector<uint8_t> 的现有代码无需更改即可工作。
为什么需要新类型
Section titled “为什么需要新类型”ROS 2 消息已有两种互补的减少拷贝的机制:
- 进程内通信(Intra-process communication):通过传递
std::unique_ptr所有权,避免同一进程内 publisher 和 subscription 之间的拷贝。 - Loaned messages:让 RMW 管理消息内存,以实现进程间的共享内存传输(适用于底层中间件可以布局的消息类型)。
当数据的来源是非 CPU 内存区域(如 GPU 渲染的图像或加速器运行时生成的张量)时,这两种机制都帮不上忙。仅仅为了满足生成的 C++ 消息类型而将此类数据拷贝到 std::vector<uint8_t> 中,就违背了在加速器上生成数据的初衷。
rosidl::Buffer 在容器层面解决了这个问题:在 .msg 文件中声明为 uint8[] 的字段在网络传输中仍然是字节数组,默认行为仍然像 std::vector<uint8_t>,但其实现是一个可插拔的 pimpl,后端可以用自己的特定内存域存储来替换它。
此特性分布在三个核心包和一组可插拔的厂商提供后端包中。
rosidl_buffer—— 定义面向用户的rosidl::Buffer<T>容器和后端子类化的rosidl::BufferImplBase<T>抽象基类。rosidl::Buffer<T>将每个操作转发给它持有的实现,并在活动后端为 CPU 时提供到std::vector<T>&的隐式转换,这正是保持向后兼容性的关键。rosidl_buffer_backend—— 定义厂商实现的rosidl::BufferBackend插件接口。该接口设计得非常小巧:通告后端的名称和描述消息类型,在发布端和接收端创建和消费描述消息,并参与端点发现。rosidl_buffer_backend_registry—— 通过pluginlib发现已安装的后端插件,并将其暴露给整个技术栈。
面向用户的容器和实现 pimpl
Section titled “面向用户的容器和实现 pimpl”┌──────────────────────────────┐│ rosidl::Buffer<T> │ (what generated messages hold)│ ┌────────────────────────┐ ││ │ BufferImplBase<T> ◄──-┼──┼── CpuBufferImpl<T> (default)│ │ (pimpl) │ │── CudaBufferImpl<T> (vendor)│ └────────────────────────┘ │── OtherBufferImpl<T> (vendor)└──────────────────────────────┘新构造的 rosidl::Buffer<T> 使用 CpuBufferImpl<T>,它简单地包装了一个 std::vector<T, Allocator>。当后端在 publisher 端分配缓冲区或在 subscriber 端从接收到的描述符重建缓冲区时,会将此实现替换为它自己的 BufferImplBase<T> 子类。
rosidl::BufferBackend 插件是 RMW 层与之交互的对象。它的本质工作是在内存中的 BufferImplBase<T> 和**描述消息(descriptor message)**之间进行转换——描述消息是一个普通的 ROS 2 .msg,描述了在接收端如何定位或重建载荷。对于仅 CPU 的后端,描述符可以直接携带字节。对于非 CPU 后端,描述符通常是一个小的引用,接收端用它来重新附加到载荷;具体机制是后端特定的。
描述消息有大小限制(rosidl::kMaxBufferDescriptorSize,4096 字节),以便 RMW 可以提前规划序列化缓冲区大小。
描述符往返与 RMW 集成
Section titled “描述符往返与 RMW 集成”当 publisher 发送包含非 CPU 后端的 rosidl::Buffer<T> 字段的消息时,RMW 会:
- 请求后端为当前对端构建描述符(
create_descriptor_with_endpoint); - 在原始
uint8[]字节的位置序列化描述符; - 在 subscriber 端,反序列化描述符并请求后端从描述符重建
BufferImplBase<T>(from_descriptor_with_endpoint)。
后端通过 on_creating_endpoint(本地)和 on_discovering_endpoint(远端)获知每个匹配的端点。它们使用这些钩子来决定给定的 pub/sub 对是否确实与后端的传输兼容。例如,CUDA 后端目前仅在接受方可以安全共享 CUDA VMM 分配时才接受对端。如果后端无法为特定对端提供服务,它从 create_descriptor_with_endpoint 返回 nullptr,RMW 将回退到该字段的普通 CPU 序列化。
RMW 无关的插件契约
Section titled “RMW 无关的插件契约”插件接口本身是 RMW 无关的。BufferBackend::get_descriptor_type_support() 返回通用的 rosidl_message_type_support_t * 聚合句柄(与 rosidl_typesupport_cpp::get_message_type_support_handle<T>() 产生的句柄相同),用于后端的描述消息类型。消费端的 RMW 在运行时将该聚合解析为它需要的具体 per-typesupport 库。当前的 rmw_fastrtps_cpp 集成将此聚合解析为 rosidl_typesupport_fastrtps_cpp,但后端 API 中没有任何内容将其绑定到特定 RMW。
后端与高层库
Section titled “后端与高层库”后端应代表一种内存介质或传输技术。示例包括基于 CUDA VMM 和 CUDA IPC 的 CUDA 后端、ROCm 后端或共享内存后端。后端知道如何分配内存、将内存打包为描述符,以及在另一端重新导入。
更高层的数据模型可以作为普通消息和库存在于这一层之上。例如,tensor_msgs/msg/ExperimentalTensor 携带与 DLPack 对齐的张量元数据(dtype、shape、strides、byte offset)外加一个 uint8[] data 字段。该 data 字段在生成的 C++ 代码中是 rosidl::Buffer<uint8_t>,因此可以通过为连接协商的后端来传输。torch_conversion 辅助库在 ExperimentalTensor 和 at::Tensor 之间进行转换;它本身不是一个 buffer 后端。当消息的数据缓冲区使用 cuda 后端时,张量字节可以通过 CUDA IPC 传输。当它使用 CPU 后端时,相同的消息和辅助 API 仍然适用于普通主机内存。
与其他 ROS 2 机制的关系
Section titled “与其他 ROS 2 机制的关系”rosidl::Buffer与进程内通信和 loaned messages 是正交的。对于给定的 pub/sub 对,后端可以实现其中之一、两者都实现或都不实现;决策完全在后端内部。- 给定的 publisher/subscriber 对是否实际能够使用非 CPU 传输(进程内、同主机进程间、跨主机等)是后端实现的属性,而非
rosidl::Buffer的属性。请参阅每个后端各自的文档以了解其支持矩阵。 .msgIDL 不会改变:之前是uint8[]的字段仍然是uint8[];只有其生成的 C++ 类型从std::vector<uint8_t>变为rosidl::Buffer<uint8_t>,而隐式转换使大多数现有代码继续工作。- 当前的 RMW 集成适用于 Topic publish/subscribe。Service 和 Action 继续使用其正常的序列化路径,不协商非 CPU 缓冲区后端。
与类型适配(Type Adaptation)的关系
Section titled “与类型适配(Type Adaptation)的关系”rosidl::Buffer 后端在生成消息的容器层运作。ROS 消息定义仍然是 Topic 类型,而选定的变长原始数组字段可以使用后端特定的存储和基于描述符的传输。
类型适配(Type adaptation)和 Isaac ROS NITROS 等系统解决的是不同的问题:它们让应用程序代码使用框架原生类型,并在 ROS 消息类型之上协商适配的表示,使用 REP 2007 和 REP 2009 等机制。这两种方法不属于同一抽象,也不是设计为相互依赖的;它们的作用域不同。当两者都有用时,它们可以在应用程序中共存。例如,一个适配的应用类型仍然可以包含或产生一个 uint8[] 字段由 rosidl::Buffer 支持的 ROS 消息。
一个实际区别是,buffer 后端对 RMW publish/subscribe 路径可见,因此后端可以提供跨进程传输支持,而类型适配只能在单个进程内工作。
- Using-Buffer-Backends —— 面向用户的指南,介绍如何为 subscription 启用 buffer 后端以及读写后端原生数据。
- Writing-a-Buffer-Backend —— 面向厂商的指南,介绍如何实现和打包新的
BufferBackend插件。 - Writing-a-Buffer-Compatible-Conversions-Package —— 关于为具有 buffer 支持的
uint8[]字段的消息创建*_conversions包的指南。 - GPU-Buffer-Transport —— 端到端示例,演练 GPU 后端的 publish/subscribe 管线。