
大型项目的 ROS2 Launch
目标: 学习使用 ROS 2 launch 文件管理大型项目的最佳实践。
教程级别: 中级
预计时间: 20 分钟
本教程介绍一些为大型项目编写 launch 文件的技巧。重点在于如何组织 launch 文件结构,使其在不同场景下尽可能复用。此外,还涵盖了 ROS 2 launch 各类工具的使用示例,包括参数、YAML 文件、重映射、命名空间、默认参数和 RViz 配置。
本教程使用 turtlesim 和 turtle_tf2_py 包。同时假设你已经创建了一个构建类型为 ament_python 的新包,名为 launch_tutorial。
机器人上的大型应用通常涉及多个相互关联的节点,每个节点都可以有大量参数。在 turtlesim 中模拟多只乌龟就是一个很好的例子。该仿真由多个 turtle 节点、世界配置以及 TF 广播器和监听器节点组成。所有节点都有大量影响其行为和外观的 ROS 参数。ROS 2 launch 文件可以让我们统一启动所有节点并设置相应参数。
在本教程结束时,你将在 launch_tutorial 包中构建 launch_turtlesim_launch launch 文件。该 launch 文件会启动两个 turtlesim 仿真所需的各种节点(包括 TF 广播器和监听器),加载参数并启动 RViz 配置。我们将逐步讲解该 launch 文件及其用到的所有相关功能。
注意:Launch 文件可以用 XML、YAML 或 Python 格式编写。本教程以选项卡形式展示三种格式的 launch 文件。你可以选择自己喜欢的格式——它们在功能上是等价的。当你看到文件名
launch_turtlesim_launch时,请确保为你的 launch 文件类型使用正确的文件扩展名(例如 Python 用launch_turtlesim_launch.py,XML 用launch_turtlesim_launch.xml,YAML 用launch_turtlesim_launch.yaml)。
编写 launch 文件
Section titled “编写 launch 文件”1 顶层组织
Section titled “1 顶层组织”编写 launch 文件的目标之一是尽可能提高复用性。可以将相关节点和配置聚合到单独的 launch 文件中,再编写一个专用于特定配置的顶层 launch 文件。这样,在同类型机器人之间迁移时无需修改任何 launch 文件;即使是从真实机器人切换到仿真环境,也只需少量修改即可。
下面我们来看顶层 launch 文件的结构是如何实现这一点的。首先创建一个调用各个独立 launch 文件的顶层文件。为此,在 launch_tutorial 包的 /launch 文件夹中创建 launch_turtlesim_launch 文件。
注意:早期版本的 launch 系统可能不支持
include语句中的let,而需要使用arg。语法相同:name和value属性保持不变(例如<arg name="target_frame" value="carrot1" />)。
XML — 将完整代码复制粘贴到 launch/launch_turtlesim_launch.xml 文件中:
<?xml version="1.0" encoding="UTF-8"?><launch> <include file="$(find-pkg-share launch_tutorial)/launch/turtlesim_world_1_launch.xml" /> <include file="$(find-pkg-share launch_tutorial)/launch/turtlesim_world_2_launch.xml" /> <include file="$(find-pkg-share launch_tutorial)/launch/broadcaster_listener_launch.xml"> <let name="target_frame" value="carrot1" /> </include> <include file="$(find-pkg-share launch_tutorial)/launch/mimic_launch.xml" /> <include file="$(find-pkg-share launch_tutorial)/launch/fixed_broadcaster_launch.xml" /> <include file="$(find-pkg-share launch_tutorial)/launch/turtlesim_rviz_launch.xml" /></launch>YAML — 将完整代码复制粘贴到 launch/launch_turtlesim_launch.yaml 文件中:
%YAML 1.2---launch: - include: file: "$(find-pkg-share launch_tutorial)/launch/turtlesim_world_1_launch.yaml" - include: file: "$(find-pkg-share launch_tutorial)/launch/turtlesim_world_2_launch.yaml" - include: file: "$(find-pkg-share launch_tutorial)/launch/broadcaster_listener_launch.yaml" let: - name: "target_frame" value: "carrot1" - include: file: "$(find-pkg-share launch_tutorial)/launch/mimic_launch.yaml" - include: file: "$(find-pkg-share launch_tutorial)/launch/fixed_broadcaster_launch.yaml" - include: file: "$(find-pkg-share launch_tutorial)/launch/turtlesim_rviz_launch.yaml"Python — 将完整代码复制粘贴到 launch/launch_turtlesim_launch.py 文件中:
from launch import LaunchDescriptionfrom launch.actions import IncludeLaunchDescriptionfrom launch.substitutions import PathJoinSubstitutionfrom launch_ros.substitutions import FindPackageShare

def generate_launch_description():    launch_dir = PathJoinSubstitution([FindPackageShare('launch_tutorial'), 'launch'])    return LaunchDescription([        IncludeLaunchDescription(            PathJoinSubstitution([launch_dir, 'turtlesim_world_1_launch.py'])        ),        IncludeLaunchDescription(            PathJoinSubstitution([launch_dir, 'turtlesim_world_2_launch.py'])        ),        IncludeLaunchDescription(            PathJoinSubstitution([launch_dir, 'broadcaster_listener_launch.py']),            launch_arguments={'target_frame': 'carrot1'}.items()        ),        IncludeLaunchDescription(            PathJoinSubstitution([launch_dir, 'mimic_launch.py'])        ),        IncludeLaunchDescription(            PathJoinSubstitution([launch_dir, 'fixed_broadcaster_launch.py'])        ),        IncludeLaunchDescription(            PathJoinSubstitution([launch_dir, 'turtlesim_rviz_launch.py'])        ),    ])
该 launch 文件引入了一组其他 launch 文件。每个被引入的 launch 文件包含与系统某一部分相关的节点、参数以及可能的嵌套 include。具体来说,我们启动了两个 turtlesim 仿真世界、TF 广播器与监听器、mimic 节点、固定坐标系广播器和 RViz 节点。
注意:设计提示——顶层 launch 文件应该简短,主要由对各子组件的 include 以及常用参数组成。
以这种方式编写 launch 文件可以方便地替换系统的某个部分,后面会看到这一点。不过,有时出于性能等原因,某些节点或 launch 文件需要单独启动。
注意:设计提示——在决定应用程序需要多少个顶层 launch 文件时,要注意权衡利弊。
2.1 在 launch 文件中设置参数
Section titled “2.1 在 launch 文件中设置参数”我们首先编写一个启动第一个 turtlesim 仿真的 launch 文件。创建一个名为 turtlesim_world_1_launch 的新文件。
XML — 将完整代码复制粘贴到 launch/turtlesim_world_1_launch.xml 文件中:
<?xml version="1.0" encoding="UTF-8"?><launch> <arg name="background_r" default="0" /> <arg name="background_g" default="84" /> <arg name="background_b" default="122" /> <node pkg="turtlesim" exec="turtlesim_node" name="sim"> <param name="background_r" value="$(var background_r)" /> <param name="background_g" value="$(var background_g)" /> <param name="background_b" value="$(var background_b)" /> </node></launch>YAML — 将完整代码复制粘贴到 launch/turtlesim_world_1_launch.yaml 文件中:
%YAML 1.2---launch: - arg: name: "background_r" default: "0" - arg: name: "background_g" default: "84" - arg: name: "background_b" default: "122" - node: pkg: "turtlesim" exec: "turtlesim_node" name: "sim" param: - name: "background_r" value: "$(var background_r)" - name: "background_g" value: "$(var background_g)" - name: "background_b" value: "$(var background_b)"Python — 将完整代码复制粘贴到 launch/turtlesim_world_1_launch.py 文件中:
from launch import LaunchDescriptionfrom launch.actions import DeclareLaunchArgumentfrom launch.substitutions import LaunchConfigurationfrom launch_ros.actions import Node

def generate_launch_description():    return LaunchDescription([        DeclareLaunchArgument('background_r', default_value='0'),        DeclareLaunchArgument('background_g', default_value='84'),        DeclareLaunchArgument('background_b', default_value='122'),        Node(            package='turtlesim',            executable='turtlesim_node',            name='sim',            parameters=[{                'background_r': LaunchConfiguration('background_r'),                'background_g': LaunchConfiguration('background_g'),                'background_b': LaunchConfiguration('background_b'),            }]        ),    ])
该 launch 文件启动 turtlesim_node 节点(即 turtlesim 仿真),并传入仿真配置参数。
2.2 从 YAML 文件加载参数
Section titled “2.2 从 YAML 文件加载参数”在第二个 launch 文件中,我们将以不同配置启动第二个 turtlesim 仿真。现在创建 turtlesim_world_2_launch 文件。
XML — 将完整代码复制粘贴到 launch/turtlesim_world_2_launch.xml 文件中:
<?xml version="1.0" encoding="UTF-8"?><launch> <node pkg="turtlesim" exec="turtlesim_node" namespace="turtlesim2" name="sim"> <param from="$(find-pkg-share launch_tutorial)/config/turtlesim.yaml" /> </node></launch>YAML — 将完整代码复制粘贴到 launch/turtlesim_world_2_launch.yaml 文件中:
%YAML 1.2---launch: - node: pkg: "turtlesim" exec: "turtlesim_node" namespace: "turtlesim2" name: "sim" param: - from: "$(find-pkg-share launch_tutorial)/config/turtlesim.yaml"Python — 将完整代码复制粘贴到 launch/turtlesim_world_2_launch.py 文件中:
from launch import LaunchDescriptionfrom launch.substitutions import PathJoinSubstitutionfrom launch_ros.actions import Nodefrom launch_ros.substitutions import FindPackageShare

def generate_launch_description():    return LaunchDescription([        Node(            package='turtlesim',            executable='turtlesim_node',            namespace='turtlesim2',            name='sim',            parameters=[PathJoinSubstitution([                FindPackageShare('launch_tutorial'), 'config', 'turtlesim.yaml'])            ],        ),    ])
该 launch 文件同样启动 turtlesim_node,但参数值直接从 YAML 配置文件中加载。在 YAML 文件中定义参数和变量,可以方便地存储和加载大量参数。需要注意的是,这个 YAML 文件本身并不是 launch 文件,而是 turtlesim_node 的配置文件,用于设置节点参数。此外,YAML 文件还可以从当前的 ros2 param 列表中轻松导出。具体操作请参考理解参数教程。
现在在包的 /config 文件夹中创建配置文件 turtlesim.yaml,该文件将被我们的 launch 文件加载:
/turtlesim2/sim: ros__parameters: background_b: 255 background_g: 86 background_r: 150要了解更多关于参数和 YAML 文件的信息,请参考理解参数教程。
2.3 在 YAML 文件中使用通配符
Section titled “2.3 在 YAML 文件中使用通配符”有时我们需要为多个节点设置相同参数。这些节点可能有不同的命名空间或名称,但参数一致。为每个节点分别编写显式声明命名空间和节点名的 YAML 文件并不高效。解决方案是使用通配符——它可以匹配文本值中的未知字符,从而将参数应用到多个不同节点。
现在创建一个与 turtlesim_world_2_launch 类似的 turtlesim_world_3_launch 文件,在新命名空间 turtlesim3 中启动一个额外的 turtlesim_node 节点:
XML — 将完整代码复制粘贴到 launch/turtlesim_world_3_launch.xml 文件中:
<?xml version="1.0" encoding="UTF-8"?><launch> <node pkg="turtlesim" exec="turtlesim_node" namespace="turtlesim3" name="sim"> <param from="$(find-pkg-share launch_tutorial)/config/turtlesim.yaml" /> </node></launch>YAML — 将完整代码复制粘贴到 launch/turtlesim_world_3_launch.yaml 文件中:
%YAML 1.2---launch: - node: pkg: "turtlesim" exec: "turtlesim_node" namespace: "turtlesim3" name: "sim" param: - from: "$(find-pkg-share launch_tutorial)/config/turtlesim.yaml"Python — 将完整代码复制粘贴到 launch/turtlesim_world_3_launch.py 文件中:
from launch import LaunchDescriptionfrom launch.substitutions import PathJoinSubstitutionfrom launch_ros.actions import Nodefrom launch_ros.substitutions import FindPackageShare

def generate_launch_description():    return LaunchDescription([        Node(            package='turtlesim',            executable='turtlesim_node',            namespace='turtlesim3',            name='sim',            parameters=[                PathJoinSubstitution([                    FindPackageShare('launch_tutorial'), 'config', 'turtlesim.yaml']),            ],        ),    ])
然而,加载相同的 YAML 文件并不会影响第三个 turtlesim 世界的显示外观,因为其参数存储在不同的命名空间下,如下所示:
/turtlesim3/sim: background_b background_g background_r因此,与其为使用相同参数的同一节点创建新配置,不如使用通配符语法。/** 会将所有参数应用到每个节点,不受节点名和命名空间差异的影响。
现在按以下方式更新 /config 文件夹中的 turtlesim.yaml:
/**: ros__parameters: background_b: 255 background_g: 86 background_r: 150现在在主 launch 文件中引入 turtlesim_world_3_launch launch 描述。使用该配置文件后,background_b、background_g 和 background_r 参数会被设置为指定值,并应用于 turtlesim3/sim 和 turtlesim2/sim 节点。
3 命名空间
Section titled “3 命名空间”你可能已经注意到,我们在 turtlesim_world_2_launch 文件中为 turtlesim 世界定义了命名空间。唯一的命名空间使系统能够启动两个类似节点而不会产生节点名或话题名冲突。
namespace='turtlesim2',但如果 launch 文件包含大量节点,为每个节点定义命名空间会变得很繁琐。为此,可以使用 PushROSNamespace 操作为每个 launch 描述定义全局命名空间,每个嵌套节点都会自动继承该命名空间。
注意:
PushROSNamespace必须是操作列表中的第一个操作,后续操作才能应用该命名空间。
为此,首先需要从 turtlesim_world_2_launch 文件中删除 namespace='turtlesim2' 行,然后更新 launch_turtlesim_launch,将 include 语句改为以下形式:
XML:
<group> <push_ros_namespace namespace="turtlesim2" /> <include file="$(find-pkg-share launch_tutorial)/launch/turtlesim_world_2_launch.xml" /></group>YAML:
- group: - push_ros_namespace: namespace: "turtlesim2" - include: file: "$(find-pkg-share launch_tutorial)/launch/turtlesim_world_2_launch.yaml"Python:
from launch.actions import GroupActionfrom launch_ros.actions import PushROSNamespace
... GroupAction( actions=[ PushROSNamespace('turtlesim2'), IncludeLaunchDescription(PathJoinSubstitution([launch_dir, 'turtlesim_world_2_launch.py'])), ] ),这样,turtlesim_world_2_launch launch 描述中的每个节点都将具有 turtlesim2 命名空间。
4 复用节点
Section titled “4 复用节点”现在创建一个 broadcaster_listener_launch 文件。
XML — 将完整代码复制粘贴到 launch/broadcaster_listener_launch.xml 文件中:
<?xml version="1.0" encoding="UTF-8"?><launch> <arg name="target_frame" default="turtle1" description="Target frame name." /> <node pkg="turtle_tf2_py" exec="turtle_tf2_broadcaster" name="broadcaster1"> <param name="turtlename" value="turtle1" /> </node> <node pkg="turtle_tf2_py" exec="turtle_tf2_broadcaster" name="broadcaster2"> <param name="turtlename" value="turtle2" /> </node> <node pkg="turtle_tf2_py" exec="turtle_tf2_listener" name="listener"> <param name="target_frame" value="$(var target_frame)" /> </node></launch>YAML — 将完整代码复制粘贴到 launch/broadcaster_listener_launch.yaml 文件中:
%YAML 1.2---launch: - arg: name: "target_frame" default: "turtle1" description: "Target frame name." - node: pkg: "turtle_tf2_py" exec: "turtle_tf2_broadcaster" name: "broadcaster1" param: - name: "turtlename" value: "turtle1" - node: pkg: "turtle_tf2_py" exec: "turtle_tf2_broadcaster" name: "broadcaster2" param: - name: "turtlename" value: "turtle2" - node: pkg: "turtle_tf2_py" exec: "turtle_tf2_listener" name: "listener" param: - name: "target_frame" value: "$(var target_frame)"Python — 将完整代码复制粘贴到 launch/broadcaster_listener_launch.py 文件中:
from launch import LaunchDescriptionfrom launch.actions import DeclareLaunchArgumentfrom launch.substitutions import LaunchConfiguration
from launch_ros.actions import Node

def generate_launch_description():    return LaunchDescription([        DeclareLaunchArgument(            'target_frame', default_value='turtle1',            description='Target frame name.',        ),        Node(            package='turtle_tf2_py',            executable='turtle_tf2_broadcaster',            name='broadcaster1',            parameters=[                {'turtlename': 'turtle1'}            ],        ),        Node(            package='turtle_tf2_py',            executable='turtle_tf2_broadcaster',            name='broadcaster2',            parameters=[                {'turtlename': 'turtle2'}            ],        ),        Node(            package='turtle_tf2_py',            executable='turtle_tf2_listener',            name='listener',            parameters=[                {'target_frame': LaunchConfiguration('target_frame')}            ],        ),    ])
在此文件中,我们声明了默认值为 turtle1 的 target_frame launch 参数。设置默认值意味着 launch 文件可以接收外部传入的参数并转发给节点;如果未提供该参数,则使用默认值。
然后,我们在 launch 过程中两次启动 turtle_tf2_broadcaster 节点,分别使用不同的名称和参数,从而复用同一节点而不会产生冲突。
我们还启动了一个 turtle_tf2_listener 节点,并设置了上面声明的 target_frame 参数。
5 参数覆盖
Section titled “5 参数覆盖”回顾一下,我们在顶层 launch 文件中引入了 broadcaster_listener_launch 文件,并向其传递了 target_frame launch 参数,如下所示:
XML:
<include file="$(find-pkg-share launch_tutorial)/launch/broadcaster_listener_launch.xml"> <let name="target_frame" value="carrot1" /></include>YAML:
- include: file: "$(find-pkg-share launch_tutorial)/launch/broadcaster_listener_launch.yaml" let: - name: "target_frame" value: "carrot1"Python:
IncludeLaunchDescription( PathJoinSubstitution([launch_dir, 'broadcaster_listener_launch.py']), launch_arguments={'target_frame': 'carrot1'}.items()),此语法允许我们将默认目标坐标系更改为 carrot1。如果你想让 turtle2 跟随 turtle1 而不是 carrot1,只需删除传递 target_frame 参数的那行即可,target_frame 将使用其默认值 turtle1。
现在创建一个 mimic_launch 文件。
XML — 将完整代码复制粘贴到 launch/mimic_launch.xml 文件中:
<?xml version="1.0" encoding="UTF-8"?><launch> <node pkg="turtlesim" exec="mimic" name="mimic"> <remap from="/input/pose" to="/turtle2/pose" /> <remap from="/output/cmd_vel" to="/turtlesim2/turtle1/cmd_vel" /> </node></launch>YAML — 将完整代码复制粘贴到 launch/mimic_launch.yaml 文件中:
%YAML 1.2---launch: - node: pkg: "turtlesim" exec: "mimic" name: "mimic" remap: - from: "/input/pose" to: "/turtle2/pose" - from: "/output/cmd_vel" to: "/turtlesim2/turtle1/cmd_vel"Python — 将完整代码复制粘贴到 launch/mimic_launch.py 文件中:
from launch import LaunchDescriptionfrom launch_ros.actions import Node

def generate_launch_description():    return LaunchDescription([        Node(            package='turtlesim',            executable='mimic',            name='mimic',            remappings=[                ('/input/pose', '/turtle2/pose'),                ('/output/cmd_vel', '/turtlesim2/turtle1/cmd_vel'),            ]        )    ])
该 launch 文件启动 mimic 节点,它会向一个 turtlesim 发送指令使其跟随另一个 turtlesim。该节点默认从 /input/pose 话题接收目标位姿。在我们的场景中,需要将 /turtle2/pose 话题重映射到 /input/pose,同时将 /output/cmd_vel 话题重映射为 /turtlesim2/turtle1/cmd_vel。这样,turtlesim2 仿真世界中的 turtle1 将跟随初始 turtlesim 世界中的 turtle2。
7 配置文件
Section titled “7 配置文件”现在创建一个名为 turtlesim_rviz_launch 的文件。
XML — 将完整代码复制粘贴到 launch/turtlesim_rviz_launch.xml 文件中:
<?xml version="1.0" encoding="UTF-8"?><launch> <node pkg="rviz2" exec="rviz2" name="rviz2" args="-d $(find-pkg-share turtle_tf2_py)/rviz/turtle_rviz.rviz" /></launch>YAML — 将完整代码复制粘贴到 launch/turtlesim_rviz_launch.yaml 文件中:
%YAML 1.2---launch: - node: pkg: "rviz2" exec: "rviz2" name: "rviz2" args: "-d $(find-pkg-share turtle_tf2_py)/rviz/turtle_rviz.rviz"Python — 将完整代码复制粘贴到 launch/turtlesim_rviz_launch.py 文件中:
from launch import LaunchDescriptionfrom launch.substitutions import PathJoinSubstitutionfrom launch_ros.actions import Nodefrom launch_ros.substitutions import FindPackageShare

def generate_launch_description():    return LaunchDescription([        Node(            package='rviz2',            executable='rviz2',            name='rviz2',            arguments=['-d', PathJoinSubstitution([                FindPackageShare('turtle_tf2_py'), 'rviz', 'turtle_rviz.rviz'])],        ),    ])
该 launch 文件会使用 turtle_tf2_py 包中定义的配置文件启动 RViz。该 RViz 配置将设置世界坐标系、启用 TF 可视化,并以俯视图方式启动 RViz。
8 环境变量
Section titled “8 环境变量”现在在包中创建最后一个名为 fixed_broadcaster_launch 的 launch 文件。
XML — 将完整代码复制粘贴到 launch/fixed_broadcaster_launch.xml 文件中:
<?xml version="1.0" encoding="UTF-8"?><launch> <arg name="node_prefix" default="$(env USER '')_" description="prefix for node name" /> <node pkg="turtle_tf2_py" exec="fixed_frame_tf2_broadcaster" name="$(var node_prefix)fixed_broadcaster" /></launch>YAML — 将完整代码复制粘贴到 launch/fixed_broadcaster_launch.yaml 文件中:
%YAML 1.2---launch: - arg: name: "node_prefix" default: "$(env USER '')_" description: "prefix for node name" - node: pkg: "turtle_tf2_py" exec: "fixed_frame_tf2_broadcaster" name: "$(var node_prefix)fixed_broadcaster"Python — 将完整代码复制粘贴到 launch/fixed_broadcaster_launch.py 文件中:
from launch import LaunchDescriptionfrom launch.actions import DeclareLaunchArgumentfrom launch.substitutions import EnvironmentVariable, LaunchConfigurationfrom launch_ros.actions import Node

def generate_launch_description():    return LaunchDescription([        DeclareLaunchArgument(            'node_prefix',            default_value=[EnvironmentVariable('USER'), '_'],            description='prefix for node name'        ),        Node(            package='turtle_tf2_py',            executable='fixed_frame_tf2_broadcaster',            name=[LaunchConfiguration('node_prefix'), 'fixed_broadcaster'],        ),    ])
该 launch 文件展示了如何在 launch 文件中使用环境变量。环境变量可用于定义或推送命名空间,以区分不同计算机或机器人上的节点。
注意:如果你在未定义
USER环境变量的环境中运行该 launch 文件(例如在 ROS Docker 文件中),则可以将上面的环境变量引用替换为你喜欢的任何其他字符串。
运行 launch 文件
Section titled “运行 launch 文件”1 更新 setup.py
Section titled “1 更新 setup.py”打开 setup.py 并添加以下内容,以便安装 launch/ 文件夹中的 launch 文件和 config/ 文件夹中的配置文件。data_files 字段现在应如下所示:
import osfrom glob import globfrom setuptools import setup...
data_files=[      ...      (os.path.join('share', package_name, 'launch'),         glob('launch/*')),      (os.path.join('share', package_name, 'config'),         glob('config/*.yaml')),      (os.path.join('share', package_name, 'rviz'),         glob('config/*.rviz')),   ],
2 构建和运行
Section titled “2 构建和运行”要查看代码的最终效果,使用以下命令构建包并启动顶层 launch 文件:
ros2 launch launch_tutorial launch_turtlesim_launch.xml(如果你使用 YAML 格式,将 .xml 替换为 .yaml;如果使用 Python 格式,替换为 .py。)
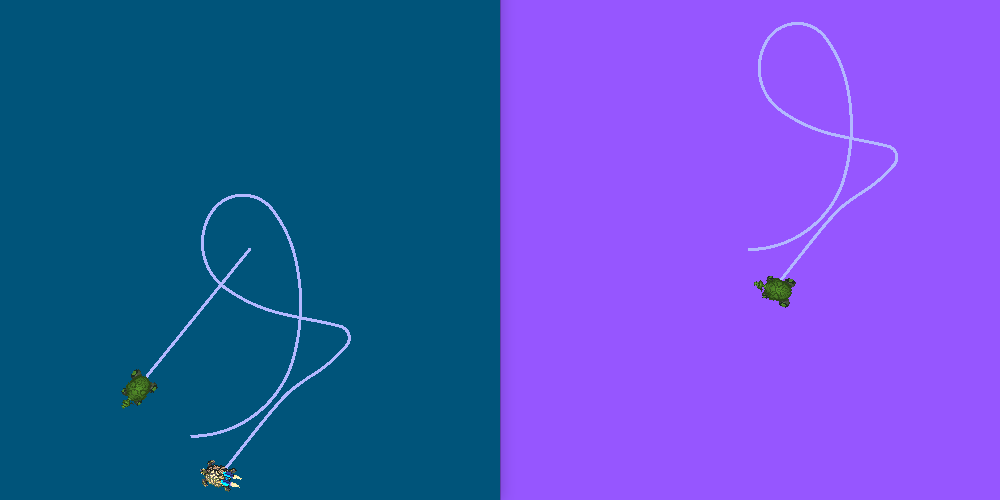
你会看到两个 turtlesim 仿真启动。第一个仿真中有两只乌龟,第二个仿真中有一只乌龟。在第一个仿真中,turtle2 出现在仿真世界的左下角,它的目标是到达 carrot1 坐标系——该坐标系相对于 turtle1 坐标系在 x 轴方向偏移五米。
第二个仿真中的 turtlesim2/turtle1 会模仿 turtle2 的行为。
如果你想控制 turtle1,可以运行 teleop 节点:
ros2 run turtlesim turtle_teleop_key你将看到类似如下的画面:
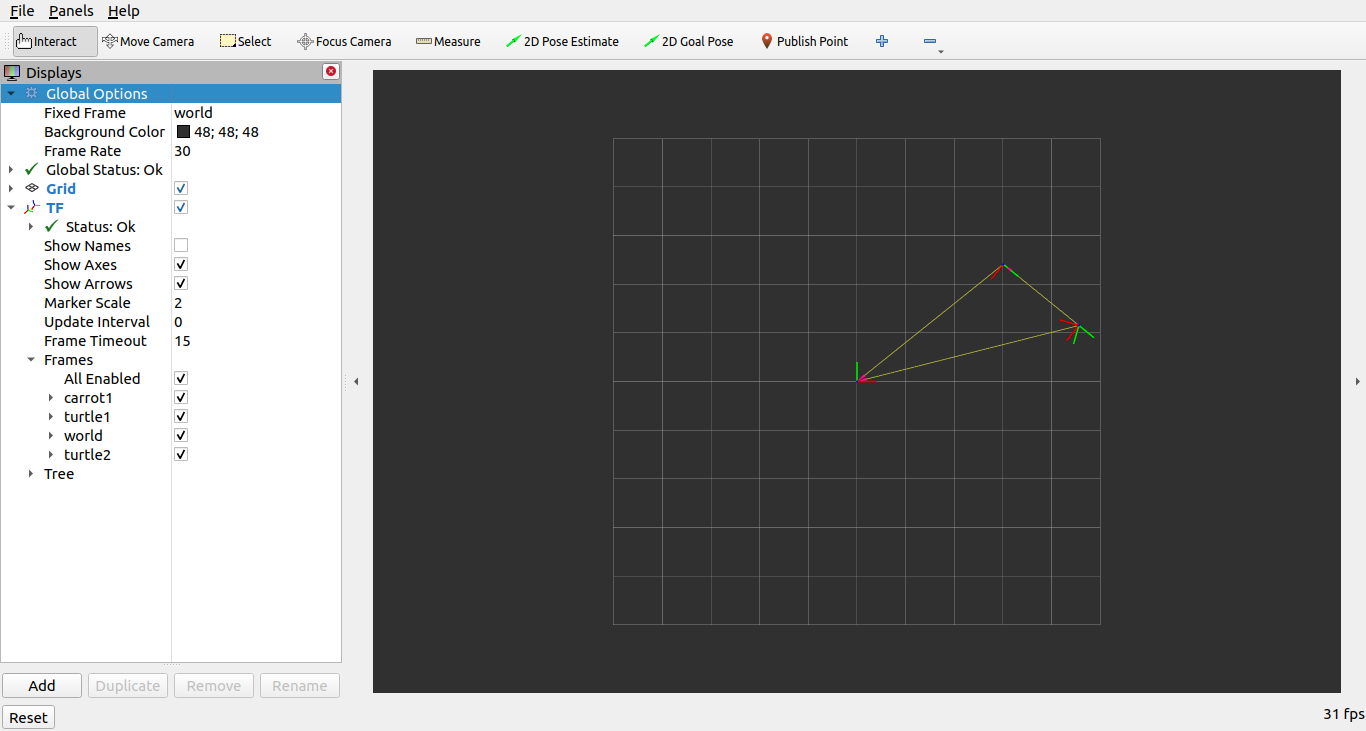
此外,RViz 也应该已经启动。它将显示所有乌龟坐标系相对于 world 坐标系的位置,其中 world 坐标系的原点位于左下角。
在本教程中,你学习了使用 ROS 2 launch 文件管理大型项目的各种技巧和实践。