
拉普拉斯算子
在本教程中,你将学到如何:
- 使用 OpenCV 函数
Laplacian()实现拉普拉斯算子(Laplacian operator)的离散形式。
-
在上一篇教程中,我们学习了如何使用 Sobel 算子(Sobel Operator)。它基于这样一个事实:在边缘区域,像素强度会出现「跃迁」或剧烈的强度变化。对强度取一阶导数后,我们观察到边缘的特征是一个极大值。
-
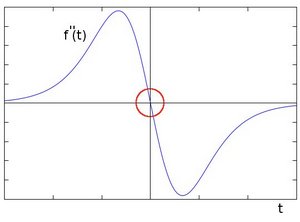
那么……如果取二阶导数会怎样?
可以观察到,在边缘处二阶导数为零!因此,我们也可以用这一准则来尝试检测图像中的边缘。但要注意,零并不只出现在边缘处(它们也可能出现在其他无意义的位置);这可以通过在需要的地方施加滤波来解决。
拉普拉斯算子
Section titled “拉普拉斯算子”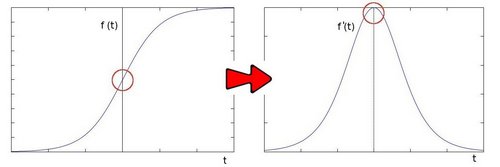
-
从上面的说明可以推断,二阶导数可以用来检测边缘。由于图像是「二维的」,我们需要在两个方向上求导。这时拉普拉斯算子就派上用场了。
-
拉普拉斯算子定义为:
- 拉普拉斯算子在 OpenCV 中由函数
Laplacian()实现。事实上,由于拉普拉斯算子要用到图像的梯度,它在内部会调用 Sobel 算子来完成计算。
本程序做什么?
- 加载一幅图像
- 通过高斯模糊去除噪声,然后把原图转换为灰度图
- 对灰度图应用拉普拉斯算子,并保存输出图像
- 在一个窗口中显示结果
C++:
本教程的代码如下所示。你也可以从 这里 下载。
/** * @file Laplace_Demo.cpp * @brief Sample code showing how to detect edges using the Laplace operator * @author OpenCV team */
#include "opencv2/imgproc.hpp"#include "opencv2/imgcodecs.hpp"#include "opencv2/highgui.hpp"
using namespace cv;
/** * @function main */int main( int argc, char** argv ){    // Declare the variables we are going to use    Mat src, src_gray, dst;    int kernel_size = 3;    int scale = 1;    int delta = 0;    int ddepth = CV_16S;    const char* window_name = "Laplace Demo";
    const char* imageName = argc >=2 ? argv[1] : "lena.jpg";
    src = imread( samples::findFile( imageName ), IMREAD_COLOR ); // Load an image
    // Check if image is loaded fine    if(src.empty()){        printf(" Error opening image\n");        printf(" Program Arguments: [image_name -- default lena.jpg] \n");        return -1;    }
    // Reduce noise by blurring with a Gaussian filter ( kernel size = 3 )    GaussianBlur( src, src, Size(3, 3), 0, 0, BORDER_DEFAULT );
    cvtColor( src, src_gray, COLOR_BGR2GRAY ); // Convert the image to grayscale
    /// Apply Laplace function    Mat abs_dst;    Laplacian( src_gray, dst, ddepth, kernel_size, scale, delta, BORDER_DEFAULT );
    // converting back to CV_8U    convertScaleAbs( dst, abs_dst );
    imshow( window_name, abs_dst );    waitKey(0);
    return 0;}
Java:
本教程的代码如下所示。你也可以从 这里 下载。
/** * @file LaplaceDemo.java * @brief Sample code showing how to detect edges using the Laplace operator */
import org.opencv.core.*;import org.opencv.highgui.HighGui;import org.opencv.imgcodecs.Imgcodecs;import org.opencv.imgproc.Imgproc;
class LaplaceDemoRun {
    public void run(String[] args) {        // Declare the variables we are going to use        Mat src, src_gray = new Mat(), dst = new Mat();        int kernel_size = 3;        int scale = 1;        int delta = 0;        int ddepth = CvType.CV_16S;        String window_name = "Laplace Demo";
        String imageName = ((args.length > 0) ? args[0] : "../data/lena.jpg");
        src = Imgcodecs.imread(imageName, Imgcodecs.IMREAD_COLOR); // Load an image
        // Check if image is loaded fine        if( src.empty() ) {            System.out.println("Error opening image");            System.out.println("Program Arguments: [image_name -- default ../data/lena.jpg] \n");            System.exit(-1);        }
        // Reduce noise by blurring with a Gaussian filter ( kernel size = 3 )        Imgproc.GaussianBlur( src, src, new Size(3, 3), 0, 0, Core.BORDER_DEFAULT );
        // Convert the image to grayscale        Imgproc.cvtColor( src, src_gray, Imgproc.COLOR_RGB2GRAY );
        /// Apply Laplace function        Mat abs_dst = new Mat();        Imgproc.Laplacian( src_gray, dst, ddepth, kernel_size, scale, delta, Core.BORDER_DEFAULT );
        // converting back to CV_8U        Core.convertScaleAbs( dst, abs_dst );
        HighGui.imshow( window_name, abs_dst );        HighGui.waitKey(0);
        System.exit(0);    }}
public class LaplaceDemo {    public static void main(String[] args) {        // Load the native library.        System.loadLibrary(Core.NATIVE_LIBRARY_NAME);        new LaplaceDemoRun().run(args);    }}
Python:
本教程的代码如下所示。你也可以从 这里 下载。
"""@file laplace_demo.py@brief Sample code showing how to detect edges using the Laplace operator"""import sysimport cv2 as cv
def main(argv):    # Declare the variables we are going to use    ddepth = cv.CV_16S    kernel_size = 3    window_name = "Laplace Demo"
    imageName = argv[0] if len(argv) > 0 else 'lena.jpg'
    src = cv.imread(cv.samples.findFile(imageName), cv.IMREAD_COLOR) # Load an image
    # Check if image is loaded fine    if src is None:        print ('Error opening image')        print ('Program Arguments: [image_name -- default lena.jpg]')        return -1
    # Remove noise by blurring with a Gaussian filter    src = cv.GaussianBlur(src, (3, 3), 0)
    # Convert the image to grayscale    src_gray = cv.cvtColor(src, cv.COLOR_BGR2GRAY)
    # Create Window    cv.namedWindow(window_name, cv.WINDOW_AUTOSIZE)
    # Apply Laplace function    dst = cv.Laplacian(src_gray, ddepth, ksize=kernel_size)
    # converting back to uint8    abs_dst = cv.convertScaleAbs(dst)
    cv.imshow(window_name, abs_dst)    cv.waitKey(0)
    return 0
if __name__ == "__main__": main(sys.argv[1:])C++:
// Declare the variables we are going to useMat src, src_gray, dst;int kernel_size = 3;int scale = 1;int delta = 0;int ddepth = CV_16S;const char* window_name = "Laplace Demo";Java:
// Declare the variables we are going to useMat src, src_gray = new Mat(), dst = new Mat();int kernel_size = 3;int scale = 1;int delta = 0;int ddepth = CvType.CV_16S;String window_name = "Laplace Demo";Python:
# Declare the variables we are going to useddepth = cv.CV_16Skernel_size = 3window_name = "Laplace Demo"C++:
const char* imageName = argc >=2 ? argv[1] : "lena.jpg";
src = imread( samples::findFile( imageName ), IMREAD_COLOR ); // Load an image
// Check if image is loaded fineif(src.empty()){    printf(" Error opening image\n");    printf(" Program Arguments: [image_name -- default lena.jpg] \n");    return -1;}
Java:
String imageName = ((args.length > 0) ? args[0] : "../data/lena.jpg");
src = Imgcodecs.imread(imageName, Imgcodecs.IMREAD_COLOR); // Load an image
// Check if image is loaded fineif( src.empty() ) {    System.out.println("Error opening image");    System.out.println("Program Arguments: [image_name -- default ../data/lena.jpg] \n");    System.exit(-1);}
Python:
imageName = argv[0] if len(argv) > 0 else 'lena.jpg'
src = cv.imread(cv.samples.findFile(imageName), cv.IMREAD_COLOR) # Load an image
# Check if image is loaded fineif src is None: print ('Error opening image') print ('Program Arguments: [image_name -- default lena.jpg]') return -1C++:
// Reduce noise by blurring with a Gaussian filter ( kernel size = 3 )GaussianBlur( src, src, Size(3, 3), 0, 0, BORDER_DEFAULT );Java:
// Reduce noise by blurring with a Gaussian filter ( kernel size = 3 )Imgproc.GaussianBlur( src, src, new Size(3, 3), 0, 0, Core.BORDER_DEFAULT );Python:
# Remove noise by blurring with a Gaussian filtersrc = cv.GaussianBlur(src, (3, 3), 0)C++:
cvtColor( src, src_gray, COLOR_BGR2GRAY ); // Convert the image to grayscaleJava:
// Convert the image to grayscaleImgproc.cvtColor( src, src_gray, Imgproc.COLOR_RGB2GRAY );Python:
# Convert the image to grayscalesrc_gray = cv.cvtColor(src, cv.COLOR_BGR2GRAY)拉普拉斯算子
Section titled “拉普拉斯算子”C++:
Laplacian( src_gray, dst, ddepth, kernel_size, scale, delta, BORDER_DEFAULT );Java:
Imgproc.Laplacian( src_gray, dst, ddepth, kernel_size, scale, delta, Core.BORDER_DEFAULT );Python:
# Apply Laplace functiondst = cv.Laplacian(src_gray, ddepth, ksize=kernel_size)- 各参数含义:
- src_gray:输入图像。
- dst:目标(输出)图像。
- ddepth:目标图像的深度。由于我们的输入是
CV_8U,我们把 ddepth 设为CV_16S以避免溢出。 - kernel_size:内部要应用的 Sobel 算子的核大小。本例中使用 3。
- scale、delta 和 BORDER_DEFAULT:保持默认值。
将输出转换为 CV_8U 图像
Section titled “将输出转换为 CV_8U 图像”C++:
// converting back to CV_8UconvertScaleAbs( dst, abs_dst );Java:
// converting back to CV_8UCore.convertScaleAbs( dst, abs_dst );Python:
# converting back to uint8abs_dst = cv.convertScaleAbs(dst)C++:
imshow( window_name, abs_dst );waitKey(0);Java:
HighGui.imshow( window_name, abs_dst );HighGui.waitKey(0);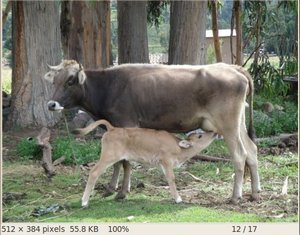
Python:
cv.imshow(window_name, abs_dst)cv.waitKey(0)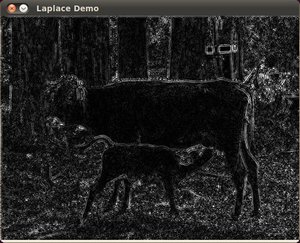
-
编译上面的代码后,我们可以把一幅图像的路径作为参数来运行它,例如传入一幅风景照片作为输入。
-
我们得到如下结果:树木和奶牛的轮廓大致都被很好地勾勒出来了(在强度非常相近的区域除外,例如奶牛头部附近)。另外要注意,树后方房屋的屋顶(右侧)被明显标出。这是因为该区域的对比度更高。