
URDF 与 Robot State Publisher (Python)
目标: 模拟一个用 URDF 建模的行走机器人,并在 RViz 中查看。
教程级别: 中级
预计用时: 15 分钟
本教程将展示如何建模一个行走机器人,将其状态以 tf2 消息的形式发布,并在 RViz 中查看仿真效果。首先,创建描述机器人组件的 URDF 模型。然后,编写一个节点来模拟运动并发布 JointState 和坐标变换。最后,使用 robot_state_publisher 将整个机器人状态发布到 /tf2。
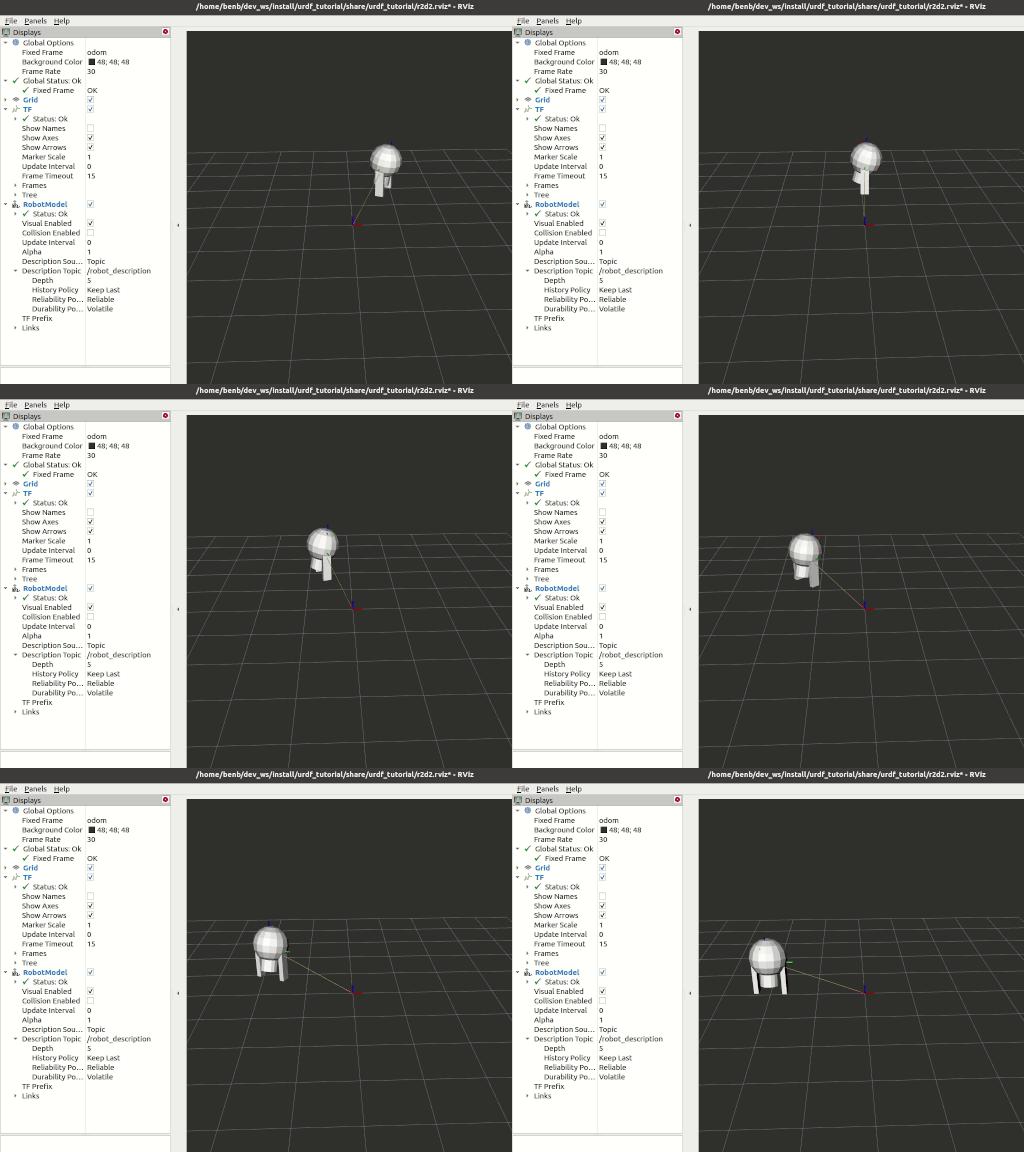
一如往常,别忘了在每个新打开的终端中 source ROS 2。
创建目录:
Linux / macOS:
mkdir -p second_ros2_ws/srcWindows:
md second_ros2_ws/src然后创建包:
cd second_ros2_ws/srcros2 pkg create --build-type ament_python --license Apache-2.0 urdf_tutorial_r2d2 --dependencies rclpycd urdf_tutorial_r2d2现在你应该能看到一个 urdf_tutorial_r2d2 文件夹,接下来需要对它进行一些修改。
2 创建 URDF 文件
Section titled “2 创建 URDF 文件”创建一个用于存储资源的目录:
Linux / macOS:
mkdir -p urdfWindows:
md urdf下载 URDF 文件 并将其保存为 second_ros2_ws/src/urdf_tutorial_r2d2/urdf/r2d2.urdf.xml。下载 RViz 配置文件 并将其保存为 second_ros2_ws/src/urdf_tutorial_r2d2/urdf/r2d2.rviz。
3 发布状态
Section titled “3 发布状态”现在需要一种方式来指定机器人的状态。为此,必须指定所有三个关节的状态以及整体里程计。
打开你喜欢的编辑器,将以下代码粘贴到 second_ros2_ws/src/urdf_tutorial_r2d2/urdf_tutorial_r2d2/state_publisher.py 中:
from math import sin, cos, piimport rclpyfrom rclpy.executors import ExternalShutdownExceptionfrom rclpy.node import Nodefrom rclpy.qos import QoSProfilefrom geometry_msgs.msg import Quaternionfrom sensor_msgs.msg import JointStatefrom tf2_ros import TransformBroadcaster, TransformStamped

class StatePublisher(Node):
    def __init__(self):        super().__init__('state_publisher')
        qos_profile = QoSProfile(depth=10)        self.joint_pub = self.create_publisher(JointState, 'joint_states', qos_profile)        self.broadcaster = TransformBroadcaster(self, qos=qos_profile)        self.timer = self.create_timer(1/30, self.update)
        self.degree = pi / 180.0
        # robot state        self.tilt = 0.        self.tinc = self.degree        self.swivel = 0.        self.angle = 0.        self.height = 0.        self.hinc = 0.005
        # message declarations        self.odom_trans = TransformStamped()        self.odom_trans.header.frame_id = 'odom'        self.odom_trans.child_frame_id = 'axis'        self.joint_state = JointState()
        self.get_logger().info("{0} started".format(self.get_name()))
    def update(self):        # update joint_state        now = self.get_clock().now()        self.joint_state.header.stamp = now.to_msg()        self.joint_state.name = ['swivel', 'tilt', 'periscope']        self.joint_state.position = [self.swivel, self.tilt, self.height]
        # update transform        # (moving in a circle with radius=2)        self.odom_trans.header.stamp = now.to_msg()        self.odom_trans.transform.translation.x = cos(self.angle)*2        self.odom_trans.transform.translation.y = sin(self.angle)*2        self.odom_trans.transform.translation.z = 0.7        self.odom_trans.transform.rotation = \            euler_to_quaternion(0, 0, self.angle + pi/2) # roll,pitch,yaw
        # send the joint state and transform        self.joint_pub.publish(self.joint_state)        self.broadcaster.sendTransform(self.odom_trans)
        # Create new robot state        self.tilt += self.tinc        if self.tilt < -0.5 or self.tilt > 0.0:            self.tinc *= -1        self.height += self.hinc        if self.height > 0.2 or self.height < 0.0:            self.hinc *= -1        self.swivel += self.degree        self.angle += self.degree/4

def euler_to_quaternion(roll, pitch, yaw):    qx = sin(roll/2) * cos(pitch/2) * cos(yaw/2) - cos(roll/2) * sin(pitch/2) * sin(yaw/2)    qy = cos(roll/2) * sin(pitch/2) * cos(yaw/2) + sin(roll/2) * cos(pitch/2) * sin(yaw/2)    qz = cos(roll/2) * cos(pitch/2) * sin(yaw/2) - sin(roll/2) * sin(pitch/2) * cos(yaw/2)    qw = cos(roll/2) * cos(pitch/2) * cos(yaw/2) + sin(roll/2) * sin(pitch/2) * sin(yaw/2)    return Quaternion(x=qx, y=qy, z=qz, w=qw)

def main():    try:        with rclpy.init():            node = StatePublisher()            rclpy.spin(node)    except (KeyboardInterrupt, ExternalShutdownException):        pass

if __name__ == '__main__':    main()
4 创建 launch 文件
Section titled “4 创建 launch 文件”创建一个新的 second_ros2_ws/src/urdf_tutorial_r2d2/launch 文件夹。打开编辑器并粘贴以下代码,保存为 second_ros2_ws/src/urdf_tutorial_r2d2/launch/demo_launch.py:
from launch import LaunchDescriptionfrom launch.actions import DeclareLaunchArgumentfrom launch.substitutions import FileContent, LaunchConfiguration, PathJoinSubstitutionfrom launch_ros.actions import Nodefrom launch_ros.substitutions import FindPackageShare

def generate_launch_description():    use_sim_time = LaunchConfiguration('use_sim_time', default='false')    urdf = FileContent(        PathJoinSubstitution([FindPackageShare('urdf_tutorial_r2d2'), 'r2d2.urdf.xml']))
    return LaunchDescription([        DeclareLaunchArgument(            'use_sim_time',            default_value='false',            description='Use simulation (Gazebo) clock if true'),        Node(            package='robot_state_publisher',            executable='robot_state_publisher',            name='robot_state_publisher',            output='screen',            parameters=[{'use_sim_time': use_sim_time, 'robot_description': urdf}],            arguments=[urdf]),        Node(            package='urdf_tutorial_r2d2',            executable='state_publisher',            name='state_publisher',            output='screen'),    ])
5 编辑 setup.py 文件
Section titled “5 编辑 setup.py 文件”需要告诉 colcon 构建工具如何安装你的 Python 包。按如下方式编辑 second_ros2_ws/src/urdf_tutorial_r2d2/setup.py 文件:
包含这些 import 语句:
import osfrom glob import globfrom setuptools import setupfrom setuptools import find_packages在 data_files 中追加这两行:
data_files=[ ... (os.path.join('share', package_name, 'launch'), glob('launch/*')), (os.path.join('share', package_name), glob('urdf/*')),],修改 entry_points 表,以便之后可以从命令行运行 state_publisher:
'console_scripts': [ 'state_publisher = urdf_tutorial_r2d2.state_publisher:main' ],保存对 setup.py 文件的修改。
cd second_ros2_wscolcon build --symlink-install --packages-select urdf_tutorial_r2d2source 环境设置文件:
Linux / macOS:
source install/setup.bashWindows:
call install/setup.bat7 查看结果
Section titled “7 查看结果”启动包:
ros2 launch urdf_tutorial_r2d2 demo_launch.py打开一个新终端,然后使用以下命令运行 RViz:
rviz2 -d `ros2 pkg prefix urdf_tutorial_r2d2 --share`/r2d2.rviz有关 RViz 的详细用法,请参见用户指南。
你创建了一个 JointState 发布者节点,并将其与 robot_state_publisher 结合使用,成功模拟了一个行走机器人。本教程所用代码最初来自这里。
感谢这篇 ROS 1 教程的作者,本教程重用了其中的一些内容。