
AI 深度估计与 Nav2 代价地图
总览(Overview)
Section titled “总览(Overview)”传统的 3D 导航通常依赖昂贵的硬件,如激光雷达或立体/RGB-D 深度相机。本教程的流水线利用 AI 模型从 2D 图像估计深度,让普通单目相机(本例为 USB 相机)也能充当深度传感器。生成的深度图像随后转换为 PointCloud2 消息,Nav2 可将其作为体素代价地图层用于避障和路径规划,从而以更低的硬件成本实现导航。
什么是 Depth Anything 3 AI 模型?
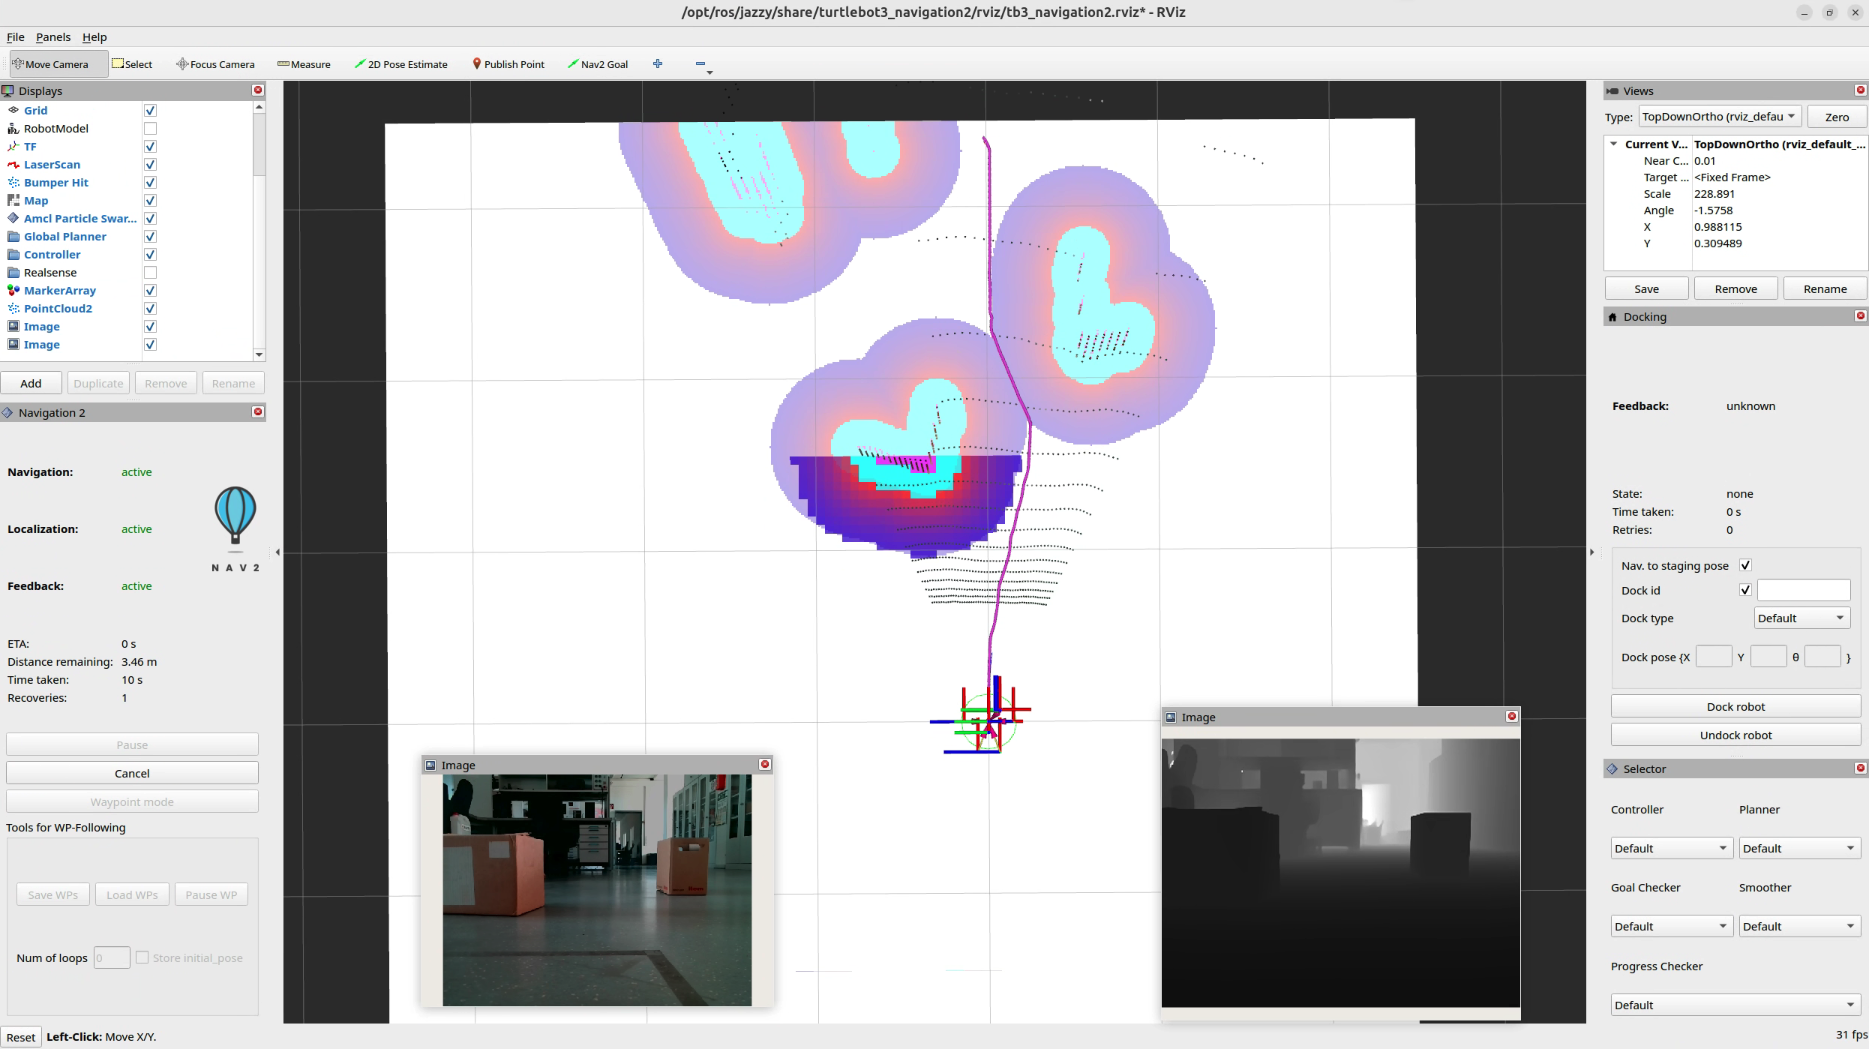
Section titled “什么是 Depth Anything 3 AI 模型?”Depth Anything 3(DA3)是一种 AI 模型,无论是否已知相机位姿,都能从任意数量的视觉输入中预测空间一致的几何信息。更多细节。本教程使用 Depth Anything 3 的 ROS 2 实现 [2],它提供了用于运行 DA3 模型推理的 ROS 2 可组合节点。下图展示了 RViz2 中的两个图像视图:左侧为 DA3 ROS 2 节点发布的彩色图像话题,右侧为深度图像话题。
图像处理流水线(Pipeline)
Section titled “图像处理流水线(Pipeline)”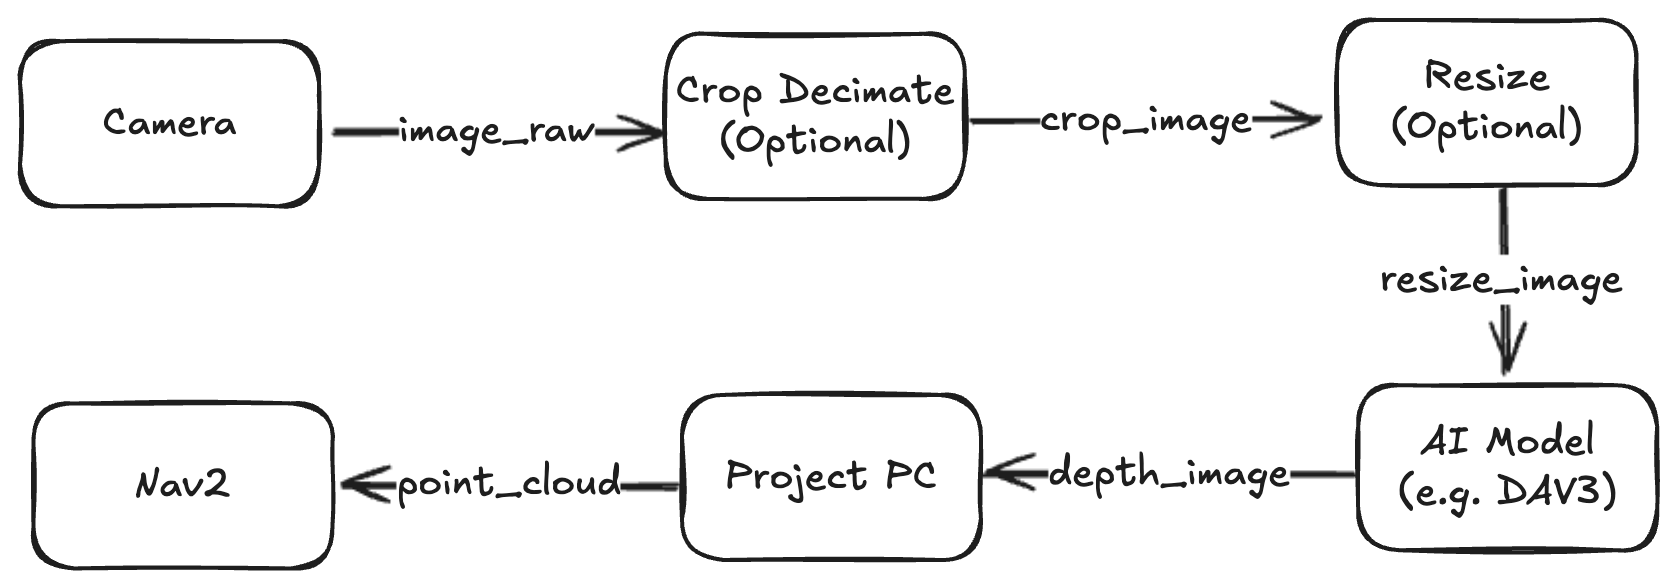
数据按顺序流经五个不同的步骤:
- USB 相机节点(USB Cam Node):从物理相机捕获原始 RGB 视频流。该节点可替换为任意来源的相机驱动,不限于 USB 相机。
- 裁剪抽稀节点(Crop Decimate Node):裁剪或跳过像素,去除不需要的外围数据并节省算力。
- 缩放节点(Resize Node):将图像缩放到 AI 模型所需的精确输入尺寸。
- Depth Anything V3 节点:处理 2D 图像并计算估计的深度图。
- 点云投影(Point Cloud Projection):将 2D 深度图转换为 3D 点云(
sensor_msgs/msg/PointCloud2),供 Nav2 直接使用。
注意:本教程使用 Depth Anything V3 TensorRT ROS 2 包来运行 DA3 模型推理。该模型已内置深度估计和点云投影功能,因此我们注释掉了 pointcloud 节点。如果你使用其他模型,只需在
nav2_depth_estimation_ai包中为各节点配置所需参数并启动该流水线即可。
需求(Requirements)
Section titled “需求(Requirements)”开始之前,请确保已具备以下硬件和软件条件:
-
硬件
- 机器人:一台运行 ROS 2 和 Nav2 的实体 TurtleBot 3(Burger、Waffle 或自定义配置)。
- 相机:任意标准且兼容 Linux 的单目 USB RGB 相机。
- 计算主机:安装在机器人上的边缘计算机(如 NVIDIA Jetson 或 x86 笔记本),最好配备支持 CUDA 的 GPU,以保证 AI 模型能以可用的帧率运行。
-
软件
- 已完成在真实 TurtleBot 3 上导航官方教程。
- 开始本教程之前,请按官方相机标定教程完成相机标定。
教程步骤(Tutorial Steps)
Section titled “教程步骤(Tutorial Steps)”需要安装核心图像处理栈,以及经 TensorRT 加速的 Depth Anything V3 ROS 2 包。
1. 安装核心依赖
Section titled “1. 安装核心依赖”在机器人主计算机上运行以下命令,安装基础的 ROS 2 感知包:
sudo apt updatesudo apt install ros-$ROS_DISTRO-image-proc ros-$ROS_DISTRO-depth-image-proc ros-$ROS_DISTRO-usb-cam2. 构建 Depth Anything V3 包
Section titled “2. 构建 Depth Anything V3 包”进入工作空间,克隆 TensorRT Depth Anything 栈并构建:
cd ~/ros2_ws/srcgit clone https://github.com/ika-rwth-aachen/ros2-depth-anything-v3-trt.gitgit clone https://github.com/ros-navigation/navigation2.ai.git
# Resolve any missing package-level dependenciescd ~/ros2_wsrosdep install --from-paths src --ignore-src -r -y
# Build the packages with optimization flags enabledcolcon build --cmake-args -DCMAKE_BUILD_TYPE=Releasesource install/setup.bash
3. 模型权重准备
Section titled “3. 模型权重准备”流水线需要编译好的 ONNX 模型权重来计算深度图。可从以下两种方式中任选其一:
A. 从 Hugging Face 下载 ONNX 文件 B. 按照此处说明生成 ONNX
将该文件放在任意合适位置即可,例如 depth_anything_v3/models/,但需在下文的 nav2_depth_ai_params.yaml 文件中相应修改路径。
4. 配置参数
Section titled “4. 配置参数”接下来,在 nav2_depth_estimation_ai 包的 nav2_depth_ai_params.yaml 文件中配置流水线各节点的参数。
USB 相机节点参数
Section titled “USB 相机节点参数”注意:可根据需要替换为你自己的传感器驱动(如 realsense)。
usb_cam: ros__parameters: video_device: /dev/video0 image_width: 640 image_height: 480 pixel_format: mjpeg2rgb frame_rate: 30.0裁剪抽稀节点参数
Section titled “裁剪抽稀节点参数”注意:该节点用于裁剪图像,请根据实际需求更新参数。
crop_decimate: ros__parameters: x_offset: 0 y_offset: 0 width: 640 height: 480 decimation_x: 1 decimation_y: 1图像缩放参数
Section titled “图像缩放参数”这里使用 Depth Anything V3 模型,以下是该模型导出为 ONNX 时所需的输入图像参数:
resize: ros__parameters: width: 504 height: 280Depth Anything V3 参数
Section titled “Depth Anything V3 参数”注意:以下参数需根据 Depth Anything V3 AI 模型进行配置。
depth_anything_v3:  ros__parameters:    # Model configuration    onnx_path: "$(find-pkg-share depth_anything_v3)/models/DA3METRIC-LARGE.onnx"    precision: "fp16"  # fp16 or fp32
    # Debug configuration    enable_debug: false    debug_colormap: "JET"  # JET, HOT, COOL, SPRING, SUMMER, AUTUMN, WINTER, BONE, GRAY, HSV, PARULA, PLASMA, INFERNO, VIRIDIS, MAGMA, CIVIDIS    debug_filepath: "/tmp/depth_anything_v3_debug/"    write_colormap: false    debug_colormap_min_depth: 0.0    # Minimum depth value for colormap visualization    debug_colormap_max_depth: 50.0   # Maximum depth value for colormap visualization    sky_threshold: 0.3               # Threshold for sky classification (lower = more sky)    sky_depth_cap: 200.0             # Maximum depth value to fill sky regions
    # Point cloud downsampling (1 = no downsampling, 10 = every 10th point)    point_cloud_downsample_factor: 2
    # Point cloud colorization with RGB from input image    colorize_point_cloud: true  # Set to true to publish RGB point cloud instead of XYZ only
从深度图像投影点云的点云节点
Section titled “从深度图像投影点云的点云节点”注意:如需输出点云,请取消注释。本例直接使用来自 depth_anything_v3 节点的点云。
pointcloud: ros__parameters: image_transport: "raw" # "raw" or "compressed" depth_image_transport: "raw" # "raw" or "compressed" queue_size: 10 invalid_depth: 0.0 # Depth value to use for invalid points (e.g., sky) colorize: true # Set to true to publish RGB point cloud instead of XYZ only exact_sync: true # Set to true to use exact sync, false for approximate synchronizationNav2 体素代价地图
Section titled “Nav2 体素代价地图”要将该点云集成到 Nav2 体素代价地图层,请在 Nav2 参数文件中配置以下参数。
local_costmap:  local_costmap:    ros__parameters:      update_frequency: 5.0      publish_frequency: 2.0      global_frame: odom      robot_base_frame: base_link      rolling_window: true      width: 3      height: 3      resolution: 0.05      robot_radius: 0.15      plugins: ["voxel_layer", "inflation_layer"]
      voxel_layer:        plugin: "nav2_costmap_2d::VoxelLayer"        enabled: true        publish_voxel_map: true        origin_z: 0.0        z_resolution: 0.05        z_voxels: 16        max_obstacle_height: 2.0        mark_threshold: 0        observation_sources: pointcloud
        pointcloud:          topic: /pipeline/points          data_type: "PointCloud2"          max_obstacle_height: 2.0          min_obstacle_height: 0.2  # Ignores reflections/noise on the floor          obstacle_max_range: 8.0    # Maximum reliable distance for AI depth          obstacle_min_range: 0.0          raytrace_max_range: 6.0          raytrace_min_range: 0.0          clearing: True          marking: True
      inflation_layer:        plugin: "nav2_costmap_2d::InflationLayer"        inflation_radius: 0.5        cost_scaling_factor: 5.0
5. 启动流水线
Section titled “5. 启动流水线”最后,使用提供的启动文件启动整个流水线:
ros2 launch nav2_depth_estimation_ai depth_estimation_pipeline_launch.py注意:该命令会启动相机节点(若尚未运行),通过 DA3 模型处理图像话题,并发布生成的 PointCloud2 话题。Nav2 订阅该话题,将其添加为体素代价地图层,用于路径规划和避障。
如果一切配置正确并正常运行,RViz2 中的结果应与下方视频演示一致。
致谢(Acknowledgements)
Section titled “致谢(Acknowledgements)”本教程与 ROS 2 社区合作开发。特别感谢在开发过程中提供宝贵意见和反馈的贡献者。