
重映射
本教程中你将学到如何:
- 使用 OpenCV 函数 cv::remap 实现简单的重映射(remapping)例程。
什么是重映射?
Section titled “什么是重映射?”- 重映射是把图像中某处的像素取出、并把它们放置到新图像中另一个位置的过程。
- 为了完成映射过程,可能需要对非整数像素位置做一些插值,因为源图像和目标图像之间并不总存在一一对应的像素关系。
- 我们可以把每个像素位置 的重映射表达为:
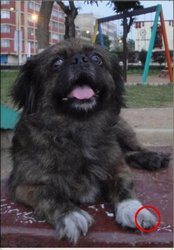
其中 $g()$ 是重映射后的图像,$f()$ 是源图像,$h(x,y)$ 是作用于 $(x,y)$ 的映射函数。- 让我们想一个快速的例子。假设我们有一幅图像 ,想做这样一个重映射:
会发生什么?很容易看出,图像将沿 $x$ 方向翻转。观察红色圆圈相对于 $x$(把 $x$ 视为水平方向)的位置变化即可。- 在 OpenCV 中,函数 cv::remap 提供了一个简单的重映射实现。
- 这个程序做什么?
- 加载一幅图像
- 每一秒对图像应用 4 种不同重映射过程中的一种,并在窗口中无限循环显示。
- 等待用户退出程序。
C++
教程代码如下所示。你也可以从此处下载。
#include "opencv2/imgcodecs.hpp"#include "opencv2/highgui.hpp"#include "opencv2/imgproc.hpp"#include <iostream>
using namespace cv;
/// Function Headersvoid update_map( int &ind, Mat &map_x, Mat &map_y );
int main(int argc, const char** argv){    CommandLineParser parser(argc, argv, "{@image |chicky_512.png|input image name}");    std::string filename = parser.get<std::string>(0);
    /// Load the image    Mat src = imread( samples::findFile( filename ), IMREAD_COLOR );    if (src.empty())    {        std::cout << "Cannot read image: " << filename << std::endl;        return -1;    }
    /// Create dst, map_x and map_y with the same size as src:    Mat dst(src.size(), src.type());    Mat map_x(src.size(), CV_32FC1);    Mat map_y(src.size(), CV_32FC1);
    /// Create window    const char* remap_window = "Remap demo";    namedWindow( remap_window, WINDOW_AUTOSIZE );
    /// Index to switch between the remap modes    int ind = 0;    for(;;)    {        /// Update map_x & map_y. Then apply remap        update_map(ind, map_x, map_y);        remap( src, dst, map_x, map_y, INTER_LINEAR, BORDER_CONSTANT, Scalar(0, 0, 0) );
        /// Display results        imshow( remap_window, dst );
        /// Each 1 sec. Press ESC to exit the program        char c = (char)waitKey( 1000 );        if( c == 27 )        {            break;        }    }    return 0;}
void update_map( int &ind, Mat &map_x, Mat &map_y ){    for( int i = 0; i < map_x.rows; i++ )    {        for( int j = 0; j < map_x.cols; j++ )        {            switch( ind )            {            case 0:                if( j > map_x.cols*0.25 && j < map_x.cols*0.75 && i > map_x.rows*0.25 && i < map_x.rows*0.75 )                {                    map_x.at<float>(i, j) = 2*( j - map_x.cols*0.25f ) + 0.5f;                    map_y.at<float>(i, j) = 2*( i - map_x.rows*0.25f ) + 0.5f;                }                else                {                    map_x.at<float>(i, j) = 0;                    map_y.at<float>(i, j) = 0;                }                break;            case 1:                map_x.at<float>(i, j) = (float)j;                map_y.at<float>(i, j) = (float)(map_x.rows - i);                break;            case 2:                map_x.at<float>(i, j) = (float)(map_x.cols - j);                map_y.at<float>(i, j) = (float)i;                break;            case 3:                map_x.at<float>(i, j) = (float)(map_x.cols - j);                map_y.at<float>(i, j) = (float)(map_x.rows - i);                break;            default:                break;            } // end of switch        }    }    ind = (ind+1) % 4;}
Java
教程代码如下所示。你也可以从此处下载。
import org.opencv.core.Core;import org.opencv.core.CvType;import org.opencv.core.Mat;import org.opencv.highgui.HighGui;import org.opencv.imgcodecs.Imgcodecs;import org.opencv.imgproc.Imgproc;
class Remap {    private Mat mapX = new Mat();    private Mat mapY = new Mat();    private Mat dst = new Mat();    private int ind = 0;
    private void updateMap() {        float buffX[] = new float[(int) (mapX.total() * mapX.channels())];        mapX.get(0, 0, buffX);
        float buffY[] = new float[(int) (mapY.total() * mapY.channels())];        mapY.get(0, 0, buffY);
        for (int i = 0; i < mapX.rows(); i++) {            for (int j = 0; j < mapX.cols(); j++) {                switch (ind) {                case 0:                    if( j > mapX.cols()*0.25 && j < mapX.cols()*0.75 && i > mapX.rows()*0.25 && i < mapX.rows()*0.75 ) {                        buffX[i*mapX.cols() + j] = 2*( j - mapX.cols()*0.25f ) + 0.5f;                        buffY[i*mapY.cols() + j] = 2*( i - mapX.rows()*0.25f ) + 0.5f;                    } else {                        buffX[i*mapX.cols() + j] = 0;                        buffY[i*mapY.cols() + j] = 0;                    }                    break;                case 1:                    buffX[i*mapX.cols() + j] = j;                    buffY[i*mapY.cols() + j] = mapY.rows() - i;                    break;                case 2:                    buffX[i*mapX.cols() + j] = mapY.cols() - j;                    buffY[i*mapY.cols() + j] = i;                    break;                case 3:                    buffX[i*mapX.cols() + j] = mapY.cols() - j;                    buffY[i*mapY.cols() + j] = mapY.rows() - i;                    break;                default:                    break;                }            }        }        mapX.put(0, 0, buffX);        mapY.put(0, 0, buffY);        ind = (ind+1) % 4;    }
    public void run(String[] args) {        String filename = args.length > 0 ? args[0] : "../data/chicky_512.png";
        Mat src = Imgcodecs.imread(filename, Imgcodecs.IMREAD_COLOR);        if (src.empty()) {            System.err.println("Cannot read image: " + filename);            System.exit(0);        }
        mapX = new Mat(src.size(), CvType.CV_32F);        mapY = new Mat(src.size(), CvType.CV_32F);
        final String winname = "Remap demo";        HighGui.namedWindow(winname, HighGui.WINDOW_AUTOSIZE);
        for (;;) {            updateMap();            Imgproc.remap(src, dst, mapX, mapY, Imgproc.INTER_LINEAR);            HighGui.imshow(winname, dst);            if (HighGui.waitKey(1000) == 27) {                break;            }        }        System.exit(0);    }}
public class RemapDemo {    public static void main(String[] args) {        // Load the native OpenCV library        System.loadLibrary(Core.NATIVE_LIBRARY_NAME);
        new Remap().run(args);    }}
Python
教程代码如下所示。你也可以从此处下载。
from __future__ import print_functionimport cv2 as cvimport numpy as npimport argparse
def update_map(ind, map_x, map_y):    if ind == 0:        for i in range(map_x.shape[0]):            for j in range(map_x.shape[1]):                if j > map_x.shape[1]*0.25 and j < map_x.shape[1]*0.75 and i > map_x.shape[0]*0.25 and i < map_x.shape[0]*0.75:                    map_x[i,j] = 2 * (j-map_x.shape[1]*0.25) + 0.5                    map_y[i,j] = 2 * (i-map_y.shape[0]*0.25) + 0.5                else:                    map_x[i,j] = 0                    map_y[i,j] = 0    elif ind == 1:        for i in range(map_x.shape[0]):            map_x[i,:] = [x for x in range(map_x.shape[1])]        for j in range(map_y.shape[1]):            map_y[:,j] = [map_y.shape[0]-y for y in range(map_y.shape[0])]    elif ind == 2:        for i in range(map_x.shape[0]):            map_x[i,:] = [map_x.shape[1]-x for x in range(map_x.shape[1])]        for j in range(map_y.shape[1]):            map_y[:,j] = [y for y in range(map_y.shape[0])]    elif ind == 3:        for i in range(map_x.shape[0]):            map_x[i,:] = [map_x.shape[1]-x for x in range(map_x.shape[1])]        for j in range(map_y.shape[1]):            map_y[:,j] = [map_y.shape[0]-y for y in range(map_y.shape[0])]
parser = argparse.ArgumentParser(description='Code for Remapping tutorial.')parser.add_argument('--input', help='Path to input image.', default='chicky_512.png')args = parser.parse_args()
src = cv.imread(cv.samples.findFile(args.input), cv.IMREAD_COLOR)if src is None:    print('Could not open or find the image: ', args.input)    exit(0)
map_x = np.zeros((src.shape[0], src.shape[1]), dtype=np.float32)map_y = np.zeros((src.shape[0], src.shape[1]), dtype=np.float32)
window_name = 'Remap demo'cv.namedWindow(window_name)
ind = 0while True:    update_map(ind, map_x, map_y)    ind = (ind + 1) % 4    dst = cv.remap(src, map_x, map_y, cv.INTER_LINEAR)    cv.imshow(window_name, dst)    c = cv.waitKey(1000)    if c == 27:        break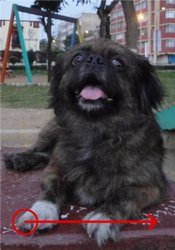
-
加载一幅图像:
C++
/// Load the imageMat src = imread( samples::findFile( filename ), IMREAD_COLOR );if (src.empty()){std::cout << "Cannot read image: " << filename << std::endl;return -1;}Java
Mat src = Imgcodecs.imread(filename, Imgcodecs.IMREAD_COLOR);if (src.empty()) {System.err.println("Cannot read image: " + filename);System.exit(0);}Python
src = cv.imread(cv.samples.findFile(args.input), cv.IMREAD_COLOR)if src is None:print('Could not open or find the image: ', args.input)exit(0) -
创建目标图像和两个映射矩阵(分别对应 x 和 y):
C++
/// Create dst, map_x and map_y with the same size as src:Mat dst(src.size(), src.type());Mat map_x(src.size(), CV_32FC1);Mat map_y(src.size(), CV_32FC1);Java
mapX = new Mat(src.size(), CvType.CV_32F);mapY = new Mat(src.size(), CvType.CV_32F);Python
map_x = np.zeros((src.shape[0], src.shape[1]), dtype=np.float32)map_y = np.zeros((src.shape[0], src.shape[1]), dtype=np.float32) -
创建一个窗口来显示结果:
C++
/// Create windowconst char* remap_window = "Remap demo";namedWindow( remap_window, WINDOW_AUTOSIZE );Java
final String winname = "Remap demo";HighGui.namedWindow(winname, HighGui.WINDOW_AUTOSIZE);Python
window_name = 'Remap demo'cv.namedWindow(window_name) -
建立一个循环。每 1000 毫秒我们更新映射矩阵(mat_x 和 mat_y),并把它们应用到源图像上:
C++
/// Index to switch between the remap modesint ind = 0;for(;;){/// Update map_x & map_y. Then apply remapupdate_map(ind, map_x, map_y);remap( src, dst, map_x, map_y, INTER_LINEAR, BORDER_CONSTANT, Scalar(0, 0, 0) );/// Display resultsimshow( remap_window, dst );/// Each 1 sec. Press ESC to exit the programchar c = (char)waitKey( 1000 );if( c == 27 ){break;}}Java
for (;;) {updateMap();Imgproc.remap(src, dst, mapX, mapY, Imgproc.INTER_LINEAR);HighGui.imshow(winname, dst);if (HighGui.waitKey(1000) == 27) {break;}}Python
ind = 0while True:update_map(ind, map_x, map_y)ind = (ind + 1) % 4dst = cv.remap(src, map_x, map_y, cv.INTER_LINEAR)cv.imshow(window_name, dst)c = cv.waitKey(1000)if c == 27:break -
应用重映射的函数是 cv::remap。我们传入以下参数:
-
src:源图像
-
dst:与 src 大小相同的目标图像
-
map_x:x 方向上的映射函数。它相当于 的第一个分量
-
map_y:同上,但在 y 方向上。注意 map_y 和 map_x 都与 src 大小相同
-
INTER_LINEAR:对非整数像素使用的插值类型。这是默认值。
-
BORDER_CONSTANT:默认值
我们如何更新映射矩阵 mat_x 和 mat_y?继续往下读:
-
-
更新映射矩阵:我们将执行 4 种不同的映射:
- 把图像缩小到一半大小,并显示在中间:
    对于所有满足 $\dfrac{src.cols}{4} < i < \dfrac{3 \cdot src.cols}{4}$ 且 $\dfrac{src.rows}{4} < j < \dfrac{3 \cdot src.rows}{4}$ 的 $(i,j)$ 对。
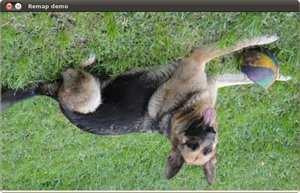
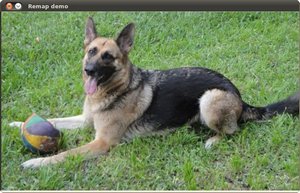
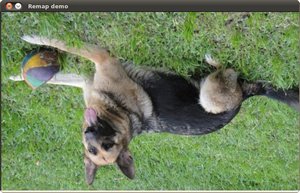
2. 把图像上下翻转:$h(i, j) = (i, src.rows - j)$3. 把图像从左到右镜像:$h(i,j) = (src.cols - i, j)$4. 第 2 种与第 3 种的组合:$h(i,j) = (src.cols - i, src.rows - j)$
这在下面的代码片段中得以体现。其中 map_x 表示 的第一个坐标,map_y 表示第二个坐标:
C++
void update_map( int &ind, Mat &map_x, Mat &map_y ){ for( int i = 0; i < map_x.rows; i++ ) { for( int j = 0; j < map_x.cols; j++ ) { switch( ind ) { case 0: if( j > map_x.cols*0.25 && j < map_x.cols*0.75 && i > map_x.rows*0.25 && i < map_x.rows*0.75 ) { map_x.at<float>(i, j) = 2*( j - map_x.cols*0.25f ) + 0.5f; map_y.at<float>(i, j) = 2*( i - map_x.rows*0.25f ) + 0.5f; } else { map_x.at<float>(i, j) = 0; map_y.at<float>(i, j) = 0; } break; case 1: map_x.at<float>(i, j) = (float)j; map_y.at<float>(i, j) = (float)(map_x.rows - i); break; case 2: map_x.at<float>(i, j) = (float)(map_x.cols - j); map_y.at<float>(i, j) = (float)i; break; case 3: map_x.at<float>(i, j) = (float)(map_x.cols - j); map_y.at<float>(i, j) = (float)(map_x.rows - i); break; default: break; } // end of switch } } ind = (ind+1) % 4;}Java
private void updateMap() {    float buffX[] = new float[(int) (mapX.total() * mapX.channels())];    mapX.get(0, 0, buffX);
    float buffY[] = new float[(int) (mapY.total() * mapY.channels())];    mapY.get(0, 0, buffY);
    for (int i = 0; i < mapX.rows(); i++) {        for (int j = 0; j < mapX.cols(); j++) {            switch (ind) {            case 0:                if( j > mapX.cols()*0.25 && j < mapX.cols()*0.75 && i > mapX.rows()*0.25 && i < mapX.rows()*0.75 ) {                    buffX[i*mapX.cols() + j] = 2*( j - mapX.cols()*0.25f ) + 0.5f;                    buffY[i*mapY.cols() + j] = 2*( i - mapX.rows()*0.25f ) + 0.5f;                } else {                    buffX[i*mapX.cols() + j] = 0;                    buffY[i*mapY.cols() + j] = 0;                }                break;            case 1:                buffX[i*mapX.cols() + j] = j;                buffY[i*mapY.cols() + j] = mapY.rows() - i;                break;            case 2:                buffX[i*mapX.cols() + j] = mapY.cols() - j;                buffY[i*mapY.cols() + j] = i;                break;            case 3:                buffX[i*mapX.cols() + j] = mapY.cols() - j;                buffY[i*mapY.cols() + j] = mapY.rows() - i;                break;            default:                break;            }        }    }    mapX.put(0, 0, buffX);    mapY.put(0, 0, buffY);    ind = (ind+1) % 4;}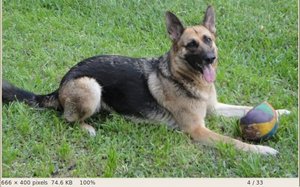
Python
def update_map(ind, map_x, map_y): if ind == 0: for i in range(map_x.shape[0]): for j in range(map_x.shape[1]): if j > map_x.shape[1]*0.25 and j < map_x.shape[1]*0.75 and i > map_x.shape[0]*0.25 and i < map_x.shape[0]*0.75: map_x[i,j] = 2 * (j-map_x.shape[1]*0.25) + 0.5 map_y[i,j] = 2 * (i-map_y.shape[0]*0.25) + 0.5 else: map_x[i,j] = 0 map_y[i,j] = 0 elif ind == 1: for i in range(map_x.shape[0]): map_x[i,:] = [x for x in range(map_x.shape[1])] for j in range(map_y.shape[1]): map_y[:,j] = [map_y.shape[0]-y for y in range(map_y.shape[0])] elif ind == 2: for i in range(map_x.shape[0]): map_x[i,:] = [map_x.shape[1]-x for x in range(map_x.shape[1])] for j in range(map_y.shape[1]): map_y[:,j] = [y for y in range(map_y.shape[0])] elif ind == 3: for i in range(map_x.shape[0]): map_x[i,:] = [map_x.shape[1]-x for x in range(map_x.shape[1])] for j in range(map_y.shape[1]): map_y[:,j] = [map_y.shape[0]-y for y in range(map_y.shape[0])]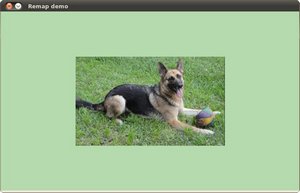
-
编译上面的代码后,你可以以图像路径为参数运行它。
-
缩小到一半大小并居中显示的结果。
-
上下翻转的结果。
-
沿 x 方向镜像的结果。
-
沿两个方向同时镜像的结果。