
感知流水线
MoveIt 支持通过 Octomap 无缝集成 3D 传感器。
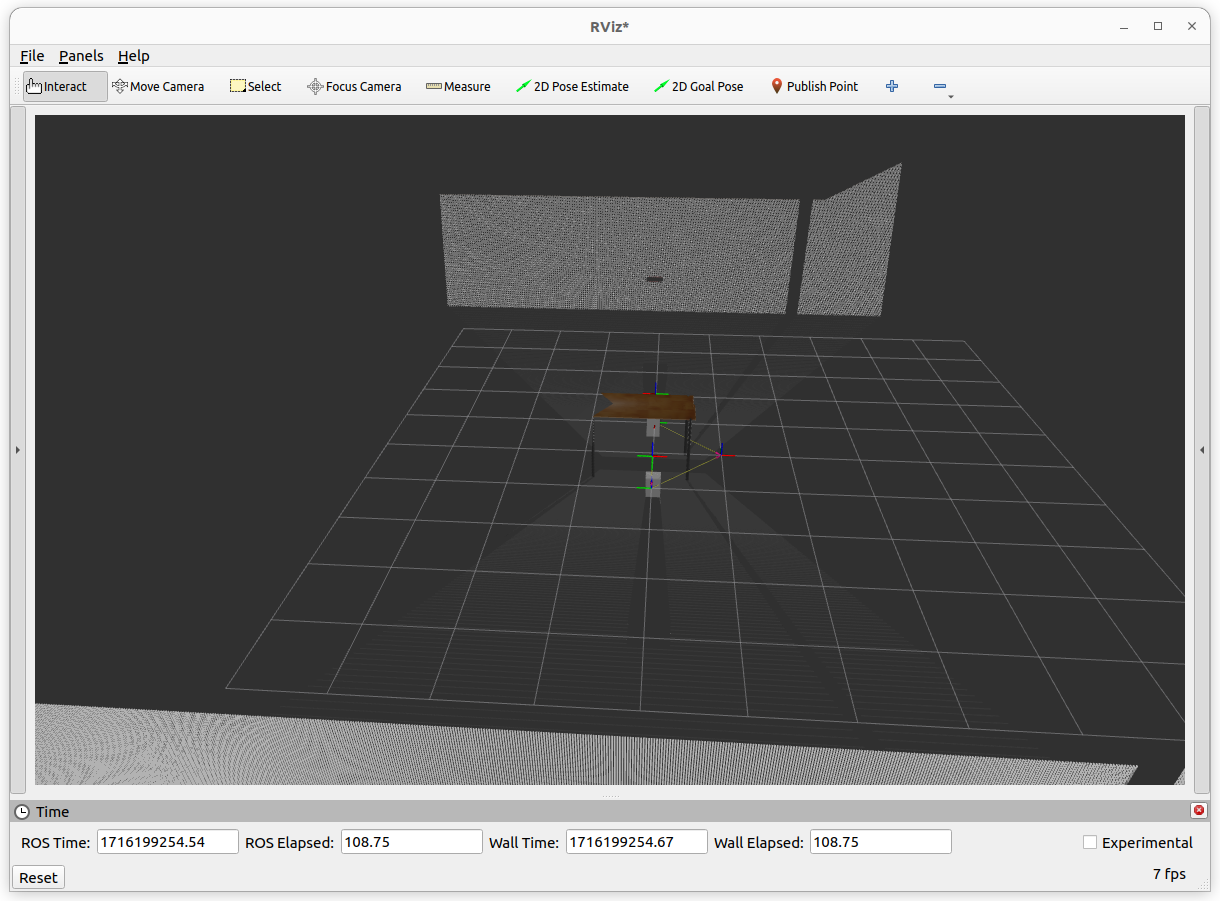
配置正确后,你应该能在 RViz 中看到类似下面的画面:
即使你从未完成过 Getting Started,也可以直接运行本教程的演示。但为了更好地理解本教程中的内容,建议你先按照 Getting Started 中的步骤操作。在本节中,我们将一步步完成在 MoveIt 中配置机器人 3D 传感器的工作。MoveIt 中负责处理 3D 感知的主要组件是占用地图更新器(Occupancy Map Updater)。该更新器采用插件架构来处理不同类型的输入。MoveIt 目前可用的插件有:
- 点云占用地图更新器(PointCloud Occupancy Map Updater):可以接收点云(
sensor_msgs/msg/PointCloud2)作为输入 - 深度图像占用地图更新器(Depth Image Occupancy Map Updater):可以接收深度图像(
sensor_msgs/msg/Image)作为输入
连接到存储后端
Section titled “连接到存储后端”要运行该演示,你需要先运行 git lfs install 安装 git lfs,并将 moveit_benchmark_resources 克隆到你的工作空间中。
如何创建用于 Octomap 生成的 3D 点云数据
Section titled “如何创建用于 Octomap 生成的 3D 点云数据”在本教程中,你可以使用 moveit_benchmark_resources 中预先录制的 3D 点云数据,也可以自己录制 bag 文件。要录制 bag,首先运行 depth_camera_environment.launch.py 文件,然后使用以下命令录制。
在终端 1 中,运行此命令:
ros2 launch moveit2_tutorials depth_camera_environment.launch.py在终端 2 中,运行此命令:
ros2 bag record /camera_1/points /camera_1/depth/image_raw /camera_1/depth/camera_info /camera_2/points /camera_2/depth/image_raw /camera_2/depth/camera_info /tf /tf_static当终端 1 中的命令执行时,会打开一个 Gazebo 环境,其中包含两个深度相机,两个相机中间放有一张桌子。该 Gazebo 环境用于获取 3D 传感器数据,应该如下图所示。
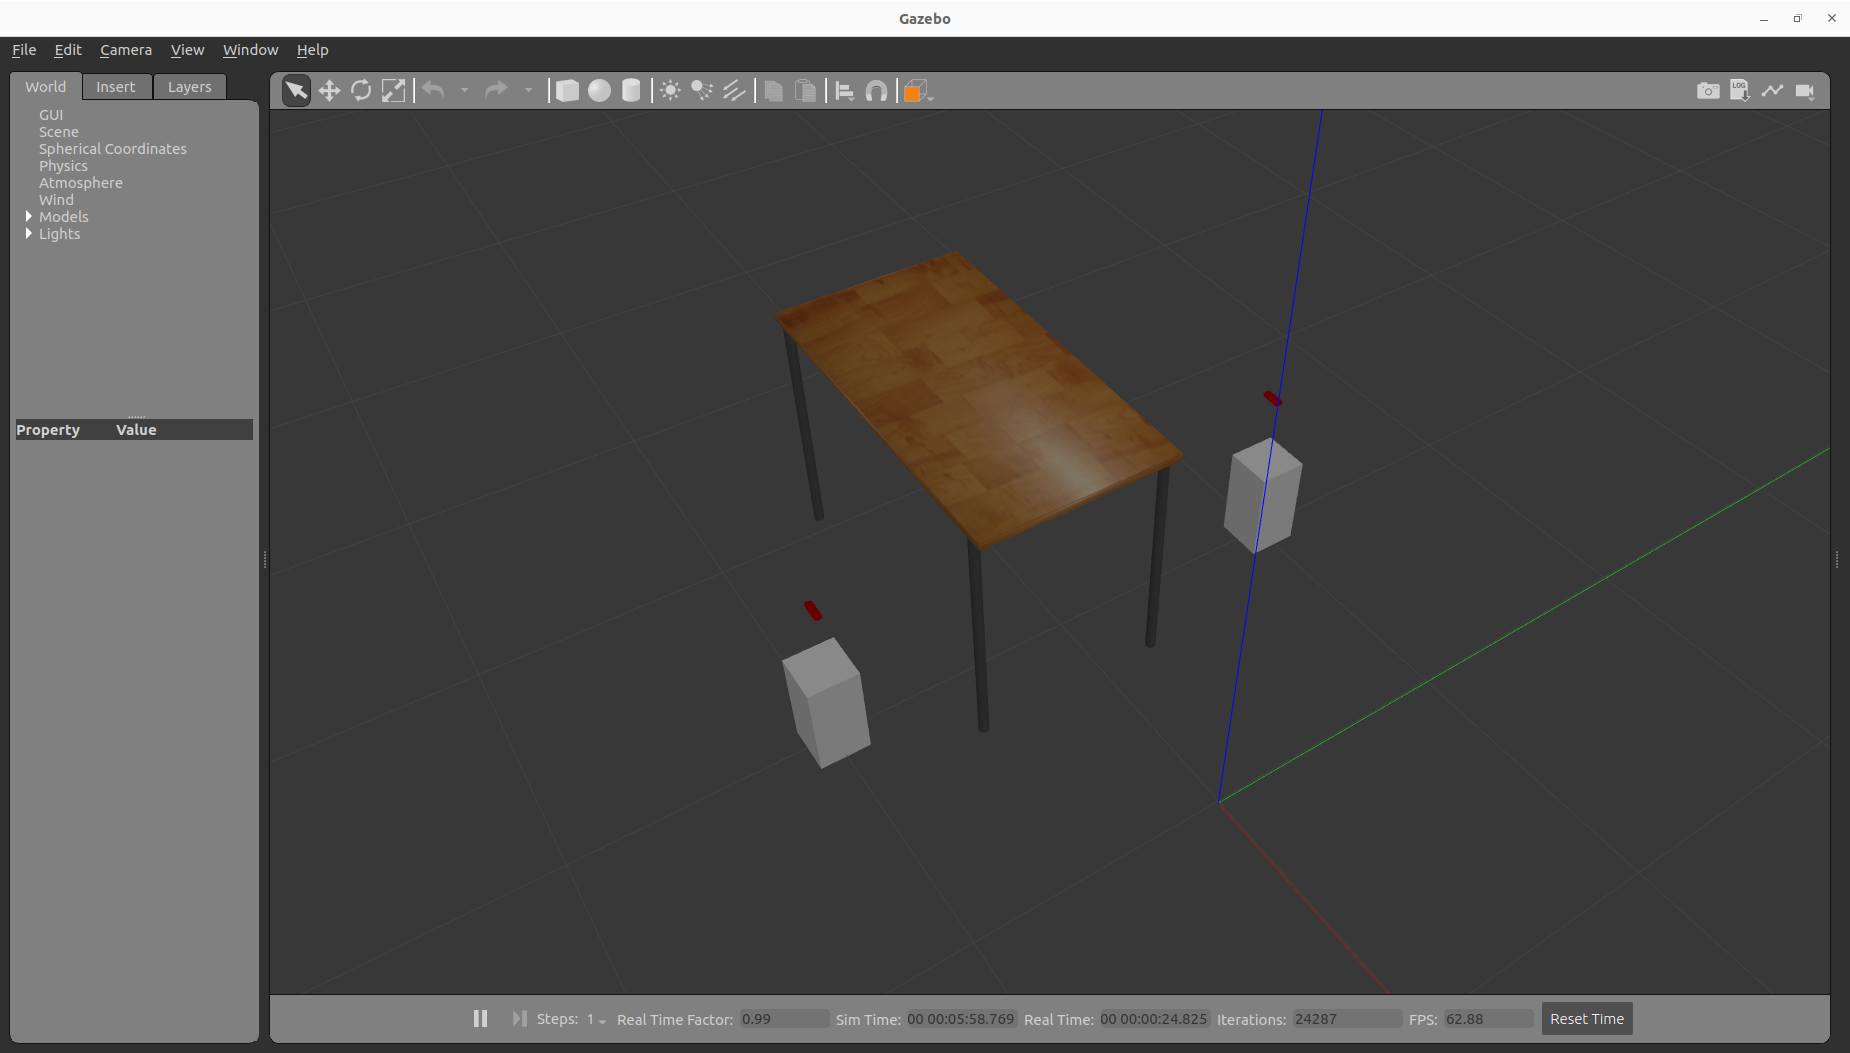
关于 depth_camera_environment.launch.py 的更多解释,可以查看 GitHub 上 depth_camera_environment.launch.py 中的注释。
import osfrom ament_index_python.packages import get_package_share_directoryfrom launch import LaunchDescriptionfrom launch.substitutions import Commandfrom launch_ros.substitutions import FindPackageSharefrom launch_ros.actions import Nodefrom launch.actions import IncludeLaunchDescriptionfrom launch.substitutions import PathJoinSubstitutionimport math

def generate_launch_description():    urdf_file = os.path.join(        get_package_share_directory("moveit2_tutorials"),        "urdf/realsense_d435/camera.urdf.xacro",    )
    # The list presents the pose in euler coordinates ordered x, y, z, yaw, pitch, roll respectively.    camera_1_pose = ["-1", "-1", "0", f"{math.pi/2}", "0.0", "0.0"]    camera_2_pose = ["-1", "1", "0", f"-{math.pi/2}", "0.0", "0.0"]
    # It is necessary for gazebo spawner to use the description of camera_1 in gazebo environment    camera_1_robot_state_publisher_node = Node(        package="robot_state_publisher",        executable="robot_state_publisher",        name="robot_state_publisher",        output="screen",        parameters=[            {                "use_sim_time": True,                "robot_description": Command(                    [f"xacro {urdf_file}", " camera_name:='camera_1'"]                ),            }        ],        remappings=[            ("robot_description", "/camera_1/robot_description"),        ],    )
    # It is necessary for spawning camera_1 in gazebo environment    camera_1_gazebo_spawner_node = Node(        package="gazebo_ros",        executable="spawn_entity.py",        arguments=[            "-entity",            "mr_camera",            "-topic",            "/camera_1/robot_description",            "-x",            camera_1_pose[0],            "-y",            camera_1_pose[1],            "-z",            camera_1_pose[2],            "-Y",            camera_1_pose[3],            "-P",            camera_1_pose[4],            "-R",            camera_1_pose[5],        ],        output="screen",    )
    # It is necessary to make transformation between world frame and camera frames enable later.    camera_1_tf_from_world_publisher_node = Node(        package="tf2_ros",        executable="static_transform_publisher",        name="static_transform_publisher",        output="log",        arguments=[*camera_1_pose, "world", "camera_1_base_link"],    )
    # It is necessary for gazebo spawner to use the description of camera_2 in gazebo environment    camera_2_gazebo_spawner_node = Node(        package="robot_state_publisher",        executable="robot_state_publisher",        name="robot_state_publisher2",        output="screen",        parameters=[            {                "use_sim_time": True,                "robot_description": Command(                    [f"xacro {urdf_file}", " camera_name:='camera_2'"]                ),            }        ],        remappings=[            ("robot_description", "/camera_2/robot_description"),        ],    )
    # It is necessary for spawning camera_2 in gazebo environment    camera_2_robot_state_publisher_node = Node(        package="gazebo_ros",        executable="spawn_entity.py",        name="spawn2",        arguments=[            "-entity",            "mr_camera2",            "-topic",            "/camera_2/robot_description",            "-x",            camera_2_pose[0],            "-y",            camera_2_pose[1],            "-z",            camera_2_pose[2],            "-Y",            camera_2_pose[3],            "-P",            camera_2_pose[4],            "-R",            camera_2_pose[5],        ],        output="screen",    )
    # It is necessary to make transformation between world frame and camera frames enable later.    camera_2_tf_from_world_publisher_node = Node(        package="tf2_ros",        executable="static_transform_publisher",        name="static_transform_publisher",        output="log",        arguments=[*camera_2_pose, "world", "camera_2_base_link"],    )
    # It is necessary to open previously created gazebo world for perception pipeline demo.    gazebo_launch = IncludeLaunchDescription(        PathJoinSubstitution(            [FindPackageShare("gazebo_ros"), "launch", "gazebo.launch.py"]        ),        launch_arguments={            "world": os.path.join(                get_package_share_directory("moveit2_tutorials"),                "worlds",                "perception_pipeline_demo.world",            ),        }.items(),    )
    return LaunchDescription(        [            camera_1_robot_state_publisher_node,            camera_1_gazebo_spawner_node,            camera_1_tf_from_world_publisher_node,            camera_2_robot_state_publisher_node,            camera_2_gazebo_spawner_node,            camera_2_tf_from_world_publisher_node,            gazebo_launch,        ]    )
对于终端 2 中的命令,我们必须同时录制相机话题和 TF 话题,因为 MoveIt 感知流水线需要监听 TF,以便根据 world 坐标系转换点云点的坐标。此外,在 depth_camera_environment.launch.py 中发布从 world 到相机坐标系的静态 TF 的原因是:需要确定机器人与点云之间的变换关系,MoveIt 的传感器插件稍后会使用这一变换。
顺便提一下,你也可以使用 GitHub 上这个 RViz 配置文件在 RViz 中可视化点云话题。
在下一步中,我们将使用录制的 bag 文件创建 Octomap。
3D 传感器的配置
Section titled “3D 传感器的配置”MoveIt 使用基于八叉树(octree)的框架来表示周围的世界。上述 Octomap 参数就是这一表示方式的配置参数:
- octomap_frame:指定该表示方式存储时所在的坐标系。如果你使用的是移动机器人,该坐标系应该是世界中的固定坐标系。我们可以通过 ROS 消息(如 pointcloud 和 image 话题)的
frame_id字段为插件设置该坐标系。 - octomap_resolution:指定该表示方式的分辨率(单位:米)。
- max_range:指定应用于该节点任何传感器输入的最大量程值。
现在,播放 bag 文件时我们会看到 /camera_1/points、/camera_1/depth/image_raw、/camera_1/depth/camera_info、/camera_2/points、/camera_2/depth/image_raw、/camera_2/depth/camera_info、/tf 和 /tf_static 这些话题。我们需要创建以下配置文件,让 MoveIt 在规划流水线中处理这些点云话题。你也可以前往 GitHub 上的此处查看完整的 sensors_3d.yaml 配置文件。
sensors: - camera_1_pointcloud - camera_2_depth_imagecamera_1_pointcloud: sensor_plugin: occupancy_map_monitor/PointCloudOctomapUpdater point_cloud_topic: /camera_1/points max_range: 5.0 point_subsample: 1 padding_offset: 0.1 padding_scale: 1.0 max_update_rate: 1.0 filtered_cloud_topic: /camera_1/filtered_pointscamera_2_depth_image: sensor_plugin: occupancy_map_monitor/DepthImageOctomapUpdater image_topic: /camera_2/depth/image_raw queue_size: 5 near_clipping_plane_distance: 0.3 far_clipping_plane_distance: 5.0 shadow_threshold: 0.2 padding_scale: 1.0 max_update_rate: 1.0 filtered_cloud_topic: /camera_2/filtered_pointssensors_3d.yaml:
sensors: - camera_1_pointcloud - camera_2_depth_imagecamera_1_pointcloud: sensor_plugin: occupancy_map_monitor/PointCloudOctomapUpdater point_cloud_topic: /camera_1/points max_range: 5.0 point_subsample: 1 padding_offset: 0.1 padding_scale: 1.0 max_update_rate: 1.0 filtered_cloud_topic: /camera_1/filtered_pointscamera_2_depth_image: sensor_plugin: occupancy_map_monitor/DepthImageOctomapUpdater image_topic: /camera_2/depth/image_raw queue_size: 5 near_clipping_plane_distance: 0.3 far_clipping_plane_distance: 5.0 shadow_threshold: 0.2 padding_scale: 1.0 max_update_rate: 1.0 filtered_cloud_topic: /camera_2/filtered_points通用参数如下:
- sensor_plugin:所使用的插件名称。
- max_update_rate:Octomap 表示将以不超过该值的速率进行更新。
PointCloud 更新器特有的参数如下:
- point_cloud_topic:指定用于监听点云的话题。
- max_range:(单位:米)超过此距离的点将不会被使用。
- point_subsample:每 point_subsample 个点中选取一个。
- padding_offset:指定从八叉树中过滤连杆时应用于机器人网格的填充大小(单位:米)。
- padding_scale:指定从八叉树中过滤连杆时应用于机器人网格的缩放因子。
- filtered_cloud_topic:过滤后的点云将被发布到的话题(主要用于调试)。过滤点云是完成自过滤后得到的点云。
深度图像配置
Section titled “深度图像配置”通用参数如下:
- sensor_plugin:所使用的插件名称。
- max_update_rate:Octomap 表示将以不超过该值的速率进行更新。
深度图像更新器特有的参数如下:
- image_topic:指定用于监听深度图像的话题。
- queue_size:排队缓存的图像数量。
- near_clipping_plane_distance:近裁剪平面距离,小于此距离的物体不可见。
- far_clipping_plane_distance:远裁剪平面距离,大于此距离的物体不可见。
- shadow_threshold:阴影贴图的最小亮度阈值,低于该亮度时实体的动态阴影不可见。
- padding_offset:填充的大小(单位:厘米)。
- padding_scale:填充的比例。
- filtered_cloud_topic:过滤后的点云将被发布到的话题(主要用于调试)。过滤点云是完成自过滤后得到的点云。
最后一步是运行 perception_pipeline_demo.launch.py 并播放我们之前录制的 bag 文件。你可以使用以下命令完成这些操作。
在终端 3 中:
ros2 launch moveit2_tutorials perception_pipeline_demo.launch.py在终端 4 中:
ros2 bag play -r 5 <your_bag_file> --loopperception_pipeline_demo.launch.py 与 MoveIt Quickstart in RViz 中的 demo.launch.py 类似,只有几处细节不同。对于 perception_pipeline_demo.launch.py,以下内容被添加到了 moveit_config 中。
你可以在 perception_pipeline_demo.launch.py 中的第 51、52 和 53 行找到这些新增内容:
.sensors_3d(file_path = os.path.join( get_package_share_directory("moveit2_tutorials"), "config/sensors_3d.yaml"))最后,所有演示代码都可以在 GitHub 上的 perception_pipeline 目录中找到。