在本教程中,你将学到如何:
- 使用 OpenCV 函数 cv::Sobel 计算图像的导数。
- 使用 OpenCV 函数 cv::Scharr 为 3⋅3 大小的核计算更精确的导数。
注意: 下面的讲解出自 Bradski 与 Kaehler 所著的 Learning OpenCV 一书。
-
在前两篇教程中,我们已经看到了卷积的应用示例。最重要的卷积运算之一就是计算图像中的导数(或对导数的近似)。
-
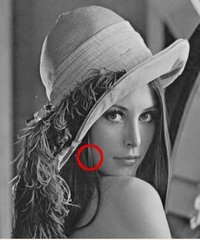
为什么计算图像的导数可能很重要?设想我们要检测图像中存在的边缘。例如:
很容易注意到,在边缘处,像素强度会以明显的方式变化。表达变化的一个好办法是使用导数。梯度的大幅变化表明图像发生了显著变化。
-
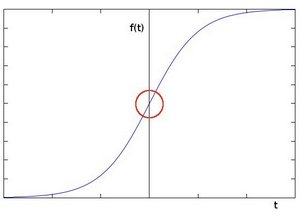
更形象地说,假设我们有一幅一维图像。下图中强度的「跳变」就展示了一条边缘:
-
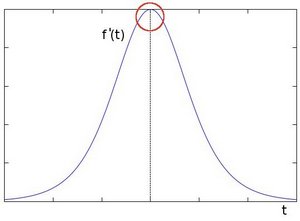
如果我们取一阶导数,边缘的「跳变」会看得更清楚(实际上这里表现为一个极大值)。
-
因此,根据上面的讲解可以推断:检测图像边缘的一种方法,可以是定位那些梯度高于其邻域的像素位置(或者更一般地,高于某个阈值的位置)。
-
更详细的讲解,请参阅 Bradski 与 Kaehler 所著的 Learning OpenCV。
-
Sobel 算子(Sobel Operator)是一个离散的微分算子。它计算图像强度函数梯度的近似值。
-
Sobel 算子结合了高斯平滑与微分。
假设要处理的图像为 I:
-
我们计算两个方向的导数:
-
水平方向变化:将 I 与一个奇数大小的核 Gx 做卷积得到。例如核大小为 3 时,Gx 的计算为:
-1 & 0 & +1 \\
-2 & 0 & +2 \\
-1 & 0 & +1
\end{bmatrix} * I$$
-
垂直方向变化:将 I 与一个奇数大小的核 Gy 做卷积得到。例如核大小为 3 时,Gy 的计算为:
-1 & -2 & -1 \\
0 & 0 & 0 \\
+1 & +2 & +1
\end{bmatrix} * I$$
-
在图像的每一点处,我们结合上面两个结果来计算该点梯度的近似:
G=Gx2+Gy2
有时也会使用下面这个更简单的公式:
G=∣Gx∣+∣Gy∣
注意: 当核大小为 3 时,上面展示的 Sobel 核可能产生明显的误差(毕竟 Sobel 只是导数的一种近似)。针对大小为 3 的核,OpenCV 通过 cv::Scharr 函数解决这一不精确问题。它与标准 Sobel 函数一样快,但更精确。它实现的是如下核:
-3 & 0 & +3 \\
-10 & 0 & +10 \\
-3 & 0 & +3
\end{bmatrix}$$
$$G_{y} = \begin{bmatrix}
-3 & -10 & -3 \\
0 & 0 & 0 \\
+3 & +10 & +3
\end{bmatrix}$$
**注意:** 你可以在 OpenCV 参考文档中查阅关于 cv::Scharr 函数的更多信息。另外,在下面的示例代码中你会注意到,cv::Sobel 函数的代码附近还有被注释掉的 cv::Scharr 函数代码。取消注释它(同时注释掉 Sobel 部分),就能让你了解这个函数的用法。
## 代码
1. **这个程序做什么?**
- 应用 *Sobel 算子*,生成一幅输出图像,检测到的*边缘*在较暗的背景上以亮色显示。
1. 本教程的代码如下所示。
**C++:** 你也可以从
[这里](https://github.com/opencv/opencv/tree/4.x/samples/cpp/tutorial_code/ImgTrans/Sobel_Demo.cpp)
下载。
```cpp
/**
* @file Sobel_Demo.cpp
* @brief Sample code uses Sobel or Scharr OpenCV functions for edge detection
* @author OpenCV team
*/
# include "opencv2/imgproc.hpp"
# include "opencv2/imgcodecs.hpp"
# include "opencv2/highgui.hpp"
# include <iostream>
using namespace cv;
using namespace std;
/**
* @function main
*/
int main( int argc, char** argv )
{
cv::CommandLineParser parser(argc, argv,
"{@input |lena.jpg|input image}"
"{ksize k|1|ksize (hit 'K' to increase its value at run time)}"
"{scale s|1|scale (hit 'S' to increase its value at run time)}"
"{delta d|0|delta (hit 'D' to increase its value at run time)}"
"{help h|false|show help message}");
cout << "The sample uses Sobel or Scharr OpenCV functions for edge detection\n\n";
parser.printMessage();
cout << "\nPress 'ESC' to exit program.\nPress 'R' to reset values ( ksize will be -1 equal to Scharr function )";
// First we declare the variables we are going to use
Mat image,src, src_gray;
Mat grad;
const String window_name = "Sobel Demo - Simple Edge Detector";
int ksize = parser.get<int>("ksize");
int scale = parser.get<int>("scale");
int delta = parser.get<int>("delta");
int ddepth = CV_16S;
String imageName = parser.get<String>("@input");
// As usual we load our source image (src)
image = imread( samples::findFile( imageName ), IMREAD_COLOR ); // Load an image
// Check if image is loaded fine
if( image.empty() )
{
printf("Error opening image: %s\n", imageName.c_str());
return EXIT_FAILURE;
}
for (;;)
{
// Remove noise by blurring with a Gaussian filter ( kernel size = 3 )
GaussianBlur(image, src, Size(3, 3), 0, 0, BORDER_DEFAULT);
// Convert the image to grayscale
cvtColor(src, src_gray, COLOR_BGR2GRAY);
/// Generate grad_x and grad_y
Mat grad_x, grad_y;
Mat abs_grad_x, abs_grad_y;
/// Gradient X
Sobel(src_gray, grad_x, ddepth, 1, 0, ksize, scale, delta, BORDER_DEFAULT);
/// Gradient Y
Sobel(src_gray, grad_y, ddepth, 0, 1, ksize, scale, delta, BORDER_DEFAULT);
// converting back to CV_8U
convertScaleAbs(grad_x, abs_grad_x);
convertScaleAbs(grad_y, abs_grad_y);
/// Total Gradient (approximate)
addWeighted(abs_grad_x, 0.5, abs_grad_y, 0.5, 0, grad);
imshow(window_name, grad);
char key = (char)waitKey(0);
if(key == 27)
{
return EXIT_SUCCESS;
}
if (key == 'k' || key == 'K')
{
ksize = ksize < 30 ? ksize+2 : -1;
}
if (key == 's' || key == 'S')
{
scale++;
}
if (key == 'd' || key == 'D')
{
delta++;
}
if (key == 'r' || key == 'R')
{
scale = 1;
ksize = -1;
delta = 0;
}
}
return EXIT_SUCCESS;
}
```
**Java:** 你也可以从
[这里](https://github.com/opencv/opencv/tree/4.x/samples/java/tutorial_code/ImgTrans/SobelDemo/SobelDemo.java)
下载。
```java
/**
* @file SobelDemo.java
* @brief Sample code using Sobel and/or Scharr OpenCV functions to make a simple Edge Detector
*/
import org.opencv.core.*;
import org.opencv.highgui.HighGui;
import org.opencv.imgcodecs.Imgcodecs;
import org.opencv.imgproc.Imgproc;
class SobelDemoRun {
public void run(String[] args) {
// First we declare the variables we are going to use
Mat src, src_gray = new Mat();
Mat grad = new Mat();
String window_name = "Sobel Demo - Simple Edge Detector";
int scale = 1;
int delta = 0;
int ddepth = CvType.CV_16S;
// As usual we load our source image (src)
// Check number of arguments
if (args.length == 0){
System.out.println("Not enough parameters!");
System.out.println("Program Arguments: [image_path]");
System.exit(-1);
}
// Load the image
src = Imgcodecs.imread(args[0]);
// Check if image is loaded fine
if( src.empty() ) {
System.out.println("Error opening image: " + args[0]);
System.exit(-1);
}
// Remove noise by blurring with a Gaussian filter ( kernel size = 3 )
Imgproc.GaussianBlur( src, src, new Size(3, 3), 0, 0, Core.BORDER_DEFAULT );
// Convert the image to grayscale
Imgproc.cvtColor( src, src_gray, Imgproc.COLOR_RGB2GRAY );
/// Generate grad_x and grad_y
Mat grad_x = new Mat(), grad_y = new Mat();
Mat abs_grad_x = new Mat(), abs_grad_y = new Mat();
/// Gradient X
//Imgproc.Scharr( src_gray, grad_x, ddepth, 1, 0, scale, delta, Core.BORDER_DEFAULT );
Imgproc.Sobel( src_gray, grad_x, ddepth, 1, 0, 3, scale, delta, Core.BORDER_DEFAULT );
/// Gradient Y
//Imgproc.Scharr( src_gray, grad_y, ddepth, 0, 1, scale, delta, Core.BORDER_DEFAULT );
Imgproc.Sobel( src_gray, grad_y, ddepth, 0, 1, 3, scale, delta, Core.BORDER_DEFAULT );
// converting back to CV_8U
Core.convertScaleAbs( grad_x, abs_grad_x );
Core.convertScaleAbs( grad_y, abs_grad_y );
/// Total Gradient (approximate)
Core.addWeighted( abs_grad_x, 0.5, abs_grad_y, 0.5, 0, grad );
HighGui.imshow( window_name, grad );
HighGui.waitKey(0);
System.exit(0);
}
}
public class SobelDemo {
public static void main(String[] args) {
// Load the native library.
System.loadLibrary(Core.NATIVE_LIBRARY_NAME);
new SobelDemoRun().run(args);
}
}
```
**Python:** 你也可以从
[这里](https://github.com/opencv/opencv/tree/4.x/samples/python/tutorial_code/ImgTrans/SobelDemo/sobel_demo.py)
下载。
```python
"""
@file sobel_demo.py
@brief Sample code using Sobel and/or Scharr OpenCV functions to make a simple Edge Detector
"""
import sys
import cv2 as cv
def main(argv):
# First we declare the variables we are going to use
window_name = ('Sobel Demo - Simple Edge Detector')
scale = 1
delta = 0
ddepth = cv.CV_16S
# As usual we load our source image (src)
# Check number of arguments
if len(argv) < 1:
print ('Not enough parameters')
print ('Usage:\nmorph_lines_detection.py < path_to_image >')
return -1
# Load the image
src = cv.imread(argv[0], cv.IMREAD_COLOR)
# Check if image is loaded fine
if src is None:
print ('Error opening image: ' + argv[0])
return -1
# Remove noise by blurring with a Gaussian filter ( kernel size = 3 )
src = cv.GaussianBlur(src, (3, 3), 0)
# Convert the image to grayscale
gray = cv.cvtColor(src, cv.COLOR_BGR2GRAY)
# Gradient-X
# grad_x = cv.Scharr(gray,ddepth,1,0)
grad_x = cv.Sobel(gray, ddepth, 1, 0, ksize=3, scale=scale, delta=delta, borderType=cv.BORDER_DEFAULT)
# Gradient-Y
# grad_y = cv.Scharr(gray,ddepth,0,1)
grad_y = cv.Sobel(gray, ddepth, 0, 1, ksize=3, scale=scale, delta=delta, borderType=cv.BORDER_DEFAULT)
# converting back to uint8
abs_grad_x = cv.convertScaleAbs(grad_x)
abs_grad_y = cv.convertScaleAbs(grad_y)
## Total Gradient (approximate)
grad = cv.addWeighted(abs_grad_x, 0.5, abs_grad_y, 0.5, 0)
cv.imshow(window_name, grad)
cv.waitKey(0)
return 0
if __name__ == "__main__":
main(sys.argv[1:])
```
## 说明
### 声明变量
```cpp
// First we declare the variables we are going to use
Mat image,src, src_gray;
Mat grad;
const String window_name = "Sobel Demo - Simple Edge Detector";
int ksize = parser.get<int>("ksize");
int scale = parser.get<int>("scale");
int delta = parser.get<int>("delta");
int ddepth = CV_16S;
```
### 加载源图像
```cpp
String imageName = parser.get<String>("@input");
// As usual we load our source image (src)
image = imread( samples::findFile( imageName ), IMREAD_COLOR ); // Load an image
// Check if image is loaded fine
if( image.empty() )
{
printf("Error opening image: %s\n", imageName.c_str());
return EXIT_FAILURE;
}
```
### 降噪
```cpp
// Remove noise by blurring with a Gaussian filter ( kernel size = 3 )
GaussianBlur(image, src, Size(3, 3), 0, 0, BORDER_DEFAULT);
```
### 灰度化
```cpp
// Convert the image to grayscale
cvtColor(src, src_gray, COLOR_BGR2GRAY);
```
### Sobel 算子
```cpp
/// Generate grad_x and grad_y
Mat grad_x, grad_y;
Mat abs_grad_x, abs_grad_y;
/// Gradient X
Sobel(src_gray, grad_x, ddepth, 1, 0, ksize, scale, delta, BORDER_DEFAULT);
/// Gradient Y
Sobel(src_gray, grad_y, ddepth, 0, 1, ksize, scale, delta, BORDER_DEFAULT);
```
- 我们分别计算 *x* 和 *y* 方向上的「导数」。为此,我们使用函数 cv::Sobel,如上所示。该函数接受以下参数:
- *src_gray*:在本例中是输入图像,此处为 *CV_8U*。
- *grad_x* / *grad_y*:输出图像。
- *ddepth*:输出图像的深度。我们将其设为 *CV_16S* 以避免溢出。
- *x_order*:**x** 方向导数的阶数。
- *y_order*:**y** 方向导数的阶数。
- *scale*、*delta* 和 *BORDER_DEFAULT*:使用默认值。
注意,计算 *x* 方向的梯度时我们使用 $x_{order}= 1$ 且 $y_{order} = 0$。*y* 方向的做法类似。
### 将输出转换为 CV_8U 图像
```cpp
// converting back to CV_8U
convertScaleAbs(grad_x, abs_grad_x);
convertScaleAbs(grad_y, abs_grad_y);
```
### 梯度
```cpp
/// Total Gradient (approximate)
addWeighted(abs_grad_x, 0.5, abs_grad_y, 0.5, 0, grad);
```
我们通过把两个方向的梯度相加来近似*梯度*(注意,这完全不是精确计算!但对我们的目的而言已经足够)。
### 显示结果
```cpp
imshow(window_name, grad);
char key = (char)waitKey(0);
```
## 结果
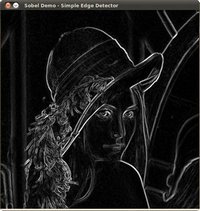
1. 下面是将我们的基础检测器应用到 *lena.jpg* 上的输出:
(结果图像中,检测到的边缘在黑色背景上以亮色显示。) 